Huffy Cranbrook Mounting Problem

FlyJSH

New Member
Howdy all,

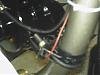
This is my second build, and I am having problems mounting the engine. The Cranbrook's downtube is oversized, but the real problem is the angle of the tube. If the rear mount is square to the seat tube, the front mount is about 15 degrees off from the down tube.

For those of you who have built out the Cranbrook, what was your solution? (Pictures please, if you have them)

Thanks in advance,
J
 
You can use a large half round file to "adjust" the front mount.

I used PC-7 To fill any irregular gaps just for added insurance.
 
sick bike parts has an oversized mounting kit that worked for me real well as far as the angle, my mill is not perfectly level but it works just fine, i gotta figure out hou to post pic s that dont take up alot of space, have a canon digital rebel any help? frank
 
click the little "Attachments" button..(looks like a paper clip)

if you need to re-size pics "Xnview" is my favorite free proggie..
 
i gotta figure out hou to post pic s that dont take up alot of space, have a canon digital rebel any help? frank

Click on the "Reply" sprocket, scroll down to "manage attachments" and click on that. Browse for you pic and load it up, it will be re-sized to a thumbnail that can then be click on to view full size.
 
sick bike parts has an oversized mounting kit that worked for me real well as far as the angle, my mill is not perfectly level but it works just fine, i gotta figure out hou to post pic s that dont take up alot of space, have a canon digital rebel any help? frank

I was wondering if you knew the width of the downtube on the Cranbrook. I think the bracket will work but not sure which one to order from SickBikeParts??

1 1/2 to 1 5/8 inches
1 5/8 to 1 3/4 inches
1 3/4 to 1 7/8 inches
1 7/8 to 2 inches
 
Cool ride Fairracing!! I have the black Cranbrook also. Gonna have to get photos posted as soon as the build is complete.

The lower motor mount of the 80cc RAW motor I have does not fit the downtube. The kit provides a bracket that requires removing the threads from the lower motor mount, inserting bolts to hold the provided plate in place and drilling through the frame...not something I wanna attempt. Instead I figure the suggested bracket would work fine.

I measured the downtube at lunch with a tape and it came in at 1 1/2 inch. Freewheeling Frank is supposed to confirm these measurements for me.
 
Hey dude. I had a similar problem with my build. I used a square plate bent into a z shape at the correct angle for the down tube. Under the air gap created at the front I used the bracket of an exhaust clamp. The bolt for the clamp went through the bracket and then through the z plate I had made up. It took a bit of mucking around to get the angle right and mine isn't 100% spot on but it works quite well. Here is a pic of mine. Please ignore the exposed bolt and munted looking cast engine mount in the pic. I destroyed mine originally when I tried to extract sheared bolts without much patience.

 
i have a cranbrook too, i used a small plate of steel mounted to the engine with bolts, along with a 1 1/2 inch muffler clamp mounted into the plate..i had pics but cant find them..i will take some more and try and get them posted
 
here is mine
 

Attachments

  • motor mount on cranbrook.JPG
    motor mount on cranbrook.JPG
    2.7 KB · Views: 764
I had the same problem so what I did was bust out my trusty Dremmel and cut the tube to allow the original mounting bolts to fit. So far no problems but I check for cracks around the cuts on a regular basis.
 
Mine mounted just like fairracing31's did. I used two 5/16" nuts on each stud for spacers between the rear block and the case and it was a perfect fit.
 
Just a word of caution to you Cranbrook owners. Keep a very close eye on the rear engine mount. If you examine the tubing used on the Cranbrook closely you will notice that the gauge of tubing used on the seat tube is much thinner than the rest of the bike (chinese trying to save a few extra cents I guess). On the Cranbrook that I built 3 years ago I let the rear mount get a little too loose a few times and wound up sawing thru the seat tube with the rear engine mount, which was discovered when I was converting it to a shifter kit from SBP. Just a word of caution, and the moral of the story is that we should all keep a close eye on routine maintenance.
 
if i were you ide bring that p.o.s. back to walmart and get the schwinn point beach coaster brakes suck and will break eventually spend the extra money remember you get what you pay for the cranbrook is a piece
 
Just a word of caution to you Cranbrook owners. Keep a very close eye on the rear engine mount. If you examine the tubing used on the Cranbrook closely you will notice that the gauge of tubing used on the seat tube is much thinner than the rest of the bike (chinese trying to save a few extra cents I guess). On the Cranbrook that I built 3 years ago I let the rear mount get a little too loose a few times and wound up sawing thru the seat tube with the rear engine mount, which was discovered when I was converting it to a shifter kit from SBP. Just a word of caution, and the moral of the story is that we should all keep a close eye on routine maintenance.

There's a simple fix for any bike with a weak/thin wall seat tube, simply jamb an old seat post down it.
 
Back
Top