brake arm mod fabrication West Coast Chopper

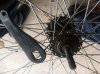
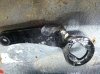
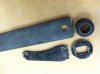
because of the spacer (1/2") required by the fat tires (20 x 3) on these bikes and the fact that they are supplied with a coaster brake, means that the coaster brake arm must be bent even more than decribed for regular coaster brake bikes in order to clear the sprocket and bolts.

This thread will show both the things that did not work and my latest attempts.

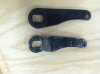
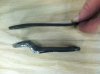
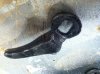
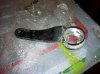
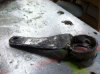
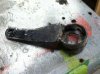
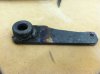
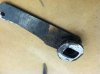
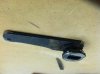
I tried the regular bending method, and had to bend and grind a lot.
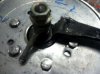
I discovered that after just a little riding the arm was begining to fail and since this is the only real way to stop the bike, i needed something better.
 

Attachments

  • IMG_3277-600.jpg
    IMG_3277-600.jpg
    38.2 KB · Views: 243
  • IMG_3288-600.jpg
    IMG_3288-600.jpg
    24.3 KB · Views: 191
  • IMG_3289-600.jpg
    IMG_3289-600.jpg
    21.7 KB · Views: 199
Failure 1 brake arm mod fabrication West Coast Chopper

after just a small amount of riding the arm was begining to fail, it think the angle to get it to "stick out put the twisting force in the "wrong" place on the arm
 

Attachments

  • IMG_3723-600.jpg
    IMG_3723-600.jpg
    22.2 KB · Views: 182
  • IMG_3724-600.jpg
    IMG_3724-600.jpg
    31 KB · Views: 167
  • IMG_3725-600.jpg
    IMG_3725-600.jpg
    40.1 KB · Views: 164
failure 2: brake arm mod fabrication West Coast Chopper

so next i made an item from the "keyhole" in the brake arm, a 1/2" cut off of pipe, and the arm of the brake arm.

my idea was that the nut and wassher from the stock assembly would fit inside the tube, and the arm would be held above the sprocket.

the assembly fit, and seemed like it would work, but given the force applied to this component, i felt it wold just twist up, and ultimately (quickly) fail

so without even testing it i moved on... it shore looks purty tho
 

Attachments

  • IMG_3734-600.jpg
    IMG_3734-600.jpg
    41 KB · Views: 172
  • IMG_3732-600.jpg
    IMG_3732-600.jpg
    36.2 KB · Views: 156
  • IMG_3736-600.jpg
    IMG_3736-600.jpg
    33.9 KB · Views: 180
  • IMG_3735-600.jpg
    IMG_3735-600.jpg
    33 KB · Views: 166
awaiting testing: brake arm mod fabrication West Coast Chopper

bringing me to my next try

this is the cut off keyhole, a 1/2" steel shaft collar i found in the "trail mix" bolt bin, and piece of 1/8" x ?? steel strap. --the collar was .43 thick, i was actually looking for a large nut to use in the same manner

i traced the (fatigued) brake arm onto the strap, and sawed/grindered the strap to shape. drilled a 1/4" hole in the tip, used a center punch and the keyhole to line up and drill a 1/2" hole in the strap for the axle


welded (FCAW- hey, it's what i got) the collar to the strap, then the keyhole on that
- i lined each piece up by eye, but i did clamp them and use a mallet to "skooch" the clamped parts

I am concerened that the welding may render the steel keyhole weaker and that the hole may get "spun out" over time. Next time i may quench the hot parts in used motor oil, to harden them, and see if that helps

this area just got hit with a crazy blizzard, but as soon as it thaws i will try it out - (no news is probably good news - but i will try to remeber to update)
 

Attachments

  • IMG_3841-600.jpg
    IMG_3841-600.jpg
    22.3 KB · Views: 174
  • IMG_3843-600.jpg
    IMG_3843-600.jpg
    22.3 KB · Views: 165
  • IMG_3844-600.jpg
    IMG_3844-600.jpg
    25.3 KB · Views: 172
  • IMG_3845-600.jpg
    IMG_3845-600.jpg
    19.8 KB · Views: 169
Last edited:
Having the exact same issue with mine. Adding gusset to the arm when it warms up. (Mine looks like your first version right now)
Getting it shaped right to fit without rubbing was NOT FUN!
But spinning the hub when it breaks is even LESS fun.
 
yes indeed, if that arm breaks and that race spins it acan be difficult to remove the wheel nut on that side

also if braking is atempted with the arm broken/missing/malfunctioning the pedals will begin to move forward

i am also adding some type of rim brake(s) in the near future...

i like to stop
 
Back
Top