Big Daddy Huffy

tolemo

New Member
This is my first build. I've had the motor kit cooling in the garage for over a year waiting for something proper to cut my teeth on. I usually pick up a Sunday paper to peruse the ads. A month or so ago I was sittin' in the parking lot after gettin' my paper when the Academy insert caught my eye....selected bikes for less than 60 bucks. Ok! Academy was just across the street from where I was, so I decided to check it out....No way! the bike I had my eye on was marked down.... The Big Daddy Huffy.

Academy - Huffy Men's Big Daddy 26" 1-Speed Cruiser Bicycle
 
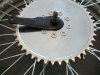
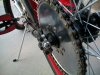
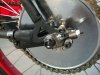
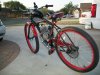
Now for the first impressions. The Bike: Have to really crank the handle bar bolt to get the handlebars to stay put. The front fender only has one rivet holding it together. Two drilled holes and some pop rivets sturdied it up. The rear coaster brake is pretty weak. The front fork flexes a lot. The frame seems short and seat height seems high. However,I had my eye on the Huffy because the tires,wheels and hubs looked much bigger than the other bikes. With the low price,I could make all the mistakes from learning something new without worrying too much. The motor kit: A marvel of ingenious design, the Red Bat Chinese 2 stroke! Clutch and throttle like a motorcycle. The sprocket lined up perfectly with the spokes and hub making everything concentric. I bored the sprocket hub to go over the hub bearing cover. Had to bend the brake arm, countersink and put in flat head screws on the sprocket for clearance.
Built a Ridley style front motor mount, but it didn't work on the big curve front downtube. I took the flat steel kit motor mount and welded it to a piece of square tubing which in turn I welded to the frame.
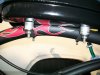
Shortened the chain and then realized the kit tensioner not only was to take slack out of the chain, but to guide the chain between obstacles...The top frame tube is so curved I didn't think I could fit the kit tank. I used some high density foam with some spacers for the tank studs to bottom the lock washers on.
I also matched the intake and exhaust to the outline of the crushed gaskets after test fit.
 

Attachments

  • image001.jpg
    image001.jpg
    110.8 KB · Views: 438
  • image005.jpg
    image005.jpg
    112.6 KB · Views: 418
  • image006.jpg
    image006.jpg
    95.5 KB · Views: 390
Last edited:
I was ready to test ride!...Nothing! Came back ,pulled the plug and checked for spark. nothing. Pulled the magneto and took down the proper readings from this forum. The mag coil was no good. Ordered a new mag plus some spare cdi from ebay. The mag I got had much higher quality wire and connectors. Put it all together and tested it. To test I pulled the plug and spun the motor clockwise from the mag with a cordless drill and socket with the clutch pulled.. Sparked like a champ! Now to ride!.. checked over nuts and bolts... This rear axle adjusting by hit or miss is for the birds! Flooded the carb good with the tickler, rode down the driveway, popped the clutch and a few seconds turning the motor came to life. Now to refine...the first refinement has to be a chain adjuster. So here it is:
I needed to clamp down the muffler so I used some plumbers tape.

I'll see how long that lasts.
 

Attachments

  • image003.jpg
    image003.jpg
    121.7 KB · Views: 484
  • image002.jpg
    image002.jpg
    121.8 KB · Views: 522
  • image004.jpg
    image004.jpg
    119.4 KB · Views: 519
  • image007.jpg
    image007.jpg
    158.7 KB · Views: 1,953
Last edited:
i also built the big daddy it perty cool all i had to do was put a grubee hd wheel on the back and some extra hand brakes and it rides great also put ape hangers and removed fenders it was a easy build and fun to ridebrnot
 
The link to pics not working. I'm also in the process of motorizing the "Big Daddy". Also purchased from Academy Sports, to good of deal to pass up. Will post my build soon. Would love to see some pics. I'm thinking about bent springer front fork and ape hangers with behind seat round gas tank.
 
i am putting a sd stinger kit on my big daddy. one problem, the chain is rubbing the tire. how did u avoid this? first time ever doing this.
 
I placed the chain sprocket on so the teeth face outward, away from the tire, to help with tire clearance.
dnut
 
Did u use both rubber rings on the spokes? If so how did u keep the sprocket flush on the hub retainer ring? Also, my clutch rod that gets pushed by the lever will not move in. R they known for getting jammed up?
 
Did u use both rubber rings on the spokes? If so how did u keep the sprocket flush on the hub retainer ring? Also, my clutch rod that gets pushed by the lever will not move in. R they known for getting jammed up?


I only used one rubber ring, that is what is recommended for coaster brakes. That way the sprocket fits tight around the dust cap and hub. My first engine kit, boygofast, was locked up. I had to take the clutch cover off and loosen up the star nut. Then the clutch was able to push pin in to disengage. Hope that helps. Search "star nut for clutch" and you will find detailed description with picture on how to do this. If these engine sit around to long they can get stuck in place or if the China man tighten it up too much.
 
Just a note on the chain tensioner. If it is a single speed bike you should have some adjustment room in the drop outs which would allow to size your chain to run with out a tensioner.
 
I am building this same bike. Please send me all the photos you can to help me!
Thanks in advance. Your bike looks great. How fast is it and how does it climb hills?
Dwight
 
Back
Top