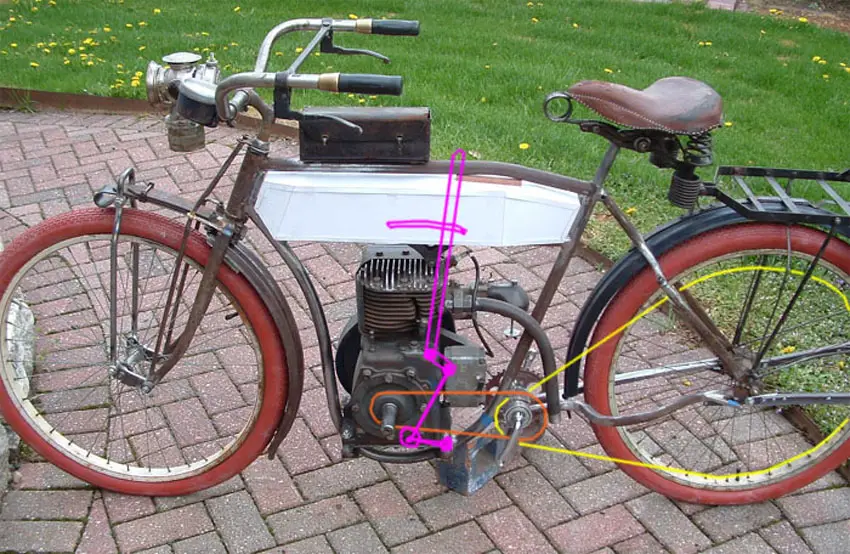
Over the past couple months ive been working on this OCC Stingray project. This bike has been an incredible amount of fun to build and quite a lot of blood sweat and tears(as well as a few kicks and curses..)shed to make it a reality. I bought the bike as a functioning pedal bicycle off craigslist. Grabbed an old Tecumseh 3hp engine i had lying around and hit the drawing pad with one thing for certain, it was gunna be belt drive. Debate between CVT and centrifugal clutch was a long one, but i went CC for cost. The driven pulley was bought at a local ag store and is 14" in diameter. The final drive ratio is about 5:1 which kinda hinders take off, but just give a couple kicks and you're fine. The bike tops out at 42mph as of right now. The only thing about the engine that has been modified is the removal of the governor, factory cam, factory rods, factory diaphragm carb... 7.5:1 compression ratio. The driven pulley was mounted to the hub by two 10-24 stainless steel bolts and lock nuts spaced equally apart from each other and the spokes. There is just enough distance between the spokes an the surrounding mounting flange to fit the bolts and still maintain strength/integrity. The bike handles like a dream, goes plenty fast for my needs, and gets almost 100mpg to boot! Feel free to ask any questions on anything i have or have not covered and or missed.
![IMG_1504[1].JPG](https://motorbicycling.com/attachments/img_1504-1-jpg.98359/ "IMG_1504[1].JPG")
![IMG_1506[1].JPG](https://motorbicycling.com/attachments/img_1506-1-jpg.98360/ "IMG_1506[1].JPG")
![IMG_1507[1].JPG](https://motorbicycling.com/attachments/img_1507-1-jpg.98361/ "IMG_1507[1].JPG")
![IMG_1508[1].JPG](https://motorbicycling.com/attachments/img_1508-1-jpg.98362/ "IMG_1508[1].JPG")
![IMG_1509[1].JPG](https://motorbicycling.com/attachments/img_1509-1-jpg.98363/ "IMG_1509[1].JPG")
![IMG_1511[1].JPG](https://motorbicycling.com/attachments/img_1511-1-jpg.98364/ "IMG_1511[1].JPG")
![IMG_1514[1].JPG](https://motorbicycling.com/attachments/img_1514-1-jpg.98365/ "IMG_1514[1].JPG")

You are using an out of date browser. It may not display this or other websites correctly.
You should upgrade or use an alternative browser.
You should upgrade or use an alternative browser.
Another Motorized OCC Stingray..... Or is it?
- Thread starter TecPowah
- Start date
WOW! right up my alley, love the old 4 stroke builds, and belt drives. Nice work! I guess the only thing different i would of done would be use a jack shaft, give it some gear changing option. Like Mr.B did
His build if you want to read it.
He started with leather belt then went to superintend belt. I had belt drive when i was a kid loved it. I bet your chopper is fun to ride.......Curt
His build if you want to read it.
He started with leather belt then went to superintend belt. I had belt drive when i was a kid loved it. I bet your chopper is fun to ride.......Curt
Mr. B's build https://motorbicycling.com/threads/excalibur-09.37011/
el Diablo Guapo
Member
way cool.
an extra level of custom.
an extra level of custom.
Thank you all, and yeah curtisfox it really is fun to drive. Going is easy, but stopping...... the brakes as of right now are a single v-brake on one side as the pulley takes up almost the entire rim on the other side and interfered with the mount for the brake. It slows the bike down, but emergency stops are a definite negatory. Lol. Waiting on a new Sturmey Archer drum brake for the front so i don't have to keep wearing out the twin brakes.(left and right shoes. hehe) Everytime i take it out at least one person stops me and asks about it, and they're always flabbergasted that a 17 yr old kid built it. "An edger motor???" "I didn't think you could do that?!" "Damn that thing's freakin cool!" But it's definitely given its share of P.I.T.A's such as stalling out 4-5 miles from home, and having to walk it back cuz it won't restart......Good times.....
The bikes just about done, just need to do a couple of things like brakes(but who needs brakes right?) Unfortunately the engine has to come off as it needs a lil bit of work done to it. Just changed the oil and it smells a might bit strong of fuel.... While it's off it'll give me the excuse to do a lil frankensteining with the flywheel. Plan is to change out the flywheel for an outboard aluminum flywheel i have lying around(i love the cast iron one on it already, but it doesn't have magnets...) that has the same inside diameter for the crank. Put the ignition plate onto the engine as it has the mounting holes for points ignition and solid state(neato!) So bolt that plate under the flywheel, and use the charging coil?alternator coil and ignition coil on the plate for the engine. The flywheel actually fits under the blower housing and is the right height to keep the recoil starter cup and assembly. The charging coil is supposed to put out about 5 amps DC at 14v so i'll have to plenty of power for directionals and the big halogen headlight. Stay tuned for progress on that.
dogcatcher
Well-Known Member
This one really brings back some memories, with the exception of the Stingray frame that looks like what we built in 1959. It was a Briggs edger motor on a Sears Roebuck bicycle.
The bikes a real blast to drive, and dirt simple to maintain. Plus the wearable parts are easily replaceable and cheap. Advantages of belt drive lol. Designing the drive system was a pain because even just finding a tecumseh engine motorized bike was a challenge forget a belt drive tecumseh powered stingray..... Which is really funny as the flathead just(and i mean just fits, like the fins are a thousandths or two away from interference fit. Because of this the engine only sits halfway on the frame as the spark plug doesn't clear the frame.) The cast iron flywheel hanging off the right side made for some balance issues, but the 14"rear pulley on the left side weighs almost the same as the flywheel so it really balances out. Plus the wide *** back tire really helps stability. You can be going down the road let off the throttle hands off the handlebars and just cruise until like five miles an hour.(Don't try this at home kids!) Overall an amazing bike and just a real blast to drive, and a real fun learning experience.
Hoover Dam Curtisfox..... Mr.B has an incredible eye for detail. What an amazing bike.... Even making a identification plate with Excalibur on it for the engine that looks like its oem. It's amazing..... I do sometimes regret not having a manual clutch as those days walking home could've been shorter with a nice down hill and a firm hand on the clutch. The thought for a shifting system crossed my mind, but the derailleur setup although the most effective by heresay for a motorized app, it is a complication for the frame as the rear is already very wide and widening it further to accept not only a cassette but the derailleur as well is a lot of additional space..... An IGH was a consideration but none of them really seemed to be able to handle any sort of power other then a weed whacker engine, and even then.... except, i had heard some good things about the sturmey archer 3 speed IGH drum hub in motorized applications. It's not something in the near future as i'm very happy with the bike right now, but maybe down the road(yes pun most definitely intended) it might sneak its way on the bike.
Ya there is a lot more builds in the board tracker and the DIY if you go back into the old posts. I started a 1913 Jefferson copy sorta, more my version, as a copy is way to much when you don't have a exact engine. Mine will be belt drive also, with manual clutch, if the one i am working on doesn't pan out will do a 3D clutch. https://www.google.com/search?q=191...AhUj5YMKHTfmBVEQ9QEIOjAC#imgrc=mdSg5pY8dA7aAM:
You should also look for cannonbal11 DIY has built some IGH bikes one as a friction drive.......You will also take note Mr.B had to make a lot of changes as the build progressed, witch seems the norm...............Curt
You should also look for cannonbal11 DIY has built some IGH bikes one as a friction drive.......You will also take note Mr.B had to make a lot of changes as the build progressed, witch seems the norm...............Curt
Well, good and bad.... Finally got with the company shipping the brake. They were delayed but got it shipped out(finally!!! Woohoo!!) Now the bad news, while riding around I was about 20 miles from home when the two bolts for the rear pulley sheared completely off. Which was suprising, as it took quite a long time for them to shear and no indication that anything hanky was in my future.... just cruising down the road, then thump. No damage to the hub or pulley, but was a very long walk....... will be machining two new bolt holes equally spaced from the other two for a grand total of four rear bolts. This "pit stop" has given me an excuse to get some work done on the flywheel swap. I got the flywheel and all ignition components off and a new flywheel key custom ground by yours truly to fit the outboard aluminum flywheel and the tecumseh crank. The plate for the outboard coils will keep the the coil in the stock orientation to keep timing the same, all i gotta do is figure out how i want to mount it to the points mount under the flywheel..... this plate has many holes already in it from various components for the points/condenser setup an none line up(grrrrr.....) so will be dedicating time for lots of thinking on a solution for that..... thinking about bolting that to a second plate which will then bolt to the block... but then have to worry about clearance with the top of the flywheel and keeping in line of the magnets..... hmmmmm
Updates
So flywheel swap progress. The outboard coils and mounting plate idea was tossed in favor of a NOS part #610893. It is a solid state coil in a points style mounting configuration with an alternator coil mounted on the otherside. It fits perfectly on the engine. But there was a little shaving involved as the coils were rubbing the flywheel magnets. Spinning it over with a drill showed I had no spark. Half hour of diagnosing later the spark plug was just dirty. Nice hot spark now. Pictures on the way.
So flywheel swap progress. The outboard coils and mounting plate idea was tossed in favor of a NOS part #610893. It is a solid state coil in a points style mounting configuration with an alternator coil mounted on the otherside. It fits perfectly on the engine. But there was a little shaving involved as the coils were rubbing the flywheel magnets. Spinning it over with a drill showed I had no spark. Half hour of diagnosing later the spark plug was just dirty.
Nice hot spark now. Pictures on the way.MEASURE TWICE
Well-Known Member
Nice the home made job that you have assembled!
If any better pictures to show how the engine is mounted. I too have used a toothed clutch and also a pulley clutch prior, but always I have a belt to a rear wheel sheave.
Do you have the name of the ag store that you got that pulley from. Also the part number of the manufacturer of the pulley. Maybe a website. I noticed it has a solid metal connection to the center where a shaft connects. Is it have a key way and two set screws? The kind of metal used?
I have a bike I made with wood sandwiched clamping a spoked 10 inch dia pulley that was made of aluminum or white pot metal and it cracked on the pulley twice.
I had 2 of these washing machine pulleys and then reverted to buying a Taiwanese made sheave made of steel. Past years in the 1970's they had washing machine pulleys made of pressed stamped steel, but no more to be found.
The wood I used I coated with resorcinal glue and painted it too so it was a bit sad to have a premade part to replace it.
Unfortunately it had to be swapped out and eventually I found that using a Dremel to grind and cut away imperfection in the weld at the end seam on the sheave finally made it not slip any more.
I could use better than the 3.5 Briggs 80202 series engine, but now I might just get a dirt bike to ride trails. Am needing to finish the art cover to put on the Briggs Bike to make it look like a California Sheephead Fish for parade use.