Questions about some of the details? First: To get proper leftside chain alignment between the output from your 4G Drive to the 17t driven sprocket on the jackshaft. Was all you had to do was flip the 17t sprocket on the jackshaft as shown in Post #7 Photo #3? Second: At the bottom bracket you appear to be using a combination of parts from both the Grubee kit and the SBP kit? The crank arms appear to be from the Grubee kit, Which BB are you using the SBP or the Grubee? If you are using the Grubee, what was required to make the SBP front freewheel adapter fit the spindle? Or were you able to get the clearance you needed by using the SBP Cartridge BB with the Grubee crank arms? Third: Since it appears that you have made your mount essentially fixed and non adjustable in the frame, How are you maintaining the chain tension on the right side of the from the 9t driver to the front chainrings? Watching this installation is very interesting and I feel shows that the HS 142 CC 4G drive can be used with the 4-stroke Shift kit with a minimum of adaption/fabrication. As of now the SBP web site indicates that the motor and drive combination you are showing does not work with their mount. This is primarily due to the overall width of the motor and drive and also the alignment of the drive with the left side driven jackshaft sprocket. You appear to have solved both of these issues with a minimum perhaps no special fabrication required.
ocscully
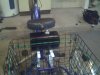
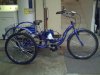
okay now i have it running and working out the small bugs i can give a little onfo
on how i did it.
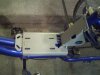
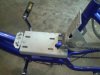
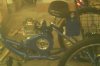
1st: i cut the trans to crank chain adjuster off the trans, the L shaped
peace that sits below the motor mounting plate. i did this so the plate would sit right on the frame.
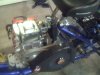
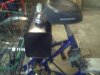
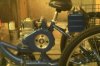
2nd: i welded the trans to the motor plate at the exact angle of the frame.
3rd: i found that in fact the motor sat to far to the right, so i slid trans/motor plate
as far left as it would go. that was exactly the amount needed to line up the
right side chain.
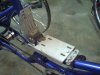
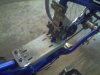
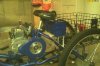
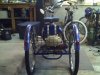
4th: i made extension for the U bolt mounts so the motor/trans can sit all the way left,
i used 1"x1/4" steel straps welded to the original mounts, after welding
i positioned the motor/trans mount on the frame and marked the
position of the U bolts, then drilled.
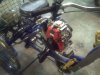
5th: i mounted the motor to the motor/trans plate and made up the motor to trans chain,
this is where the idea of no adjustment come in to play. the motor plate have elongated bolt
holes that give approximately 1" of travel, this is more than enough adjustment. also with that plate you have a
small amount of side to side adjustment.
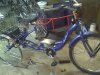
6th: mounting it on the bike frame, this was very strait forward.
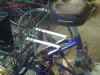
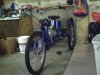
7th: running the chain from the trans to the crank sprocket, now if you remember i cut the adjustment
tab off the mounting plate so to make this work it was almost to perfect. the motor mount
plate is exactly the correct height and right next to the chain. so the easiest way to explain this
is look at an original chain tensioner that comes with a motor kit , turn it sideways and there is exactly the pattern for the side
of the motor mount. drill it exactly to the same size and it works perfectly. it slides 2"
and that's it,
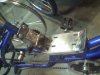
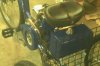
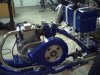
parts i used
the crank & bearings from the SBP kit.
the pedal arms from the motor kit
motor plate from SBP
trans from SBP
chain tensioner from motor kit
i drove it today and worked absolutely flawless.


")