First partial project: S&R motorized road bike

GoldenMotor.com

fabgear

New Member
Jul 28, 2013
28
0
0
Southfield, MI
Hi everyone,

This is my first post (other than my introduction), and it's my first project of sorts. I didn't start this, but while looking for a motor for what I am hoping to cobble together for myself I was offered this along with the motor I was trying to purchase for a deal I couldn't pass up... just purchased 2 days ago. I have no need for 2 motorized bicycles (finding places to ride the one I hope to complete will be tough enough in the Detroit burbs where I live) so my initial thought was to strip this one for the parts I need for my build and get rid of the rest. However, the more I think about it and checked prices around for everything but the other motor I bought, it seems to maybe make more sense to get this one completed and then sell it to put the money back into my own project (or essentially pay for my other project that way).

Bear with me as I upload the photos, but this is essentially what I can tell you and what I have concerns over. I realize that some of the info may be floating around here, so I apologize in advance if I re-ask those things in this thread.

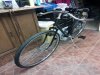
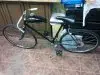
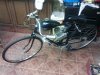
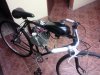
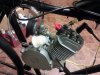
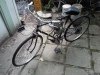
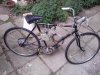
From what I can tell, this started a 60's Sears and Roebuck road bicycle (made in Austria based on the front tag). I was told the engine is an 80cc, though I have no way of being able to confirm that and don't know how I would (the one I was purchasing was a 66cc marked black engine). There is backpedal with the clutch engaged, so I'm assuming this didn't start out as a single speed but I don't know that either. I knew it was missing the gas tank obviously when I bought it, and I know that's an easy replacement. The air filter is missing off the carburetor, but since the other motor is missing the carb cap and I can't seem to track one down separately it seems to make more sense to just use that air filter and just replace the carb for $10-15 when I get to that motor.

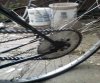
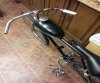
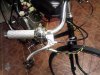
I know that the wires have been cut coming off the kill switch, but haven't read enough to see where these actually go yet. The chain for the motor appears to have a decent amount of slack as it hangs, and I did read some differing opinions on tensioners here. There appears to be some sort of bearing sleeve welded into the frame, which I'm guessing may have been an attempt at a tensioner mount at one time but I don't know (can't figure out why else it's there). I don't know if it makes more sense to remove some of those links or rig another tensioner or if it's sufficient to leave as is.

I took the seat in the pictures off to use for my own project... too cool to sell off and goes with my idea for the other...and replaced it currently with a basic cushioned Magna I had here. It looks as though they made a custom muffler/ exhaust for it (old moped one maybe?) which I could easily remove and hit with some high heat flat black to clean up a little. My other consideration is that I remove this motor (assuming it's the larger and more powerful of the 2) and mount the black 66cc onto this and then keep this motor for my own project.

I guess my first question would be where you would start; what are your first things to check and what to address first and where to go from there. I know when cleaned up, I'm not looking at some $400 motorized bike but it'd be nice to get it in working shape and then pass it on to someone who might enjoy it as I put that money back into my own project and pay for it with what I may make off this one. It would certainly be easier to justify my own project...

Thanks, look forward to any advice or opinions you may all have.

-Jeff
 

Attachments

Last edited:

comfortableshoes

New Member
Jul 22, 2008
606
3
0
Beverly, MA USA
I'd bet money it's a standard 48/49.5cc Happy time/China Girl engine. I suspect you'll need a tensioner.

There are many threads about how to wire up the kill switches. This is the best one:
http://motorbicycling.com/showthread.php?t=8058

It could be a shadow but in the pic it looks like their is a hole in the frame below the welded on mount. I'd get that welded up.

The pedals look like they are from an OCC chopper, certainly are not original to the bike.

All in all it's a nice bike. Get ti running and ride the heck out of it.
 

fabgear

New Member
Jul 28, 2013
28
0
0
Southfield, MI
Thanks for the reply....

I was told that this motor he thought was an 80cc and the black one I got was a 66cc (that one does have a tag on it that denotes it as a 66cc). I'm not sure how to exactly tell which size the silver one would be or if there's a quick and simple way to determine that (physically, it appears both are either the same size or the silver one on the bike now is slightly larger). My plan is to sell this bike, so if this one indeed is the smaller engine, I'll keep the 66 for my own project and not swap the 2.

The chain is definitely too long, needs at least 3 links removed. I'm still mixed on the tensioner since I've been reading some people love them and some people hate them (it's similar to the relic guitar/ non relic guitar in my world). Certainly not opposed to putting one together for this bike, and I'll cross that road with my own project when I get to it too. I certainly can try one, it won't hurt.

If you're referring to the thing that looks like a hole in the middle of the seat post tube (behind the motor), that's a bearling sleeve that either he or his friend welded to the inside of the frame. I'm not sure what the purpose of it was, as it doesn't seem to get close to being an actual tensioner spot if you were going to rig something there. I have half a mind to either just pop two caps in there to seal it or just pop that piece off (the weld doesn't look too pro). A couple friends and I started looking it all over this morning before work and there's no actual holes in the frame anywhere.

Yeah... those are definitely not the original pedals, but they're metal and seem decent enough (even if they're a bit small and square). I suppose those don't matter anyway, as you'd only need them if you ran out of gas or for starting it.

I've ordered a gas tank for it that should be here before Monday, so we'll pop that on and a new line/ petcock/ filter etc and I'll definitely check that thread to rewire the kill switch back. Before the bike gets really tested, I'm either going to move that brake to the back or I'm going to add a back brake... I don't need myself or anyone else going head first past the handlebars on a fast stop at 30 mph.


Thanks again... any other thoughts you may have or anyone else does I welcome.

-Jeff
 

comfortableshoes

New Member
Jul 22, 2008
606
3
0
Beverly, MA USA
I'm not a fan of the stock tensioners on bikes like this. On something like an OCC stingray with flat square-ish tubes where you'd mount the tensioner, they are fine, on round tubes unless you weld them, a death trap. (Being a little dramatic.) Once you get out of the stock tensioner realm and start to look at alternatives things are different. There's the engine mounted spring tensioner that people are very happy with, and it works well. Or the brace type like I have. It works well. The difference in these sorts of tensioners is that they don't have a chance of rotating into the tire and spokes. They are safer if you have to use one. If I could get away without one I'd do that but it's just not a reality on most builds. In any case they make getting the back tire off much easier than breaking the chain.

I like using both a back and a front brake. The back break slows me down and the front brake stops me after I've slowed down, done right, no going over the handle bars.

I like the OCC pedals. they are tough, grab the bottom of my shoes really well, and get the job done.

Take a look around the forum for some threads on the "myths" of the 66 and 80cc engines. The engine I have is marked 66cc, there is no way it really is. Someone actually went to the trouble a few years ago to measure the bore and stroke of some of the engines claiming to be 66/80cc and they weren't. I'm sure some of the newer engines are 66 or 80cc but a few years back it was a manufacturers pipe dream.
 

fabgear

New Member
Jul 28, 2013
28
0
0
Southfield, MI
Good advice... thanks. Probably wont matter a ton then if I swap motors, other than asthetics. As long as I can zoom around on mine some when its done and get this one running around for some fun until.I sell it, then that's fine w me. If anything, this one will be a good bench test for my own and can see things I might want to change for sure or address on that one.

If I wanted a motorcycle again, I'd just buy one... after all.

Soldered new leads into the kill switch this afternoon (18 gauge, little beefier than stock) so those are ready to splice in to the main ignition lines. Those old leads he had coming off the motor etc look a little flimsy, so I might just take care of those too.... not much effort for reliability and some peace of mind.

Tires reinflated so its not sitting on those tubes/ rims, even though its at least a week away from getting ridden.
 

fabgear

New Member
Jul 28, 2013
28
0
0
Southfield, MI
Thanks... its growing on me as I work on it, but its still going to get sold when I'm done (might test it a little for a couple weeks first). Definitely good practice, if anything, for my own project. Here's where it stands right now, will update what I've done and what's to come in a bit:
 

Attachments

fabgear

New Member
Jul 28, 2013
28
0
0
Southfield, MI
Ok, so as you can see, I've made some progress.

I ended up disassembling the whole bike. I didn't want to risk anything being loose or suspect based on the other work that was done to it. All the parts started getting a degreasing bath, and the welds around that engine post and the mystery bearing were cleaned up and filed/sanded to remove all that extra slag and neaten them up.

I decided I wasn't happy with the gloss paint and the stickers, plus I had to touch up around those added pieces to the frame so I opted to do a similar look to what I plan on doing to my cruiser project.... shot the fork and the frame with high heat black to give it a nice durable semi flat look. I ended up doing the same to the gas tank as well.

The handlebars are now mounted as they started in the latest pics. Flipping them made a huge visual difference to me... much more cycle looking. Now I also have the dummy grip and the throttle grip remounted in their proper places.

Engine still needs to be degreased before I remount it, but will get to that this week. Have all new cables for it, but will leave those for a bit.

I do think its crying out for a round headlight like I plan for my build, but might just get a generator one for it to also have the back light (unless there may be a problem with the dynamo running with a motorized bike).

Still need to also trim those gas tank mounting bolts too, but not a high priority right now. With the last week I had, I'm frankly amazed I even found the motivation to do this much.
 

bigbutterbean

Active Member
Jan 31, 2011
2,417
3
38
Lebanon, PA
This being a road bike, it was originally a multi-speed. Though I can't understand why, it almost certainly appears that the previous owner attempted a jackshaft build, and that's what the bearing sleeve is for. Apparently after either failing to successfully install the jackshaft or not being happy with it for some other reason, they converted the pedal side to single speed. I am not sure what you mean by "backpedal when the clutch is engaged", but I'm assuming that it means the wheel is not completely locked when you release the clutch and try to roll the bike. The wheels might move back and forth a bit? This just means the clutch is slightly out of adjustment. Also, if that flat black paint is not fuel proof, it will end up running on the gas tank. The problem with a dynamo powering a light directly on a motorized bike is that the dynamo will end up blowing the lights due to being overpowered and in turn overpowering the lights. I have a link in my signature to a generator/charger setup that I installed on my bike. The charger protects the battery and lights from being overloaded by the generator. The generator charges the battery and powers the lights while moving, and when stopped the battery takes over. Its not cheap if you buy all the parts new (mine were given to me, but the overall cost including the lights I'm using would be close to $200, cost to me was about $70), and its probably more trouble than its worth for a bike you're going to sell, but if you're interested in the setup, you could put it on your personal ride. The generator, charger, power distributor and battery I'm using add up to about $110, just to give you an idea. If these parts had not been given to me, I would consider it worth it to spend the extra money to eliminate the need to have to pull batteries off the bike to charge them in the house. But everyone's opinions are different. Hopefully this gives you some idea.
 

fabgear

New Member
Jul 28, 2013
28
0
0
Southfield, MI
Interesting. Not having heardbabout a "jackshaft" before, I just looked it up quickly and it's possible that's what they were doing but considering the "skill" they showed on the rest of it, who knows? I don't think they really had any sort of plan, but maybe they had some sort of experiment they attempted at some point.

When cleaning the back hub, I did see that it's stamped and yes... this was originally a 3-speed. All I meant about tthe backpedal was that the bike had no coaster brake, therefore must have originally been a multi-speed but for some reason someone removed the other gears.

I didn't think about the fuel/paint relationship but I should have. I doubt the paint is fuel proof, but I can still remove the tank and give it a few more coatings of something that is. I am not going to keep it but I don't want the paint melting off easily if someone buys it from me.

Upon further reading, I see your point about a dynamo light. For me, its not worth the money invested to build something along the lines you did but excellent job there. Even for my own build when I get to it, it's going to be a side project for me and I'm going to try to keep it under control costwise. Since I probably wont be riding mine at night often at all, a vintage style round light with LEDs will suit it just fine I think (same with this one... would mainly be for the look on both amd to "complete" them).
 

fabgear

New Member
Jul 28, 2013
28
0
0
Southfield, MI
It's been difficult keeping motivated right now (been dealing with a lot of things at the moment), but here's where I'm at right now.

I've reshot the tank with black engine enamel to help with fuel spillage. I've completed redoing all the cables and wiring.

I've got both chains now mounted, but I ran into a slight issue. I removed one link out of the 415 motor chain, but I'm going to be about a 1/2 link-1 link slack on the pedal chain now. I've attempted to work around this, but because of the stepped setup of a typical chain, I end up with the incorrect mating pieces if I remove anything.

The solution I see is to mount some sort of tensioner on the pedal side; since I'm only going to be using it to either start the bike or if itnean out of gas (and anyone that buys it would too), I'm thinking it makes much more sense to have a tensioner on that side since it'll take less abuse and much less stress... does that make sense?

Other than that, mounting the headlight once it arrives this week and finishing cleaning and repainting the exhaust, I don't think there's much more to do and then it hopefully will run.
 

Attachments

fabgear

New Member
Jul 28, 2013
28
0
0
Southfield, MI
Because of the limited space I have above the engine (because they made that pedestal mount so high), I'm wondering now if that loop of fuel line is going to cause me problems...

I'm thinking that this is just gravity fed, and if so there's not enough pressure to force fuel up and over that loop. Problem is, I don't know how else I can do it with the space I have. The carb is almost horizontal to the outlet on the tank, so shutoff, fuel filter and line all need to fit in that space. Putting the "proper" petcock on might buy a half in or more, and maybe swapping the fuel filter to a opaque saucer style lawnmower one might add a little more space, but don't know. I know I don't want to run dry or not at all if this isn't going to feed.
 

fabgear

New Member
Jul 28, 2013
28
0
0
Southfield, MI
I ended up remembering that they do make offset half links, so I ran up and got one for the pedal chain this afternoon. Both chains are nice and tight now and shouldn't require a tensioner on either now.

I spent part of the afternoon trying to clean up all the welds on that exhaust and the more I looked it all over, it just had way too many spots I wasn't happy with. I ended up just ordering a basic kit style exhaust/ muffler this afternoon and I'll mount that when it arrives. Hopefully it will fit ok and I'll be able to work it into the position it needs to be, even with the high placement of the engine.
 

fabgear

New Member
Jul 28, 2013
28
0
0
Southfield, MI
Okay folks, I suppose it's time for an update....

I've got the bike done essentially, other than 2 vintage style stem mirrors for the handlebars, which should be here later this week. Today was the first test start, and overall it went quite well but I do have a few questions or concerns. since it seems to be related to the carburetor, I will also posted in that area but thought I should at least have it in the same thread as the rest of the bike.

I was able to start the bike right up after about five turns of the pedal, after releasing the clutch. The bike seems to have plenty of power, it really does seem to move quite well and quite strong. however, I don't know that Ive ever adjusted the idle on a 2 stroke motor and I'm not sure if I have the fuel mix too heavy or not... here's what I'm noticing:

The bike idles quite rough, and if I release the throttle it will conk out within a few moments. When you're building up from a lower speed or hang your around a lower speed, you can definitely hear the engine either choking or aspirating a little and sounds like the engine is pulsating slightly.

I haven't adjusted the idler screw at all yet other than just messing with it a little bit... trying to just open it and close it some and see what happens. If I close the choke on the carburetor, which is just the stock carburetor that came with the engine, it will run really slow and will stall out itself.

I haven't noticed any fuel leaks so far other than when I was almost out of gas finally (I only put in 1/4 tank, and mixed one pack of Opti to one gal of gas today), I noticed that that last short piece of hose running from the back of the pancake fuel filter to the carburetor was leaking some right at the brass connection to the carburetor. I read that the fitting is actually 3/16th of an inch and not 1/4", so I will get another piece of fuel line from work tomorrow (3/16") and I will just heat up the other and to expand it and slide it over the 1/4" barb of the fuel filter.


Any suggestions on where to start? I don't know if that last connection of fuel line is causing the equivalent of an air or vacuum leak and if thats causing some problems, I don't know if it's that the air filter needs to be removed or replaced with something different or if I just need to mess around with the idler screw until I find a happy medium... or maybe something else?

When I'm actually just riding it, it really moves and seems to handle quite well.... I think it's just a matter of some sort of adjustment or some sort of tweaking to get it to run really well but I could certainly use some help those that would know. It's a blast to ride right now and I'm really enjoying it even with just trying it out today for the first time. Thanks in advance...
 

fabgear

New Member
Jul 28, 2013
28
0
0
Southfield, MI
Alright... sometimes I can be pretty stupid. I think, looking back, I was keeping he clutch out when stopping..... sigh. I've got to address that fuel line first, then I'll retest and see if that is what was going on and if I can then adjust the idle. Not sure about the surging/ sputtering I noticed but that could.just be the nature of these and I just don't know it, or it's just the engine breaking in still... any advice is greatly appreciated.
 

fabgear

New Member
Jul 28, 2013
28
0
0
Southfield, MI
Small update....

turns out once I remember to put the clutch in, it idles just fine. I do need to figure out exactly what is an optimal idle.... am I just looking for a smooth and consistent speed or do I need to adjust it as low as I can without it conking out? Right now, I have it set so that it is idling nice and smooth and doesn't sound like the engine is about ready to take off so I'm guessing that's probably OK?

I also adjusted the throttle inside so that the plunger opens fully now, though I did not try to adjust the needle. I'm not sure if Its running a little rich or not but I do know that the engine has not had very much use...

ticket for another ride this evening and it really picks up speed and rides nice and smooth and stops and idles really well. I just need a front brake still and I should be basically good for a few longer tests. A big thanks to the knowledge on here...definitely has helped me and given me lots to go on for mine when I get to it.
 

comfortableshoes

New Member
Jul 22, 2008
606
3
0
Beverly, MA USA
There is a thread here somewhere about adjusting the idle screw. SCrew it all the way in and then back it out exactly 3.5 turns. It will idle perfectly after that with maybe 1/4 turn adjustments as needed.
 

fabgear

New Member
Jul 28, 2013
28
0
0
Southfield, MI
Thanks, I appreciate that. Bike is virtually done now, just have to wait for the final coats of semi flat black to drive on the bike rack and then it should be done. Will post pictures soon.