Dual Suspension 'Roo'

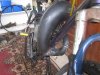
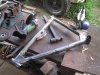
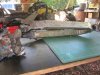
I thought that manifold was cast the first time I saw it too and was wondering how you did it or where you had it made... That might be something you may consider making a handful and selling because not only as a performance add on it also looks really cool and may help some of us with tight frame clearances. Just an idea to consider in order to help fund your motorbiking habit.

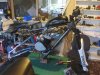
I bet that Roo engine would respond really well to a 16 to 18mm Walbro or Tilly carb from the way you describe how it performs, especially if it feels like you're running out of carb on the top end, or even running a pair of 12 to 14mm Tillys might work out really well on a dual carb manifold once tuned proper...
 
It didn't feel like running out of carb with the twins, but is now wearing a 21mm Walbro Chainsaw carb, I am also swapping the barrel to a similar barrel that has had the ports widened but not lifted. The Roo motor runs a fairly thick base gasket, as well as a thick laminated head gasket, so I'm going to change things around a little for experimentation.
The Twin carb manifold was a b*tch to make, but will be easier the second time now I have a pattern. But the time involved would be hard to charge for.
 
The Twin carb manifold was a b*tch to make, but will be easier the second time now I have a pattern. But the time involved would be hard to charge for.

Been there before... Some ideas are really good but there's no way to get back the amount of time or effort put into some of these projects without setting the price so high nobody would buy it...
 
Hay, if I was set up with a proper metal fab shop, and decided to make enough pieces, I still wouldn't be able to make something like my dual carb manifold at a competitive price. What would people want to pay for a manifold like that? $50? Probably not. If I had a proper shop, I'd want to be charging more than $50 an hour, could I make one in an hour? No. If I made 50 of them over a week, maybe? would they sell here in OZ? NO.
 
Another thing it would be good for someone to make, a real expansion pipe that fits.
To get the most from a boost ported motor, an expansion chamber is recommended.
I want to get some serious grunt from this bike, Wheel stands and power slides.
So it's getting the reed valved motor with the KTM pipe, I got it to fit!
I
IMG_4834_zps0a626019.jpg
need to do a little more 'tweeking', but it suits the bike and clears everything.
IMG_4830_zpsaa6d29bf.jpg
IMG_4829_zpsf61a2ad1.jpg
 

Attachments

  • IMG_4834_zps0a626019.jpg
    IMG_4834_zps0a626019.jpg
    145.6 KB · Views: 223
  • IMG_4830_zpsaa6d29bf.jpg
    IMG_4830_zpsaa6d29bf.jpg
    103.2 KB · Views: 230
  • IMG_4829_zpsf61a2ad1.jpg
    IMG_4829_zpsf61a2ad1.jpg
    102.8 KB · Views: 203
Doesn't that efect the the cooling with all that heat right in front of the motor?Looks KOOOL .....................Curt
 
I've got the bike running with the old bottom end from the Phantom and the top end from the old Goat motor, She's a ripper and hit 10 000 no worries, a very smooth motor, near as smooth as my 'Roo' Cranked motors.
I lifted the exhaust port a little and this seems to be good with this pipe, I have sacrificed a little low down compared to how I had the Goat with the torque pipe for a bit more top end, this has complemented my slightly lower gearing and she is a bit quicker up top, less inclined to lift the front wheel now though, but I think that has a bit to do with the frame lay out and change of pipe.
I havn't got a decent set of dirt tyres for her yet, and she's on a set of cheap street tyres ATM, which aren't much good for anything but cruising.
Still deciding on the right tyres.
But I got a new set of 130mm forks for her today in a vivid white, which matches my new rims, The frame will be done in some 2 Pac White left over from my Suzuki.
IMG_4980_zps2b3bc8ab.jpg
 

Attachments

  • IMG_4980_zps2b3bc8ab.jpg
    IMG_4980_zps2b3bc8ab.jpg
    145.2 KB · Views: 151
I have stripped 'Frankenstein' to do the final welds and give the frame a coat of white 2 Pac I have left over.
IMG_4989_zpsc45af16c.jpg

IMG_4990_zpsf6e51b46.jpg

IMG_4993_zps3452d270.jpg
 

Attachments

  • IMG_4989_zpsc45af16c.jpg
    IMG_4989_zpsc45af16c.jpg
    144.1 KB · Views: 182
  • IMG_4990_zpsf6e51b46.jpg
    IMG_4990_zpsf6e51b46.jpg
    140.3 KB · Views: 189
  • IMG_4993_zps3452d270.jpg
    IMG_4993_zps3452d270.jpg
    99 KB · Views: 160
IMG_4994_zps1af352ca.jpg

IMG_4997_zpsdeeee91d.jpg
IMG_4999_zps640de4d3.jpg

The hardener for my 2 Pac white was a little hard, so back to plan A, a couple of coats of metallic charchoal and clear.
Today I hope to get the rear end done.
 

Attachments

  • IMG_4997_zpsdeeee91d.jpg
    IMG_4997_zpsdeeee91d.jpg
    123.1 KB · Views: 198
  • IMG_4999_zps640de4d3.jpg
    IMG_4999_zps640de4d3.jpg
    116.1 KB · Views: 183
  • IMG_4994_zps1af352ca.jpg
    IMG_4994_zps1af352ca.jpg
    178.3 KB · Views: 179
Getting a paint job I see, soon get also the knobby tires and cover the paint with mud. Well temporarily anyway.

I got my bike registered for Off Road Only (pegs no pedals) and been through quite viscous mud to traverse. Going through small stream does not quite wash all mud off.
 
It rains a lot here, even in the dry season, It rains regularly.
Some times in the wet season we can get up to 2 Ft of rain in a day!
Annual average is around 20ft.
So plenty of mud here.
 
With the mud being about 6 inches deep, I had to pretty much just keep going straight or I would be wallowing in it!

I would aim for a track through the mud which other motorcycles had left and gave approximately that 1/2 foot depth of mud or else the top would be over a foot deep. My bikes power and belt drive would not make the about 5 feet across before dumping me so I was careful to get up some speed and take the best course.

I should have better power as soon as I fix my valve timing and also better gas mileage.

When I get that fixed and when weather cools down, I will be seeing about fall season riding trails again.

If you get pictures of the Roo in the elements, please post!
 
I've been building a better swing arm for this bike, It's just about done.
Made mostly from some old thin wall 40 x 25mm RHS and 6mm plate for the Drop outs.
IMG_5043_zps4f4d113e.jpg
IMG_5051_zps3bec1731.jpg
IMG_5047_zps9226f23b.jpg
IMG_5049_zpsdf77e6ca.jpg
 

Attachments

  • IMG_5043_zps4f4d113e.jpg
    IMG_5043_zps4f4d113e.jpg
    102.1 KB · Views: 213
  • IMG_5045_zpsab9eb6e9.jpg
    IMG_5045_zpsab9eb6e9.jpg
    110.7 KB · Views: 182
  • IMG_5051_zps3bec1731.jpg
    IMG_5051_zps3bec1731.jpg
    129.7 KB · Views: 182
  • IMG_5047_zps9226f23b.jpg
    IMG_5047_zps9226f23b.jpg
    102.2 KB · Views: 193
  • IMG_5049_zpsdf77e6ca.jpg
    IMG_5049_zpsdf77e6ca.jpg
    160.4 KB · Views: 221
I have decided to use my Roo Print motor in this bike after all.
And have built a new Boost Ported top end for it reusing my RSE reed set up.
Port times aren't too radical, as I'm after good power from low down, But know this crank is good for over 10 000 RPM and also know that this pipe will support that sort of behavior.
After spending quite some time on the barrel, I decided best to match the cases to the transfers, but while I had the bottom end apart, I took advantage of the straight cut clutch and sprocket shaft and have shimmed the sprocket bearing out by 3mm to hopefully help clear the 24" x 2.35 'Digger' that I have ordered.
http://www.ebay.com.au/itm/DMR-DIGG...pt=AU_Sport_Cycling_Parts&hash=item4d21904028
Next I'm thinking to strip the bike once again and repaint the frame, this time in a 'Gloss Ivory' to match the forks.
IMG_5057_zps3f115fa9.jpg
IMG_5058_zpsfbc1a65b.jpg
IMG_5060_zps0e97a974.jpg
 

Attachments

  • IMG_5057_zps3f115fa9.jpg
    IMG_5057_zps3f115fa9.jpg
    111.5 KB · Views: 192
  • IMG_5058_zpsfbc1a65b.jpg
    IMG_5058_zpsfbc1a65b.jpg
    80.2 KB · Views: 179
  • IMG_5060_zps0e97a974.jpg
    IMG_5060_zps0e97a974.jpg
    99.4 KB · Views: 178
Coming right along Theo! I like the swing arm, forks and wheels. All white will look really cool. Great work mate. Ill be checkin back in.

Rob,
 
Cheers Rob,
I hope this frame will hold together OK, with my welding ability being a little less than professional.
Hopefully I have made up for that with extra bracing and a rather heavy piece of sway bar running inside the seat tube.
I think if I do manage to break this frame, I have a 'pattern' now and would like to order all new steel and replicate it from scratch next time?
I think it'll hold together though.
Bike is completely stripped again, awaiting paint and a couple a other bits in the mail.
 
Cheers,
Frame and welds look good. The swing arm is a masterpiece. You are a great artist and engineer. You'd be surprised how crappy looking some welds I've seen on high dollar custom parts in pretty much every industry. I've taken a few classes and have welded ton of times. I just don't have my own equipment yet. Its on the wishlist for sure. I'm not a pro welder either but we can get the job done. As long as you get good penetration you should be good. I see you have reinforced and made several strengthening mods to the frame. Those should help out a lot. Can't wait to see it all back together with a fresh coat on!

Rob
 
Paint's still soft, but I carefully started putting her back together,
It was a bit of a rush job on the paint, but I managed to get a fairly good colour match with a shot of white over Ivory followed with clear.
Can't wait to see this 2.35 'Digger', should be here by Friday?
IMG_5066_zpsd1ecca49.jpg

How's your Dual suspension bike going Rob?
 

Attachments

  • IMG_5066_zpsd1ecca49.jpg
    IMG_5066_zpsd1ecca49.jpg
    89.7 KB · Views: 169
Back
Top