I got a case of the blues...

itchybird

Member
I've been feeling a bit blue lately and I just don't know why... Maybe it's this new project I've been working on. Thought maybe if I share I could cheer myself up.

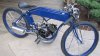
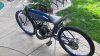
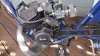
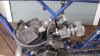
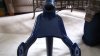
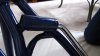
Here is the first peek, this is Racer 001x, the first ever stretch and loop out of the Gilroy factory that Sportscarpat calls home. This is numero uno folks, and since it is my own personal ride, I added quite a few extra touches. It's been on road for a while now, but I thought it could use some new clothes. So I tore it all apart, added a few new features (like that slick upper motor mount) and sent it off to the local powder coater for a little more shine.

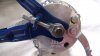
This first shot shows the engine bay, home to a 9.4 hp S6S Morini.
 

Attachments

  • close up of mounts.jpg
    close up of mounts.jpg
    230 KB · Views: 741
I always thought that a proper motor bike should have some nice axle adjusters to make chain alignment a little easier. So what the heck, I added a set.
 

Attachments

  • axle adjusters.jpg
    axle adjusters.jpg
    154.4 KB · Views: 608
Last edited:
I also thought the Worksman frames needed a little more meat where the rear triangle meets the seat tube.

So I fab'ed up this cool little gusset to give a little more strength to the rear frame.
 

Attachments

  • rear gussett.jpg
    rear gussett.jpg
    136.8 KB · Views: 545
Last edited:
And since the vintage Schwinn's have the best kickstands, I added one of those too.
 

Attachments

  • integrated kickstand.jpg
    integrated kickstand.jpg
    147 KB · Views: 567
Last edited:
Who makes the coolest tanks? Sportscarpat of course.

Sure looks pretty in blue.

You can see the bare worksman rims in background, ready for a fresh set of stainless spokes and a set of our super duty hubs.
 

Attachments

  • tank.jpg
    tank.jpg
    168.4 KB · Views: 579
Last edited:
It's all in the details....

We run super beefy hubs on our motorbikes. And since the axles are nearly a half inch in diameter, my vintage schwinn springer fork assy required some mods as well. The drops are made wider and a little a pin is welded into the drop to hold the brake plate.
 

Attachments

  • pin for front brake.jpg
    pin for front brake.jpg
    241.7 KB · Views: 492
Last edited:
Here's a close look at that upper engine mount. It's a neat little addition that really adds strength/rigidity to the mounting system. It picks up the mounting hole on the cylinder head.

This little mount really anchors the motor into the frame, and it just plain looks cool.

The picture makes the upper bar look bent, but I assure you it's straight as an arrow.
 

Attachments

  • upper mount.jpg
    upper mount.jpg
    179 KB · Views: 476
Last edited:
Here we are, about half way thru the assy process. So far, so good...

The pipe is from an old KTM 50cc motorcycle. To make it fit, I had to cut/rotate the main chamber, build a new head tube, fab up a new flange, then find a way to tuck it all in. This view makes it look a bit funky, but I assure you, it really fits the bike well. I'll post some more pics later that better show how it is integrated into to the build. It takes a bit of work to make things fit properly, but it's worth the effort to get what you want.

This being my second build, I spent a lot more time on the details and it shows in the end product.
 

Attachments

  • partially assembled.jpg
    partially assembled.jpg
    275.8 KB · Views: 756
Last edited:
We need bigger pictures, Rich! I rode this little beast the other night. Man, what a sweet ride it is!
 
Here are few pictures of the finished bike
 

Attachments

  • the finished product.jpg
    the finished product.jpg
    237.7 KB · Views: 678
  • from the rear.jpg
    from the rear.jpg
    277.2 KB · Views: 596
  • from the front.jpg
    from the front.jpg
    234.2 KB · Views: 594
and a few close ups of the motor. Here you can see how the upper mount works. You can also see how I chose to mount the coil and you get a better feel for how I routed the pipe. I tried my best to keep the layout simple and clean.
 

Attachments

  • motor.jpg
    motor.jpg
    240.7 KB · Views: 609
  • close up of motor.jpg
    close up of motor.jpg
    218.8 KB · Views: 586
Last edited:
and a few close ups of the motor. Here you can see how the upper mount works. You can also see how I chose to mount the coil and you get a better feel for how I routed the pipe. I tried my best to keep the layout simple and clean.

First of great build, great choice in color too.

Quick question for you, did you fab up that 90 degree exhaust outlet or buy it (if so, where?). How are people securing the exhaust? Ive seen in a few pics people securing it with a spring. Im almost done TIGing up my mounts for my 9.4 and an am gonna be moving on to the exhaust soon.

Thanks for any info
 
I guess I will answer up on questions as Rich bail out of town for a couple days. Rich fabed up the exhaust including the cylinder flange. I know he made a few extras as I did the welding. A spring holds the flange to the cylinder. The bike runs great. We found we kept calling it a little motorcycle instead of a motor bike. Actually it hauls ass. It doesn't have a speedometer on it so I can't say how fast I was going but plans are get the speed potential figured out. Currently it has a 45t sprocket.
Pat
 
The bike got a serious test yesterday at the Delta Whizz-in along the Sacramento River. It's a 90 mile ride that takes you thru the delta, along the river, with ferry crossings and lots of bridges. It was a very scenic ride along with some very serious, and very fast bikes. In total, there were around 50 bikes: classic Whizzers, Cushmans, and lots of highly modified Whizzers, many of which had overhead valve conversions.

I've been on some long rides, but I never thought I'd put 90 miles on the bike in a single day. The bike rode great with no problems at all and the motor never broke a sweat, it ran cool the whole ride, even after extended runs at near full throttle. The 45t rear sprocket is a very good choice for long fast rides.

My new pipe worked out well, and for those that need an exhaust flange, Pat and I fabed up some spares in case any of you are building a custom pipe of your own.

Rich
 
Last edited:
I guess I will answer up on questions as Rich bail out of town for a couple days. Rich fabed up the exhaust including the cylinder flange. I know he made a few extras as I did the welding. A spring holds the flange to the cylinder. The bike runs great. We found we kept calling it a little motorcycle instead of a motor bike. Actually it hauls ass. It doesn't have a speedometer on it so I can't say how fast I was going but plans are get the speed potential figured out. Currently it has a 45t sprocket.
Pat

Any chance you could snap a pic of one so I have an idea what i need to TIG up?
 
The most important part is to find a piece of pipe with the correct ID, so it slips over the exhaust port and can seal with the two o-rings. It took a bit of searching, but I found the right stuff, it matches the Morini blueprint and fits the OD of the exhaust port like a glove. The tubing we use is very thick wall, 0.095", so its nice and beefy.

From there, you can weld out whatever pipe suits your fancy.

As for pics, here you go...
 

Attachments

  • morini flange.jpg
    morini flange.jpg
    128.7 KB · Views: 442
  • morini flange 2.jpg
    morini flange 2.jpg
    84.8 KB · Views: 442
Last edited:
I can attest to the performance of this build as I was on the Whizz-in run with Rich and he let me put some serious miles on it. I beat the snot out of it (sorry Rich) and oh man what a machine! It is like there is no end to the rev potential of the Morini engine. It just winds up so smooth! Nicely sorted build and quality all the way. The bike easily soaked up 90 miles and ran with the big dogs at the front of the pack. Nice build Rich, real nice.
Pat
 
Last edited:
Back
Top