Motorized Bicycle Carburetor install and rebuild

Status
Not open for further replies.

Norman

LORD VADER Moderator
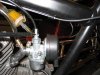
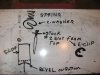
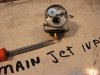
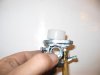
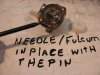
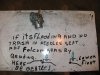
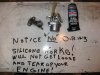
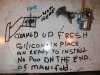
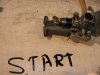
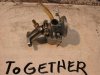
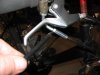
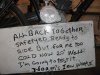
Pictures from taking the carb off the bike and taking it apart to puting it back together and some info. on how and what it all does well sort of and ways to change the min jet for those who want to and areas that can bite you by plugging off and sort of how to fix them. I hope this will sort out your questions if not let me know. I think this is a very nice and simple carb I think its great some of you hate it, can't make everyone happy. Here's the pictures.
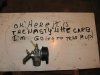
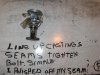
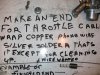
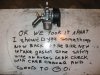
The pencil is pointing to where you can turn this out and take up some of the slack on the throttle cable.

CLICK ON THUMBNAILS TO ENLARGE
 

Attachments

  • carbpict027.jpg
    carbpict027.jpg
    92.7 KB · Views: 3,834
Re: Carb pictures how to

off the bike and on the bench.
 

Attachments

  • carbpict001.jpg
    carbpict001.jpg
    76.6 KB · Views: 2,462
Re: Carb pictures how to

bang its apart. My dry board doesn't have spell check and my penmanship needs work.
 

Attachments

  • carbpict002.jpg
    carbpict002.jpg
    19 KB · Views: 3,590
Re: Carb pictures how to

I wanted you to see the IDLE SCREW and the little throttle slide guide and the fuel tickler, push it down for a few seconds and it lets fuel in the carb for a cold start along with using the choke. I don't use it myself.( the tickler)
 

Attachments

  • carbpict003.jpg
    carbpict003.jpg
    98.3 KB · Views: 2,604
Re: Carb pictures how to

this should explain its self.
 

Attachments

  • carbpict004.jpg
    carbpict004.jpg
    92.8 KB · Views: 3,111
Re: Carb pictures how to

.026 is stock dia. of main jet on my carb to go leaner solder shut and drill smaller my suggestion is one size at a time.
Most adjustment can be made with the e-clip on the needle. This effects a little on the idle to about 3/4 throttle. If you can't get it tuned with the e-clip and want to go richer or leaner make sure of your stock size then drill the next size bigger or smaller.
If you want to lean it out go smaller depending on what you think you need then test your bike.
I've found that going to a 0.65mm at my elevation of 3200 ft this size works good.
when you look at some of these main jets your going to find some drilled wobbled out or way out of round getting a nice straight true hole is important and having no burrs is a very good idea if you mess it up solder it shut and do it again it don't take much solder and just plain solder used to solder wire works good. try to do it as precise as you can if you can't or don't have the tools I can do it for you just PM me to let me know so I can send you my address for mailing it to me be sure to put the main jet in something so the jet won't come out of the envelope or box. I had one guy send me one and it got lost in the mail the envelope got here but no jet.
the photo shows the main jet with a drill bit in it the tool to the right laying on top of the micro bits is the pin vice its a hand operated drill you chuck up the micro drill bit in the pin vice and spin the drill with your fingers slow to do but if done right you won't break the drill bit.
Do not use an electric drill with the micro bits you will break them and more than likely they wont fit the electric drills chuck as the bits are very small in diameter.
 

Attachments

  • carbpict005.jpg
    carbpict005.jpg
    112.2 KB · Views: 1,927
Last edited:
Re: Carb pictures how to

screwdriver points to the mainjet on the very end of the emulsion tube/siphon tube might be a better name as only gas comes up through it no air.
 

Attachments

  • carbpict006.jpg
    carbpict006.jpg
    91 KB · Views: 2,290
Last edited:
Re: Carb pictures how to

pointing to the place where if you get trash in the tank and no filter this is where it will get to first and cause the engine to flood you got to take it apart to get it out. this can be removed by taking off the fuel line and unsrcewing the fuel inlet pipe carefully and don't loose the red gasket hard to make and will leak if you mess it up.
 

Attachments

  • carbpict008.jpg
    carbpict008.jpg
    111.8 KB · Views: 2,356
Re: Carb pictures how to

explains its self
 

Attachments

  • carbpict009.jpg
    carbpict009.jpg
    102.3 KB · Views: 2,073
Re: Carb pictures how to

float how it looks when its upside down I'm sure there's a measurement in china but I don't know what it is I should have measured it the pic. should get you in the ball park.
 

Attachments

  • carbpict011.jpg
    carbpict011.jpg
    40.6 KB · Views: 2,044
  • carbpict010.jpg
    carbpict010.jpg
    87.3 KB · Views: 2,131
Re: Carb pictures how to

adjusting the float for the fuel level this is something to do only if you can't get it to stop flooding or over filling the bowl with fuel. If you ruin it you most likely will have to get a new carb. I haven't checked on parts at the cycle shops. I'm showing where to bend it I don't recommend bending the tangs as it would be hard to bet them the same and they probably are not the same anyway. messing with fuel level in the float bowl will affect rich to lean to a degree how much on this thing I don't know. lower fuel level equals learner mixture and can starve engine and you might burn a hole through the piston. something to think about. Do a plug check when messing with the carb.
 

Attachments

  • carbpict014.jpg
    carbpict014.jpg
    102 KB · Views: 1,411
Re: Carb pictures how to

I'm not a big fan of silicone but there is a time and a place for this stuff. This will seal the intake to carb very, very, I do mean very well. YOU WILL NOT SUCK SOMETHING into your engine and cause you a big heartache this way. I ,m showing you how easy it is to do step by step.
 

Attachments

  • carbpict015.jpg
    carbpict015.jpg
    109 KB · Views: 1,672
  • carbpict016.jpg
    carbpict016.jpg
    115.5 KB · Views: 1,570
  • carbpict017.jpg
    carbpict017.jpg
    75.3 KB · Views: 1,463
Re: Carb pictures how to

push it together. you can do this on the bike if you got the room sometime you will have to remove the aircleaner to mount the carb on a tight fitting frame. after pushing it together just a little twisting to help spread the silicone and aline up the casting seams on the carb and the manifold tighten the bolt and TADA.( I polished off the seam fooling around with the polishing wheel and never mind the weird fitting its for a boost bottle and I wanted to try one so I made one. I would recommend a tuned pipe money better spent and thats my 2-cents but they don't hurt anything and if you want it to look cool sticker and all go for it( it your cash spend it the way you want to). I did find the engine will idle at a much lower setting on the idle screw and the thing seems to run smoother but top end nada. My final thoughts on the boost bottle is don't waste your time/money on them.
 

Attachments

  • carbpict018.jpg
    carbpict018.jpg
    101.7 KB · Views: 978
  • carbpict019.jpg
    carbpict019.jpg
    97.2 KB · Views: 1,071
Last edited:
Re: Carb pictures how to

as the picture says no part of a o-ring sticking out in the bore and no need to worry about it coming loose and the engine eating it. the carb should not come loose or leak and you don't have to worry about keeping the carb pushed up tight against the ring while tightening it. I rest my case.
 

Attachments

  • carbpict020.jpg
    carbpict020.jpg
    103.4 KB · Views: 1,004
Re: Carb pictures how to

airbreather exploded view. I cut the opening where the air comes in on the breather teeth opened it up a little. the gain? more noise for sure.
 

Attachments

  • carbpict021.jpg
    carbpict021.jpg
    103.7 KB · Views: 1,335
Re: Carb pictures how to

I thought I'd show the choke and the symbols we all know what they mean . you can read chinese can't you. The filter ain't the best but it works for me and I'm cheap. #2 pic. almost done the last parts to go in the carb and again the stock setting and parts aligned on sequence of assembly
 

Attachments

  • carbpict022.jpg
    carbpict022.jpg
    102.7 KB · Views: 1,149
  • carbpict023.jpg
    carbpict023.jpg
    109.4 KB · Views: 1,523
Re: Carb pictures how to

I should delete as this didn't turn out real well. I wanted to show you how to make the cable end for the carb made out of a single strand of copper phone wire wrapped around the cable and silver soldered and there is an example of the wrapping and a finished end I made these just for this post on a scrap piece of cable ther's more ways to do this I find this very simple to do. The silver solder to me is important don't want the end to get loose and go through the engine and that is where it will go if it gets a chance. Nasty picture.
 

Attachments

  • carbpict024.jpg
    carbpict024.jpg
    131.5 KB · Views: 1,317
Re: Carb pictures how to

bottom picture is a little out of focus but shows how the thing looks assembled correctly
 

Attachments

  • carbpict025.jpg
    carbpict025.jpg
    104.9 KB · Views: 1,174
  • carbpict026.jpg
    carbpict026.jpg
    61.5 KB · Views: 1,517
Re: Carb pictures how to

pen pointing to an adjustment area for taking up slack on the throttle #2 pic my throttle cable has another adjustment up at the twist grip to take the skack out of the throttle cable.#3 all done. #4 its running and its cold .
Thats it hope your questions got answered if not give me a PM.
Norman
 

Attachments

  • carbpict027.jpg
    carbpict027.jpg
    92.7 KB · Views: 1,163
  • carbpict028.jpg
    carbpict028.jpg
    67 KB · Views: 1,089
  • carbpict029.jpg
    carbpict029.jpg
    106.6 KB · Views: 1,121
  • carbpict030.jpg
    carbpict030.jpg
    125.4 KB · Views: 1,202
Status
Not open for further replies.
Back
Top