What a Noob Did To His Head and Cylinder. Grind, Polish

Toadmund

New Member
http://motorbicycling.com/showthread.php?t=16646
credit to above thread ^

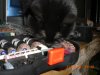
Got motivation from somewhere and did some grinding, sanding and polishing to my head and cylinder.
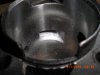
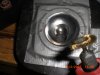
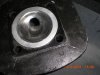
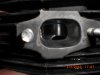
Pic #1 shows a ridge, one of two (give credit to thread) that resides in the transfer ports.
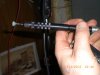
Well I ground these off with a dremel type tool (a jobmate, $15 bux at Canadian Tire!) Notice that I did scuff the cylinder wall with the bit holder, or chuck I think it's called, nothing major I hope. Did much better with the second port.
See pics:
 

Attachments

  • CIMG6374.JPG
    CIMG6374.JPG
    122.1 KB · Views: 276
  • CIMG6372.JPG
    CIMG6372.JPG
    98.1 KB · Views: 269
  • CIMG6376.JPG
    CIMG6376.JPG
    123.6 KB · Views: 273
Right on Toadman, cleaning up the ports really perks these little motors up. Don't forget to clearance the jug gasket too.

This a new engine? Or one you've had on your bike for a while?
 
I had a really tough time with the dremel type tool and resorted to my real dremel shaft, using that was much better! Best part is that it fit the non-dremel tool. (One day my real Sears brand dremel died, RIP)

I used a stone that required frequent dressing due to aluminum loading and fast wear.

This stuff attracts curious onlookers.
 

Attachments

  • CIMG6378.JPG
    CIMG6378.JPG
    104.5 KB · Views: 226
  • CIMG6383.JPG
    CIMG6383.JPG
    108.1 KB · Views: 227
  • CIMG6384.JPG
    CIMG6384.JPG
    135.7 KB · Views: 237
Right on Toadman, cleaning up the ports really perks these little motors up. Don't forget to clearance the jug gasket too.

This a new engine? Or one you've had on your bike for a while?

It's brand new, I really want to intimately know this thing, and make it right the first time.
 
Then I moved on to polishing the head, I used duct tape to keep the work where the work should be done. I trimmed it with a box cutter, be careful though.
I used 400 grit sandpaper, and sanded by hand, well, finger and thumb anyway, then the magic happened, I used a brass wire brush on the dremel type tool, what a nice shine that brought out!
pic#1

Then I moved on to the head and cylinder leveling.

I used a stone floor/wall tile instead of glass as it was what I had around.

I sanded dry at first then I got some loading, so I went wet, I am very classy so I used some white wine from a glass sitting on the table here, I really like beer though, to drink.
It was obvious while doing this that it needed to be done, now the surfaces are flat and true.
 

Attachments

  • CIMG6385.JPG
    CIMG6385.JPG
    143.2 KB · Views: 258
  • CIMG6386.JPG
    CIMG6386.JPG
    137.3 KB · Views: 261
  • CIMG6394.JPG
    CIMG6394.JPG
    153.7 KB · Views: 258
  • CIMG6396.JPG
    CIMG6396.JPG
    119.7 KB · Views: 245
And La piece de la resistonce.
(Say this like your French and mean it!)

Sanded out the exhaust port (I am leaving the intake as is) by finger using 400 then onto 600 grit.

For me there came a time when I said, that's good enough.

The paint in there was a real pain as it resisted being sanded, I gently scraped some of it away very gently with the box cutter. The other problem was casting pits, that's why I said; 'good enough'

I hope I help someone a bit further, I myself did not know how I should go about polishing the head dome, I guess I did OK on my own.

Thank You everybody.

PS, I also trimmed the transfer port gaskets for better flow, grinding those ports is for another time down the road.
 

Attachments

  • CIMG6397.JPG
    CIMG6397.JPG
    92.7 KB · Views: 248
  • CIMG6398.JPG
    CIMG6398.JPG
    86.5 KB · Views: 254
Last edited:
Coolage. Yea, exhaust port likes to be smooth, but the intake likes to be rough to promote atomization(I think). "Golf Ball Effect" or something...

Oh yea, while you have the jug off, its a great time to lap the port gasket surfaces too(they can be as wonkey as the head gasket surface), and the surface of the actual intake and exhaust flanges too :)

one last thing :p 
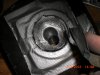
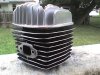
Being a black painted jug, they really look sharp with the edges of the fins sanded up :D

Nice work on the Chamber, thanks for the brass brush tip :)
 

Attachments

  • DSC00087.JPG
    DSC00087.JPG
    74.9 KB · Views: 209
Your welcome and nice jug! I would like to hold that.

I will fore-go the lapping on the transfer port side of the jug as the gaskets are on quite good and I can't get them off without destroying them, there are two, one is stuck to the jug the other to the crankcase, but they did not stick to each other. This is also why I am not matching the transfer ports, not destroying the gaskets, perhaps next year when I rebuid it completely.

Those gaskets are like tar paper or something, or perhaps they are asbestos fibres held together with PCB laden tar with a bit of melamine, arsenic and lead thrown in for good measure?

Yeah, the brass brush was great, softer than the steel wire brush so as not to be to aggressive on the soft aluminum.
I am glad we both learned something today!
 
oh, not the ports themselves, I mean clearance the gasket(s?). The gasket blocks the bottom of the port a bit, a quicky with an exacto and you're good. ;)

yea, the polished fins really make it "pop" eh?

edit- and I meant the surfaces where the intake/exhaust mount to, those can be wonkey
 
Last edited:
Back
Top