
You are using an out of date browser. It may not display this or other websites correctly.
You should upgrade or use an alternative browser.
You should upgrade or use an alternative browser.
orange crate
- Thread starter scratchbuilder
- Start date
scratchbuilder
Member
scratchbuilder
Member
scratchbuilder
Member
scratchbuilder
Member
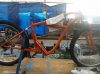
 Hey thanks guys. My builds are crude, but from down the block they look good...lol. Just a hf 90 amp.flux core welder. The ideas are first time attempts. Not being sure they will work i just throw the whole thing together.
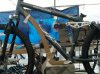
If I could just comment on one small detail here, the only thing about this build that seems off aesthetically to me, and this is purely an aesthetic preference of mine, is that the down tube does not connect to the bottom bracket. If this were my bike, which I know it is not, I'd have made a section of tube to go from the motor mount to the bottom bracket. The way it is now, that angle where the down tube meets the bottom bracket just kind of....throws my eyes off a bit. That is the only critical comment ivhabe to make. The rest of the bike looks great, and I especially like your welded on sprocket. Keep an eye on those rivets though. I would personally be a bit worried that they might not take the torque of the motor. Fortunately, it's an easy fix if you want to get out in front of it, just drill the rivets out and use bolts instead. But, that's up to you, just a suggestion on my part. Welding the sprocket on is great as long as the welds are solid, which your welds appear to be. I chose to use a moped hub on my build for two reasons, the first being the fact that the sprocket bolts directly to the hub via six drilled and tapped mounting holes, IMHO opinion far superior to any rag joint or adapter, you simply took it a step further and welded yours on, yet if you drill out those rivets you can still remove the sprocket for replacement or a gearing change if so desired. Overall, excellent job in my opinion.
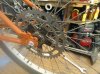
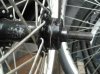
This was how i did my sprocket. Its a 1pc. I just carefully filed round & round so that it slipped over the hub and rested on the ridge of the larger diameter.
He! He! love it did that about 55 years ago,never had a problem with it ...........Curt
scratchbuilder
Member
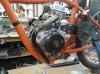
Yeah, dtv, i agree. I was gonna shape a piece of sheet metal for looks to fill that space. But, goofs started adding up. I missed the desired arc in the top tube. The middle tube is upside down,thought it looked better with the arc down, wrong.lol. The rear triangle needed to be level. That down slope makes my 24" crank arms only 1 n a half off the ground. And the hf engine is so noisy. Thats compared to my little hs49. Hey curt..50 years ago...when the bug bites its forever eh...lol.
scratchbuilder
Member


If you've ever seen a handlebar stem of the goose neck type, you will notice that the end of the goose neck that goes into the steerer tube has an angle for the wedge nut to slide up and down against. The way your frame is now, adding a section of tube between the motor mount and the bottom bracket won't change anything from a structural point, so what you could do if you want is take that section of tube and make an angle like the one I've described on a handlebar stem, and make the angle match part of the circumference of the bottom bracket, since it doesn't have to butt up against the bottom bracket for structural integrity because the motor mount is providing the structural integrity already. Anyway, just an idea, hope it makes sense the way I described it.
scratchbuilder
Member
Heck i'm goin for new build. Probably put the frame in the donor pile. Lol. I like the fact that its low, 24 rear triangle, both my feet set flat on the ground (5'8). I've been wanting dual suspension, i think i have the frame. I'll use the rear components and make the top tube, down tube and seat tube.In the pic the front clip will be extended 3".
Attachments
scratchbuilder
Member
Umm..orange crate ll...