Noobie first build

Jamesgregory

New Member
Well today I came home from work and there was a big brown box on the porch. I got my motor today. I am looking forward to installing this on my bike. I have about a days work on the bike first. I want to grease all the wheel bearings and bottom bracket first. Then the fun can begin. Looking at the front mount I hope it will fit the tube on my mountain bike. I read somewhere to use high temp grease when I repack the bearings, makes sense to me. This doesn’t look to complex of a job just setting the carb to get it to start is what I'm not sure of…. I’ll post as I progress pics too 
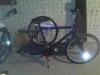
This is my bike soon to have my new motor from Jakes Custom
 
Last edited:
Looking forward to seeing your first build!
I just got my first build running and the carb was pretty much right on for the first firing. Be sure to run a rich oil mix for break in, Im running 20:1 for about the first gallon.
 
With all the cold weather we’ve been having, and I mean cold I've had a slow start getting my build started. I needed to degrease the bike I'm using. My better half didn’t want me doing it in the house. Today was warm enough to do it outside, so finally got that done. I've rode this bike in rain and snow all this winter as a peddle bike, can’t wait now to get started on the build. I also received my universal front mount and my down tube is so thick I can’t use the thick rubber vibe isolator, thinking of cutting inner tube and using that. I also got one of those 2 legged kick stands but I think will ride to low for ground clearance, its about 3” off the ground in the up position. When I was cleaning the rear wheel I dropped my freewheel in the degreaser, I've got bike and chain lube from the bike shop will that be good enough. And I'm repacking the wheel bearings with car wheel bearing grease like was told here before.. Here is the bike now…
 

Attachments

  • CAM00079.jpg
    CAM00079.jpg
    20.2 KB · Views: 140
Do not use rubber in the engine mounts. Or any other resilient material. The engine needs to be mounted to the frame as solidly as you can get it. This isn't just my opinion. It has been proven time and time again that rubber in the mounts will NOT eliminate vibration but simply transfer the vibrations to the mounts and the fasteners resultintg in fastener failure. Take a little time and do some research here on mounting methods and read what has been written about the pros & cons of rubber mounting.
http://www.google.com/cse?cx=partne...15#gsc.tab=0&gsc.q=rubber mounting&gsc.page=1

Good luck

Tom
 
Iwas going to put the tubing rubber on the outside of the frame. The universal mount would be flush aginst the frame. But if you say that is bad I will not use it. Is it possible to over tighten it? I dont want to snap the case from being to tight. Gorilla tight
 
If you have or have access to an inch pound torque wrench, torque the engine mount fasteners to about 60 to 70 inch pounds. Recheck everythinbg after a few miles but don't exceed your original torque values. The engine mount studs/nuts are 6mm. The values I suggested is good for that size fastener. They also applie to the intake and exhaust manifold fasteners.

Good luck. Let us know how things go for you.

Tom
 
Tonight I tore into my wheels to repack them with car bearing grease and one of the bearing seals bent and one of the front was jammed so tight it was wedged onto the cone nut when I tried to remove them. Guess I'm off to the bike shop tomorrow to get two new ones ****, might as well replace all 4. Bearings themselves look good and so do the races.
 

Attachments

  • wheel1.jpg
    wheel1.jpg
    201.1 KB · Views: 126
  • Wheel.jpg
    Wheel.jpg
    199.2 KB · Views: 141
You talk about a stroke of luck! I was given a 26” bike that was ready for the trash. I only took it because I bent the dust cover for the bearings trying to get it out to repack them with good grease. I was going to try again when I found that the hub was a steel hub and the bearing dust cover was part of the cone, awesome. I stripped my wheel used my new bearings and repacked that wheel putting my freewheel on it, works like it was made that way. All the wheel work is done now. I never realized my bike was so bad in need of maintenance. Next comes the wheel sprocket and handle bar set up along with the new break kits I got for it. God this seems like its taking forever, but I want to do it right so its safe to ride, call me a perfectionist. More to come!
 
Back
Top