My first build. Cheap and efficient!

GoldenMotor.com

pulsar2121

Member
Feb 20, 2013
48
0
6
USA
My goal here is to spend as little as possible to complete this kit. As of a result I will be using only the parts supplied with the kit for most of the build. Excluding the kill switch. That was kind of ridiculous. When I hooked up the leads to a multi-meter I realized all the switch does is short out the generator to the ground wire. Not a good design in my opinion. So I think for that part I will be getting a SPST toggle switch and placing it on the blue magneto wire.

Anyways, below are some pictures of my bike: before I started and where I am now in the project. Excuse the poor quality of the photos. I used my flip camcorder. I will be getting a still camera soon.

Here's a bike that I got at the thrift store a couple of years ago for $15. Notice my shnazzy bike hanger I built for $13. It is sturdy, efficient, and gives you plenty of room to work on either side of the bike. After working with it for a few hours, I wish I would have built one of these hangers years ago. It's so simple, but it works so well.


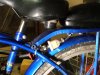
This is where I am at with the build right now. I have most of the parts on. The next step is to connect everything together. Right now I am waiting on some tools that I ordered off of the internet before I continue.


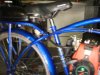
Here are a couple of pictures of my sprocket. I am not so sure I like the design, but I am going to stick to the kit for now. Maybe I will try some new things on my next build. We'll see how this one goes first.


2door

Moderator
Staff member
Sep 15, 2008
16,302
175
63
Littleton, Colorado
Your assumption regarding the kill switch is incorrect. It will not cause any harm to any ignition component when wired to connect the blue and black wire from the engine/CDI. It is simply a normally open momentary switch that shunts the circuit and shuts down the ignition thereby killing the engine. If you opt to replace it make sure your toggle switch is located in an easily reached position. The kill switch is a safety device and should be utilized.

Your sprocket bolts are in backwards. You might run into interference with them in that way. The bolt heads should be on the outside of the sprocket with the threads and nuts to the inside.
Just a suggestion based on experience.

Tom
 
Last edited:

pulsar2121

Member
Feb 20, 2013
48
0
6
USA
Yeah, I was going to redo the sprocket anyway. After I got it assembled I realized that the sprocket was flipped in a way that the teeth are sticking out and the chain might rub against the frame.

I do have a question about the kill switch though. Because it is just a momentary switch. If you have a runaway bike because you adjusted the carb wrong or something, won't it start back up when you let go if you are still moving.

Also, don't know if this changes anything. But when I tested it with the meter, the switch temporarily joins the generator wire(white) with the negative(black). It is not connected to the CDI wire(blue).
 
Last edited:

2door

Moderator
Staff member
Sep 15, 2008
16,302
175
63
Littleton, Colorado
Many of us never use the white wire for anything. In fact I cut them off at the magneto coil. Splice the two kill switch wires, color doesn't make any difference, to the blue and black wire. Yes, if the engine is running and you press the kill button then release it before the engine stops rotating, the engine will restart and continue to run. It doesn't take long to kill it. A few seconds but you'll need to disengage the clutch as you depress the kill button.

As for the sprocket, I'd wait until you mount the wheel into the frame to see how the sprockets align. You want the engine drive sprocket to be exactly in line with the rear wheel driven sprocket with no lateral misalignment.

Before you put the chain on spin the rear wheel and check the sprocket for concentricity with the rear hub. It can't wobble or be off center. It MUST spin true. getting it to do that can take patients and time but it is absolutely necessary to make the chain run smooth without derailing. There is a lot of discussion here on how to get the rear sprocket installed correctly.
Good luck.

Tom
 

pulsar2121

Member
Feb 20, 2013
48
0
6
USA
I think I am still going to go with a toggle or rocker for the kill switch. I'll probably mount it on the handlebars next to the throttle like a motorcycle.

About the sprocket, I'll keep that in mind.
 

Toadmund

New Member
Jan 19, 2012
792
6
0
Saint John, New Brunswick, Canada
I managed to build mine for about 300 bux. (bike, motor, hardware, chemicals)
Paid $50.00 for the bike, really good deal because the tires and tubes were new, like getting the bike for free really.

Have fun living the dream!
dance1
 

pulsar2121

Member
Feb 20, 2013
48
0
6
USA
So today I did the wiring. I took a rocker switch and wire from an AC clamp style lamp that I didn't use anymore and re-purposed it for my kill switch. After much debate, I decided the kill switch would be most accessible right by the clutch lever.

Here is an overall picture of my wiring setup. Notice I ran the wires from the kill switch along the handlebars and under the gas tank and I made sure the wire had plenty of play at the neck for when the handlebars are turned.


Here is my kill switch. I just connected the 2 wires together after the switch to create a circuit.


And here is a close up of the wiring by the ignition control module.


Here's a quick diagram that I made to explain how the switch works. The setup on top is my design. The rocker switch is either always on or off. It just interupts the magneto wire going to the ICM. Below is how original switch worked that was supplied with the kit. It would temporarily make a connection between the generator and the negative wire creating a short circuit. Not only is this bad for the ICM, it is also unsafe. Because it is only a momentary switch. When you let go of the button the engine will start back up, unless you hold the clutch in until you are at a stop. Which might be adjusted incorrectly if it is your first run or you might forget in a panic. So, that is why I think my design for a kill switch is safer and just makes more sense.
 
Last edited:

Trey

$50 Cruiser
Jan 17, 2013
1,432
5
0
Where cattle outnumber people 3 to 1.
Looks good! The budget idea is good too. I recently wired a toggle type kill switch into a motorized scooter. Grounded to the engine block, worked great.

In the arena of penny talk:
2door- "concentricity", used in context, is a 50 cent word sir. :)
 

pulsar2121

Member
Feb 20, 2013
48
0
6
USA
Well, I got the throttle cable and fuel line hooked up to the carb today. I decided to add a small inline fuel filter. Thanks for the idea Norman. Anyways, it was only $2.50 at walmart. The inlet size for the filter was too big so I had to make 2 adapters by using the black hose that came with the filter and then fitting the smaller clear hose inside. It seems to be a pretty tight fit, but if it leaks I'll just seal it up with some RTV silicone. Installing the throttle cable into the carb was a little tricky, but with a little help from this thread Motorized Bicycle Carburetor pictures how to install and rebuild I was able to get everything together right. Here's a pic of my carb now.
 

Trey

$50 Cruiser
Jan 17, 2013
1,432
5
0
Where cattle outnumber people 3 to 1.
Good job getting the throttle together.
Two things about your filter- I use that size, but they make them for lawnmowers that are fine for these bikes, they are smaller and so are the inlets fyi.
The fuel line really should all be replaced. That might hold for a hundred years, or it might catch you on fire. RTV won't seal gas anyhow, and you only need a foot of fuel line (1.50) and 2 hose clamps (.60) to be perfectly safe. And you get to ride to an auto parts store and talk to gearheads about your bike:)

I"m sorry the pics are so bad, but as an example, my fuel line is only cut where it must be, and clamped securely. I use 1/4 inch inside diameter automotive fuel line. Between all the different components- tank, filter, carb etc, it is sometimes a tight fit, sometimes not so much, but hose clamps of the proper size fix that. Cheap insurance
 

Attachments

Last edited:

pulsar2121

Member
Feb 20, 2013
48
0
6
USA
Hey Trey, I have never heard of a liquid that can get past RTV, but I am interested in that lawnmower filter that your were talking about. Could you post a part number for that?

Anyways, this week I hooked up the clutch and installed a dual pull brake lever. I got the brake lever on eBay for $13.80 with free shipping. It seems to work well.


The clutch feels kind of weird though. It gives very little resitance when I pull the lever. It feels like it is not moving, but maybe that is something that will change when the motor is running.
 

Trey

$50 Cruiser
Jan 17, 2013
1,432
5
0
Where cattle outnumber people 3 to 1.
I recently picked up a dual brake lever from Bird Dog Dist. and it doesn't look as nice as yours. Different style- I may have to re-consider:)
As far as the RTV, I should have said that you would need the type rated for gasoline. But that's just more possibilities for a leak anyhow.
The filters are at any lawnmower shop, small engine place, Walmart, Kmart, and usually hardware stores. There's even some smaller one's for other applications such as string trimmers etc, but I do not know their flow rates. You'd probably have to change them out pretty often too.
I can't help with the clutch, but you will soon have some suggestions I bet!
 

kevyleven007

Active Member
Sep 25, 2008
1,217
8
38
texas
the directions that say to wire the kill switch to the white wire are wrong.These things are like that.Good job.
 

pulsar2121

Member
Feb 20, 2013
48
0
6
USA
Well, today I decided put the wheels back on. Which meant flipping the sprocket and bolts around first. Note: They didn't clear the frame. Anyways, now it looks like a bike again. I was amazed by how much heavier the bike feels now.

The next step is the chain. I was checking out the tensioner and it looks pretty cheesy. I was wondering if it would be better to just shorten the chain to the correct length. Since both gears are fixed, it really shouldn't need much slack. Has anyone else tried this?

Anyways, he's a pic of the bike so far.
 

Trey

$50 Cruiser
Jan 17, 2013
1,432
5
0
Where cattle outnumber people 3 to 1.
There is lot's of stuff here on this subject. Before I learned to use the Google custom search at the top of the page, I asked this question too.
Seems like a split decision from the folks who responded. I don't like the idea, but ended up doing it on my bike- works fine. Just keep 3/4 inch play in both chains, tire straight, tighten appropriately.
Good luck. You are going to have ridiculous fun on that thing:)
 
Last edited:

outdoordan

New Member
Mar 8, 2013
3
0
0
Maine
Nice bike. I'm new to this. And I wanted to find something that was going to be cheap for my first one and I'm glad I found your post. Gave me some good ideas. Thanks
Dan
 

maniac57

Old, Fat, and still faster than you
Oct 8, 2011
4,484
22
0
memphis Tn
I recommend not using the tensioner if possible, but only with HD chain. The stock junk stretches too much to last long without a way to take up slack. I use a tensioner on my bike because the chain rubs the frame. I have had absolutely no problems at all with the stock tensioner since upgrading to #40 HD chain. The weak point in the drivetrain is the stock chain.
Having said this, I do weld the tensioner to the frame stay to prevent it from twisting into the spokes, and I bend it to align the idler with the chain exactly. If you set it up properly, the kit tensioner works just fine. I have more than 5k miles on my drivetrain with no problems at all. I havent touched the slack in 6 months. If your frame will allow it, running a HD chain and not using the tensioner is the best setup.
Either way, running HD chain is the FIRST mod any chinagirl kit needs.
Have fun!
 

pulsar2121

Member
Feb 20, 2013
48
0
6
USA
Well today I shortened the chain. I decided to go without the tensioner because in this case I think less is more. And since I had to shorten the chain anyways... you get the point. So, I bought a chain breaker at Harbor Freight for $12.79 including my 20% off coupon from an ad in Autoweek magazine. The drive pin on the tool was a bit too big for the chain, but it still worked well and didn't seem to damage the chain at all.

Then I decided to finally shorten the my replacement studs for the bottom mounts. I used a bolt cutter and then a hand file to clean them up.


After I got the chain hooked up I realized that it doesn't clear the edge of the cover. You can see in the picture below where the chain ate some of the sprocket cover. The cure for this will be to make a notch in the cover to give the chain some breathing room. My handy dandy bench grinder should do the trick!