New BTR first project

GoldenMotor.com

OleSkool

New Member
Dec 19, 2009
15
0
0
West WI
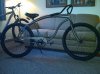
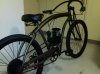
Here is the start to my first MB / BTR project.

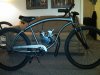
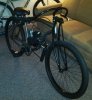
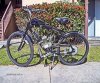
A firmstrong bruiser prestige is the base with a black springer fork to be installed and 66cc kit from Pirate Cycles on the way. I am going to add a 4" offset seatpost and a 0 rise neck maybe some 24" wheels with drum brake front hub and really fat tires down the road.

I have about $300 bucks in it so far and I am looking for a BTR style tank that wont bust the budget! The Peanut tanks that come with the kits are not going to cut it. If anyone knows of someone that fabs tanks for a resonable cost I would appreciate the lead.

Also wondering about the rear cog? I am 230lbs, will ride in rolling hills and hoping to get 30 MPH out of this ride, do you think the stock sprocket that comes in the kit will be adequate?

I apreciate the fourm for all the ideas while planning this.

Thanks for any feedback you might have.
 

Attachments

Schneebly

New Member
Jan 28, 2010
5
0
0
Las Vegas
I'm choosing the Bruiser for my first project also. I've been worried about the bottom tube being too far down for the motor to mount to the seat post high enough to clear the sprocket. I looks like you just mounted the kit farther forward, but how did you mount it to the seat post? If you could post more pictures of your engine mounting that would be great. Also, did you use the Grubee 66cc Angle Fire? Thanks so much!
 

Salty Gator

New Member
Aug 3, 2009
672
0
0
Florida
Some updated photos it is comming along with the typical issues
Skool

I have a cruiser I'm building up ( again )..that is basically the same type frame....and envisioned the same springer on the front and slightly different bars....but all in all basically the same look you have ....please keep us posted on the progress so I can learn what to expect....

Much obliged,
Salty.shft.
 

Attachments

OleSkool

New Member
Dec 19, 2009
15
0
0
West WI
update with photos to follow.

Motor mount issues: I got some allthread and cut it to fit the rear mount bolts used the longer rear studs on the front. I moved the motor more to the center from the original photos using rubber coil boosters I found at a auto parts shop as spacers. Hint: A sharp utility knife worked better than using a copping saw. The chain is a bit short with the longer frames I wish they were longer in the kit to avoid additional hassel and expence.

The rear sprocket needed some modification because the center hole was 1mm to small to fit over the flange on the hub I used a grinding stone in a drill to open it up but again it was a hassle.

Fork instal was a pain since the bruiser has a short headtube and the standard springer was 2 in longer than needed. Thought I was going to just cut it down but the alignment of the spring mount and the top pivot required me to add spacers to the headset. I can fix it with further mods but right now I will keep it stock so be carful to get the right headtube length on the fork you buy!

The throttle / kill switch is really cheap and I can see that breaking from routine use. The break lever and cables are really low end as well.

I have been struggling with finding a good tank. I have lost a few on e-bay not wanting to spend as much on a the tank as the engine kit. The top mount peanut tanks dont fit the BTR look and if someone could mass produce a BTR square wrap over they would sell for sure. In the mean time hunting for a 70's Japanese dirt bike tank or fabricating one yourself is the way to go.

I am working a seat post mod with an cutdown MTB seatpost that will rest on the extended top tube and secured to the braised on fender mount and bracket to the original pinch bolt. I am mounting the CDI below the motor for a clean look. I am going for the BTR asthetic over all.

All is going slow and I hope this thing fires up without to much trouble.
 

troyboy

Your East Coast Gasbike Connection
Apr 18, 2009
171
1
0
Wista ma
IMG_0741.JPG IMG_0740.JPG IMG_0738.JPG IMG_0737.JPG

My Bro wheelstand Matty just banged me out one of these for my Felt Elgauapo.
It took him a little more then 2 hours to make it so I threw him a 50 spot.
I can ask if he will make one for you if you would like me to?
I think it looks as sweet as a pineapple juice can.
Still have to put on a straight intake to create better gravity flow for the fuel.
We got the idea from this forum. Thank You Blakenstein!
Theres a how to make your own post somewhere around here called apple juice tank...
Also... The braided line is not our fuel line. We slipped it over our original fuel line just for looks...


Justin
 
Last edited:

OleSkool

New Member
Dec 19, 2009
15
0
0
West WI
I want to first off thank FreeAgent for the inspiration for my selection of a cruiser and the look that he achived.

Here are the promised pics with a motor shot that shows the mounts and CDI placement. I ended up buying a entirely new length of chain and fit it with the tensioner.

I finnaly just bought a 1972 Suzuki dirt bike tank off ebay after loosing a few cheap auctions so that was $70 with shipping and everything.

I am going to get a longer ignition wire today to reach the plug from its under engine CDI location and install the stock tank! I may even try to fire it up?

I look forward to the tank arriving so I can prep and paint it and ditch the peanut tank!

I will let you know how it goes today.

TTYL
 

Attachments