Johnny 5 is Alive a Short Circuit BTR!

LabRat

New Member
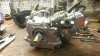
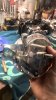
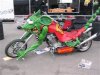
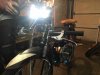
No idea where you all start when you build. Is it with a bike and you get an engine or do you start building an engine and the bike sort of shows up in pieces?

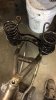
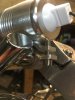
This one started with the engine. Saw a deal on eBay Made in Taiwan clone GX120 4hp engine. Quite a few HP parts for these GX120 engines are there is midget stock class they race with them.

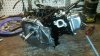
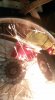
I found the footprint to be that of the HF99cc/79cc engine. How ever it is a bit wide on the right side according to my tape.

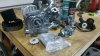
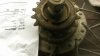
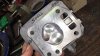
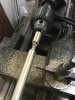
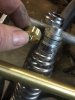
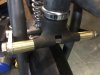
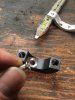
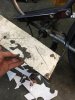
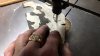
First thing I do is strip it and rip it. Strip it of its excess parts and rip it of its governance and oil sensor.

Rip rip strip strip.

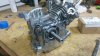
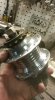
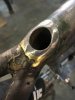
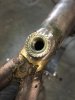
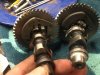
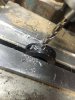
This block has three holes to plug. Requiring tap. I use JB weld in place of silicone. These pugs will never be removed. Or leak.
 

Attachments

  • un painted block.jpg
    un painted block.jpg
    75.9 KB · Views: 282
  • 4hpshaftside.jpg
    4hpshaftside.jpg
    316.8 KB · Views: 235
  • open case.jpg
    open case.jpg
    81.1 KB · Views: 281
Once the block was striped and sealed and put together again. I got bored and took the side of the case off and buffed it for an hour.... and again bored I painted the block black. Used disk brake paint. Hard and takes heat. the new look is outstanding!
 

Attachments

  • parts porn.jpg
    parts porn.jpg
    92.4 KB · Views: 274
  • polished side b.jpg
    polished side b.jpg
    85.7 KB · Views: 272
  • painted block.jpg
    painted block.jpg
    90.4 KB · Views: 239
Here are my hubs. The front is an old worksman front drum and the rear is from a vintage moped. The second picture shows the invoice for the used wheel. They clean up really nice with SOS pad and water. Buffer her if you got one!

My standard wheel builds are with 10g Stainless steel spokes.
 

Attachments

  • worksman front hub.jpg
    worksman front hub.jpg
    60 KB · Views: 260
  • hub as arrived.jpg
    hub as arrived.jpg
    49.7 KB · Views: 218
  • hub cutting spokes.jpg
    hub cutting spokes.jpg
    50.9 KB · Views: 264
  • Hub ready to be laced.jpg
    Hub ready to be laced.jpg
    53.4 KB · Views: 252
Seeing there was a vendor selling Indian Grinder type forks for bicycles on eBay I quickly snapped up a few pair. Took a while to fit. And there is more on these forks. I will post about upgrades and bolts next thread.
 

Attachments

  • Indian Grinder instalation.jpg
    Indian Grinder instalation.jpg
    94.1 KB · Views: 286
  • Indian Grinder instalation a.jpg
    Indian Grinder instalation a.jpg
    103.6 KB · Views: 261
  • Front fender mounted from front.jpg
    Front fender mounted from front.jpg
    100.7 KB · Views: 325
How to lose a GF in 60 seconds or less. Tell her she will never fit into that leather mini skirt again, followed by slice and dice. Oh that blue pad. Yoga matt. If she would use it, skirt would fit. Yes?

Nice saddle though!
 

Attachments

  • GF Skirt.jpg
    GF Skirt.jpg
    77.9 KB · Views: 205
  • GF Skirt a.jpg
    GF Skirt a.jpg
    105.4 KB · Views: 201
  • GF Skirt finished.jpg
    GF Skirt finished.jpg
    97.9 KB · Views: 255
Last edited:
And that pesky miniskirt .... Mounted like no other. Still do not see it. I know right.... let me get my turn signals mounted then I will put on the saddle.
 

Attachments

  • seat post cut off.jpg
    seat post cut off.jpg
    60 KB · Views: 276
  • nut installed.jpg
    nut installed.jpg
    66.7 KB · Views: 234
  • setting the seat pan a.jpg
    setting the seat pan a.jpg
    114.1 KB · Views: 260
  • setting the seat pan.jpg
    setting the seat pan.jpg
    17.9 KB · Views: 254
Back to the engine.... HP parts... Put them in put them in....

Word is about $368 of parts inside of my $140 clone motor. I did not go for the expensive flywheel... I want the weight of the cast iron.... body in motion stays in motion not interested fon rip rip turn rip tun. Local area long roads and flowing hills.

Race head with 26lb springs, there is a pic of the stock cam with the race cam. Specs are WOT is now 7,500rmp. Jonny 5 will be a bit beastie.
 

Attachments

  • camshaft compair.jpg
    camshaft compair.jpg
    88.8 KB · Views: 254
  • race head.jpg
    race head.jpg
    70.4 KB · Views: 188
Back to the indian springer. Time to dress them up. Rather have brass bushings then steel washers. Making spacers where there is a stack of washers.
 

Attachments

  • brass bling f.jpg
    brass bling f.jpg
    96.6 KB · Views: 212
  • brass bling e.jpg
    brass bling e.jpg
    57.6 KB · Views: 244
  • brass bling g.jpg
    brass bling g.jpg
    53.1 KB · Views: 208
Lights got to have head lights.... And a name was born! Projects start with no name around here because they will tell you there name once you get to the point where you may introduce yourself.

Note in the first pic you see the light bracket was built for 1" bar not 7/8".
What I came up with was 7/8" locking collar modified with a hole for the light and another for the set screw.

And that is when it happened; magically.

Builders.... Meet Johnny 5

johnny 5: these two books are wonderful may i have them craphead
-johnny 5
 

Attachments

  • light not fit.jpg
    light not fit.jpg
    62.6 KB · Views: 216
  • Light clamp cuting.jpg
    Light clamp cuting.jpg
    88.6 KB · Views: 260
  • light tap.jpg
    light tap.jpg
    77.9 KB · Views: 208
  • talking to Jonny 5.jpg
    talking to Jonny 5.jpg
    71.6 KB · Views: 212
johnny 5: Hello Bozos
Oooooo! Beautiful. Light bulb
-johnny 5

Test lights and brass bling more bling. Cover the gap. Brass scrap was kick plate from an old door.
 

Attachments

  • Light test.jpg
    Light test.jpg
    67.2 KB · Views: 214
  • brass bling a.jpg
    brass bling a.jpg
    77.2 KB · Views: 199
  • brass bling b.jpg
    brass bling b.jpg
    44.8 KB · Views: 203
  • brass bling c.jpg
    brass bling c.jpg
    45.2 KB · Views: 201
  • brass bling d.jpg
    brass bling d.jpg
    66.6 KB · Views: 216
Number 5: No disassemble Number Five!
 

Attachments

  • BMX bar to BTR.jpg
    BMX bar to BTR.jpg
    232.3 KB · Views: 215
  • BMX bar to BTR chopped.jpg
    BMX bar to BTR chopped.jpg
    230.7 KB · Views: 222
  • bmx finish.jpg
    bmx finish.jpg
    231 KB · Views: 190
  • BMX bar to BTR installation.jpg
    BMX bar to BTR installation.jpg
    233.1 KB · Views: 277
Back
Top