The Rustoration Build Off

GoldenMotor.com

silverbear

The Boy Who Never Grew Up
Jul 9, 2009
8,325
670
113
northeastern Minnesota
...the two smaller pieces are to hold the upper plate in place in respect to side to side movement. For each side I used a piece of flat aluminum stock and a piece of angle soldered together. It is my first try at aluminum soldering and isn't the best looking, but is strong enough and now I know how to do it better next time (clean the pieces really well with a stainless steel brush). I bolted the side pieces to the upper plate and ran a bolt through each support from side to side through the seat post tightening hole. It is snug and very secure. Then I cut slots into the upper plate for the stainless steel clamps to fit through which hold the tank in place. The shape of the upper plate allows for the seat to go all the way down if need be. I will no doubt modify the shape of the support pieces in the future and realize now that they can be smaller and less obtrusive. But the idea I think is sound enough even if someone else can do a better job of fabrication. I hope this is of use to someone else out there.
SB
 

Attachments

BarelyAWake

New Member
Jul 21, 2009
7,194
21
0
Maine
Been a while and I've not much to report - it's startin' to get down to detail work on the Rollfast really, save the blasted tank ofc, which is still waitin' on my buddy to weld it *sigh*

Still, a "blessing" of these motorized bike projects is that they're never really done, I've been doin' lil stuff here and there like cleanin' up and painting the rear rack, figuring out these fenders I don' like so much, painting and mounting them anyway just so I'd have a place to mount the ol' headlight assembly that cleaned up pretty good.

I stopped work on the bike for a while, "pending further investigation" on a few things - then decided "ta heck with it" and went ahead, figuring anything I didn't like I'd just replace later... like these fenders. I can't really rig my lights & wiring w/o them... so why hold up the project for what amounts to a small aesthetic dislike?

So much is waiting on the tank tho - all my wiring and cables get routed under it, let alone the plumbing of the fuel system itself... even final paint and detailing is waiting on the tank installation as there's no point in doin' the spiffy stuff only to scratch it all up again. I figure I'll basecoat and assemble the whole thing, then come spring and the resultant better, warmer weather I'll take it all apart and topcoat & detail.

I've got a few things to attend to, finishing the now highly modified SBP pipe, the taillight housing, dropstand and chainguard, recovering the seat and my least favorite ofc - the electrical system lol

Funny how it looks so much different with jus' a few "accessories" bolted back on o_O


bairdco

a guy who makes cool bikes
Aug 18, 2009
6,537
264
63
living the dream in southern california
looks really great, BA!

i see what you mean about the fenders, something about them doesn't sit right.

on my new bike i'm gonna make some custom fender struts (maybe complete custom fenders, i'm not sure yet,) and maybe you could do the same. you could curve them to match the rear rack struts, and mount them so they're covering the tires more.

here's a pic to give you an idea:
 

Attachments

BarelyAWake

New Member
Jul 21, 2009
7,194
21
0
Maine
Thanks bairdco, yea - yer onto something there! I was thinking on makin' custom struts, nufin' quite so fancy as those (tho those are incredible!) - more the plain straight rod stock type with simple acorn nuts (ya know what I'm referring to? I haz no pic)... but what the problem is (well, problems actually) is these fenders simply weren't "as advertised" or pictured even. They certainly aren't the "full sized" ones I wanted anyway as the rear one has been "bobbed" (obviously not a factory cut either). Additionally - I seriously doubt they were for a 26" wheel as the included struts were about an inch too short, even sitting on the tire - which would also explain the wrong curvature and the slight "flattening" from me tryin' to make them work anyway.

Toss in some shipping damage and I'm not exactly impressed with them - but they were cheap lol *shrug* Ya get what ya pay for I figure :p Still, they'll work for now. I will get offn my butt and go to my local bike shop to see what they've got... I'm hoping for more sidewall coverage as well as actually going all the way down to the bottom bracket... The "down to the BB" part really doesn't matter as I do intend to make a "toolbox" for in there - common on the early 1900s motorcycles, and I'll prolly use a hunk of the old fender for the... well "fender" part :D

So while "something doesn't sit right" (heh, appropriate) I'm glad it's not just my eye playin' games - thanks for the critique man, it really does help as I really was undecided about them... I couldn't for the life of me tell if it was just 'cause I knew they weren't right - or if in fact they looked a lil "off" o_O
 

bairdco

a guy who makes cool bikes
Aug 18, 2009
6,537
264
63
living the dream in southern california

BarelyAWake

New Member
Jul 21, 2009
7,194
21
0
Maine
Yeah, that's a good link fosho - but I seem to be hung on the ducktail style for w/e reason heh and after this lil fiasco I kinda wanna physically pick up a set to peer at them o.o

Still, if ya say WALD is good - I'll do some diggin' and see what comes up. BTW - you may be right, they could be two front fenders... the only thing preventing me from agreeing completely is the rear came complete w/a reflector (not in original part description or pic either) which sux 'cause I didn't want the holes there... seems like a lot of trouble to go through just to sell a mismatched set *shrug*
 

bairdco

a guy who makes cool bikes
Aug 18, 2009
6,537
264
63
living the dream in southern california
wald makes the best fenders out there. they've come stock on all the old american schwinns, and tons of other bikes. i have a set on a bike from the 60's, and the chrome is better than any new fender i've seen recently. they're sturdy (they're thicker than normal fenders,) have great brackets and struts, and they're cheap.

and totally worth it.
 

BarelyAWake

New Member
Jul 21, 2009
7,194
21
0
Maine
hmmm...

*strokes beard & sighs*

'nother thing to go on the shopping list then lol, but $30 is a great price for the quality you describe... meh - gawdangit bairdco, obv you need to be psychic and tell me this stuff before I waste mine pennies on useless crap :D


actually - on second thought, yer prolly far better off stayin' outa my brain :p
 

pre-war Schwinn

New Member
Nov 15, 2009
109
0
0
73
Los Angeles 90039
my 2 cents; I found some Wald fenders on Amazon for a good price, the only problem was that I just needed the struts not the skinnyer than Phantom fenders per say. So, I improvised. the holes are different and the quality is obviously perfect.
What I did was install the struts with one center screw onto my schwinn phantom ones, then cut sections of the wald to lay over top of the dents in the real ones caused by 40 years of use. I got real fancy on the rear and sliced and diced three flairs to give it that shark attack flair.
I have no final cut pic now but the glamor of my idea is evident. I previewed the bike at the
Griffith Park Seinor Center on December 12th 2009 to get feedback from old codgers whe are the actual kids who had these. Thumbs up all around. the director of the center is going to attempt to put agrubee on a ten speed Duh
 
Last edited:

silverbear

The Boy Who Never Grew Up
Jul 9, 2009
8,325
670
113
northeastern Minnesota
Just checking in quickly. I got a virus on my laptop a few weeks ago, thought I had the problem cleared up, but now the hard drive needs to be formatted and a new OS install done. I'm on a borrowed machne at the moment. I'm still alive and still buried under a ton of snow in the Catoktin Mountains in northern Maryland. I've done a little indoor tinkering on the bike, but nothing for show and tell. Hopefully the snow will melt soon and I can find a few warmish days to do some fender painting outside. Can't wait to ride this Elgin. Bairdco, fender struts are not all the same length, so those fenders may well have been for a 26 incher. I had thought I could use a strut from a 50 schwin fender on my 39 Elgin, but it was good deal shorter. Fender struts from an early 50's Monarch were different yet. I like the idea of custom stuts and look forward to what you guys come up with. This coming week I'm going to make my first attempt at a rear drop stand with aluminum channel and will show results later (bad or good), as it is something I can do indoors during the next storm. Later...
SB
 

KULUKIN

New Member
May 2, 2009
36
0
0
Burbank, CA
"are we done here?"
__________________

No, that thing NEEDS a real tank between the top bars, until then it will never b "done". sorry, just true. It is an immaculate Motorized bike and deserves a "real" tank.
 

BarelyAWake

New Member
Jul 21, 2009
7,194
21
0
Maine
Done? NEVVOR! laff

Not only am I in the process of gettin' the tank welded (my buddy has been... busy), here's a glimpse of some of my "task list" lol

electrical sys (lights ign)
seat padding & leather recover
fuel sys (copper tubing)
rear drop stand fabrication
grips & throttle (leather & side pull)
cut & fit chainguard (shift kit)
"vintage" airbox
behind the seatpost toolbox
fabricate taillight assembly

THEN take it all back apart again and repaint & detail w/original paint scheme. o_O *sigh*

UNLIKE "damn the torpedoes - full steam ahead" baridco lol, I'm a lil on the slow side. As the tank is kinda holdin' up some of my plans anyway, I've taken this opportunity to attend to some other stuff. Sure the Rollfast is sittin' there beggin' (or taunting) me, but sometimes that's just the way it rolls *shrug*

Not to mention every time I log into this forum the "task list" grows longer as I pilfer ossum ideas from ya'll... like the bedanged fenders & struts o.o


*To be continued* ;)
 

silverbear

The Boy Who Never Grew Up
Jul 9, 2009
8,325
670
113
northeastern Minnesota
First off, I don't weld so I am somewhat limited when it comes to fabricating things. I've been wanting to make a drop down stand for my 39 Elgin and had the idea that aluminum channel might work. I already had some of the alumirod soldering/welding sticks purchased last summer. I've done very little with this stuff, but thought I'd learn as I go. So, I bought three feet of the 5/8" channel at Lowes for about five bucks. I measured everything very carefully from an original stand on my 38 Elgin and used it as a model for the new one. As you can see in the photos I used a hacksaw to cut at the bend spots, but did not cut all the way through, wanting to keep it as one piece. I was pleased enough with how that went. I cleaned up each spot to be joined with a stainless steel brush which came with the rods, fired up the propane torch and went to work. I don't know that the propane produces enough heat unless the aluminum is very thin. Bairdco may well be right that higher heat may be required for this, as with a Maps gas setup. I have a good bit of experience sweating copper pipe for water lines and know that the material being joined has to be hot enough or the solder will not flow into the joint. Instead it will sit on top of the metal like a glob of glue. I was looking for that kind of union with the alumirod and did not get it as I would like. It doesn't look as good as I want it to and I don't trust how strong the joints are. I think this approach will work if the alumirod can be made to flow into the aluminum stock being joined, but I wasn't successful. Someone with better skills and more experience might do it right, but I admit being disappointed and am going to explore another approach. I'm thinking of copper water pipe and may try that using regular pipe fittings. At least with copper I know that I can make clean joints. I need to figure out how to beef up the corners at the bottom with braces or gussets of some sort unless I can find a ready made fitting to accomplish the same thing.
SB
 

Attachments

silverbear

The Boy Who Never Grew Up
Jul 9, 2009
8,325
670
113
northeastern Minnesota
I mounted the aluminum stand for the heck of it and decided that I like the look of it enough to fool with it some more. I made up two little gusset deals out of aluminum angle and used bolts to join them to the stand, pictured below. It is a good deal stronger now, but can't go further with it until I have the fender in place. Can't do the fender until the weather clears enough to paint and the forecast is for one winter storm after another until the Ides of March, so it will be awhile. In the meantime I'll amuse myself with a copper pipe drop stand and this morning started making a tin can headlight. Fun! It beats sitting around watching TV or snow fall outside my window. I dream of spring time and spinning wheels...
SB
 

Attachments

bairdco

a guy who makes cool bikes
Aug 18, 2009
6,537
264
63
living the dream in southern california
mekano? weekend fun? you guys still in this? what the heck, BA? where's yer tank? give the guy a 12 pack already and get it welded. SB, you're about done, right?

c'mon guys, your winter builds are gonna turn into springtime projects.

chop chop!
 

BarelyAWake

New Member
Jul 21, 2009
7,194
21
0
Maine
...but can't go further with it until I have the fender in place. Can't do the fender until the weather clears enough to paint and the forecast is for one winter storm after another until the Ides of March, so it will be awhile...
Ahh my situation summed up perfectly lol I should be following yer excellent example and workin' ona dropstand... but the hang-up with that is it's mount. The Rollfast hasn't the "tabs" or holes for one and I'm reluctant to use the axle for a coupla reasons, not least of which it kinda defeats one of the major advantages of a dropstand - being able to work on/remove the rear wheel. The reason I've not made the weld-on mounts yet is simple - I need to get ofn my butt and go see if my buddy has a dropstand he's willing to part with. While I could make one, I'd rather not - but until I haz one in my grubby fists I'll not know what the mounts need ta be like.


As for the rest of the bike it's a bit of a catch 22, while most of what remains is simple and easy - until the tank is finished and fitted, there's little point in "completing" such things as wiring, routing cables and the fuel system as they're all dependent on the tank (wiring and cables under it). Even what I could do w/o the tank in place pointless as I'd just disassemble it for the final paint & detail work - of which I can't (well, "shouldn't" is prolly a better word) do until the tank itself is finished lol What fitting and fiddling I've already done has marred the basecoat a bit, the unfinished edges of that tank are sharp heh

I wasn't gonna up these pics till the tank was done as it's not really "fair" - raw, uncleaned tack welds look pretty crappy, the quality hard to see until it's all finished and dressed. Still waitin' on the "after" for these "before" pics, I figure what the heck, ifn I don't show somethin' baridco is gonna freak out heh

Here's a shot I've noticed ya don't see too much with the DIY tanks, the inside - particularly the mounts... there was much discussion and debate regarding those mounts, the backing plates and their size my idea - their thickness his, neither of us thought it a good idea to just weld nuts/studs to the tank itself as the stock tanks have, for obvious reasons. (click to view larger);


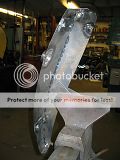
You'll note the perhaps overly thick backing plates for the mounts, the thickness just to help make the welding easier - they're also not welded completely around their edges. While this would ofc be desirable, it's not particularly needful as I won't be relying on them to seal - they'll have studs sealed on the outside w/a nut... the simplest solution for any number of associated problems as I see it. All the internal fasteners, fill cap, and backing plates were MIG welded to help "build up" the material. The tank will be lined ofc.

Before the bottom was tacked in place - the tank got a ride home again for one final test fit. Much as I tried, there was never a chance to get it all in one piece, accurately - with nothing but mere tape. To say I was happy to note a near perfect fit and uniform frame spacing would be an understatement heh


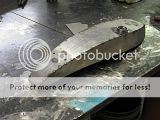
Back to work again, the bottom panel tacked in on a lunch break - it now sits on a shelf gettin' dusty as Murphy has his way with us, six day work weeks and another flood (16hrs w/o power, heat, phone or water) on the freakin' day we picked to finish the tank not being the least of which... this winter has been a doozy meh;

 
Last edited:

silverbear

The Boy Who Never Grew Up
Jul 9, 2009
8,325
670
113
northeastern Minnesota
Your tank is worth the wait, my friend. That bike is going to be as great ride as well as a great looker. All the time, thought, attention to detail and money is coming together in a one of a kind, custom bike which is an expression of you. How worthwhile is that!
My own time is being spent largely in diversions. I'm hoping to pick up the copper pipe materials for another version of the drop stand in a day or two as cash permits. Nothing cheap about copper any more... a ten foot section of 1/2" thick wall copper pipe is $22.00+ at the local Ace, which would be enough for three stands, not counting elbows.... which isn't bad for three stands, but is a lot for an experiment if it turns out to be one stand I don't use. I'm waiting for Bairdco to come up with steel channel version which doesn't require welding. Hint.
I've also been fooling with refinements of the juice can gas tank with some good results. It has been time well spent with half a dozen finished ones in different configurations covered in harness leather. Along similar lines I've made a few different versions of the tin can headlight, one of which is also finished off in harness leather. Yesterday I made a little tail light from a mandarin oranges can which I like a lot. I'll make another and finish it off in the same leather. I need to find a source for red plexiglass for tail light lenses. Any ideas for a source would be much appreciated.
SB
 

fasteddy

Well-Known Member
Feb 13, 2009
7,454
4,920
113
British Columbia Canada
The Monark is at Redi Strip being cleaned. Gave up on my brother getting the compresser hooked up so I could use the sandblasting cabinet and there is too much stuff in the garage to clean it with a whizzer wheel. Rains here about every day in the winter so thats out. Should be ready this week.

Chrome is out to the plater and will be ready late March. It's a small shop and when I went into talk to them all I saw was older car parts and some beautifull work. Price was resonable and since there are not very many chrome platers around any more I was pleased to find one with in ten miles of me.

All the final bits and pieces are ordered and when the bike is together I can tackle the sidecar mount.

This is just a thought that I want to toss out but next winter I think that we should meet at Bairdco's. Better weather and the man is a true insperation. Bet he won't settle for any slacking off.

Steve.