Old Guys Simplex moto-peddle bike

GoldenMotor.com

indian22

Well-Known Member
Dec 31, 2014
4,725
7,711
113
Oklahoma
Silver bear by using Pat's frame & his work it's freed me up to "focus" on the forks as my part of the build. I hope to cut some copper today & beat out a couple of plates for the forks. I won't be using a great deal of copper on the "pea shooter" nowhere near what I put into the Simplex Copper Gator, but just touches here and there...accents really, along with a bit of brass as well. I may use copper on the "Keystone" plates as well & wahooo.

Hope you guys up North have thawed out & are getting back into your own projects. Build on!
Rick C.
 

curtisfox

Well-Known Member
Dec 29, 2008
6,048
3,960
113
minesota
We sure are got up to 80, for the most part it's in the 70's and rain every other day. Same with mowing lawn, it seems......................Curt
 

indian22

Well-Known Member
Dec 31, 2014
4,725
7,711
113
Oklahoma
Dang you work fast!!!
Butch I'm old how fast could I be? Lol, but some things don't require much time as others. I cut and hammered copper this morning in my kitchen. The photos show what I used for the copper work. I'll use a small bench top drill press to cut some holes later. The aluminum top plate was formed a couple of days ago using nothing but the small press & a worn out angle grinder. Used a cut off wheel for the rough shaping the aluminum & a 60 grit flap wheel to shape it.

Point being I crafted the aluminum in far less than an hour & the copper as shown in the photos in less than 30 minutes. I have a machine shop that would have been faster but I sometimes like to do things with basic tools. It kinda takes my mind off things and reminds me how I used to build everything when I was a youngster & flat broke!

I think anyone who wants to use copper and brass, as well as the more common metals, in their builds can learn to do it first by just starting out with a good pair of scissors, pencil & some construction paper & learn to cut templates. Then forming 3 D shapes by folding the templates to form brackets, boxes etc. Quicker & cheaper than making mistakes in metal while learning...fun also. Later pick up a set of sheet metal shears and start practicing on thin sheet scrap metal in no time at all you'll be amazed at what you can create.

Wear good leather gloves this stuff is like juggling with large razor blades and will slice to the bone. Just saying... Rick C.
 

Attachments

indian22

Well-Known Member
Dec 31, 2014
4,725
7,711
113
Oklahoma
We sure are got up to 80, for the most part it's in the 70's and rain every other day. Same with mowing lawn, it seems......................Curt
Great news you all survived another harsh Winter. Your weather now sounds like Indian Territory weather this year down here, Curtis. Raining hard right now so I came in to dry off. Two years ago we were at the tail end of a 5 year drought. I think I averaged mowing 4 times a year. Last Spring it started raining again and I'm mowing every 5 days, but thank God it's raining again!!

I drilled the copper & mounted just the top. Fresh copper is just so bright it doesn't photograph well until a patina forms. The plate is heavily worked with the hammer, but difficult to see in the photos. I have some welding to do on the fork so I won't mount the rest of the copper till I've done a bit of tacking. Quite a bit to do yet on the forks. Rick C.
 

Attachments

  • Like
Reactions: Nightster

indian22

Well-Known Member
Dec 31, 2014
4,725
7,711
113
Oklahoma
Just when I thought I'd seen it all Ludwig. I want one!! I'm not sure how long it would average to start all four let alone tune and sync, but no one in my neighborhood would have one.

I'm about to cut the loop out of Pat's beautiful frame. Those faint of heart might want to look away. I've said it before...most builds get very ugly before they're completed & this ones at that point. Rick C.
 

indian22

Well-Known Member
Dec 31, 2014
4,725
7,711
113
Oklahoma
After the loop was cut out the motor still won't fit between the seat tube & the down tube, no surprise to me as I do have a tape measure, but I wanted those who thought it would fit in the stock loop to see why I'm going to Keystone the motor & frame. By dropping the motor four inches it fits vertically & I can now easily remove the valve cover for servicing the top end without pulling the motor. It also lowers the weight of the engine center of gravity. I'll still have 4.5" of ground clearance after the Keystone mount is installed

Front to rear I need an additional 2.5" to 3" & I can gain this in one of two ways: bend the down tube or cut the down tube just below the lower straddle tube & replace the tube with one that drops more vertically to bolt up to the forward Keystone motor mount connection. I'm going with the second option...well kinda both as the curved portion of the down tube can be turned 180 degrees and reused as the down tube. I'll sleeve the connections and add more strength by adding a 1/4" thick grommet plate at the lower straddle tube/down tube connection as well. Fairly simple alteration to gain some seriously required space. I'm thinking 2" of clearance between tire and drop tube will be sufficient.

Rick C.
 

Attachments

indian22

Well-Known Member
Dec 31, 2014
4,725
7,711
113
Oklahoma
About right after the second session of slice and dice. Pedal sprocket, pedal levers are just wide enough, shift lever is at about the same position as on the Copper Gator. Motor needs to lean a bit more forward to be level & the jug will look a lot like the "half a Harley" racers converted V-twin/ to single mod to qualify for class displacement. Duck taped & flipped down tube from the lower straddle to show the approximate look & spacing...it's still fairly tight front to rear, but exhaust & front motor mounts on my version of the Keystone all should fit.

There's a lot of space left open behind the jug assembly. I might have to fab a proportional fake oil tank/tool & electrical's box at the junction of the straddle & seat tube & forward.

Short racing look exhaust will drop down the pedal drive side & end just below the kick start lever pivot. It will be baffled, just short and no copper on this one!
Rick C.
 

Attachments

Ludwig II

Well-Known Member
Jul 17, 2012
5,071
783
113
UK
On the Honda CG125, there are a pair of plates that fit between the rocker box and the frame tube, I think it's as a steady to damp out vibration.
 

indian22

Well-Known Member
Dec 31, 2014
4,725
7,711
113
Oklahoma
Ludwig I suppose that's the purpose as well. I also connected two plates to the upper tubes & the rocker bracket on the Simplex Copper gator which were robust enough to bear weight but don't. The engine runs through the range without "buzz" but I haven't a clue if the "extra" connection helps or not. I will be connecting it to the Peashooter as well...it can't hurt.

I've noticed some of the guys who run the Honda clones vertically also have an upper bracket, probably for the same reason. I also remember Cushman Eagle scooters had an upper bracket mounted head to frame, the bracket was subject to cracking & that engine would really vibrate as a result. Rick C.
 

sportscarpat

Bonneville Bomber the Salt Flat record breaker
Jun 25, 2009
1,839
471
83
california
For what it's worth I have always mounted the four strokes into the frame in three places, rear, front, and top. This effectively triangulates the engine and cancels out the various forces trying to twist the engine out of the frame. I am sure you guys all know this. Doing this of course gives the frame a chance of survival.
Just a thought as you reconnect that down tube, add an inner sleeve into the tube and cross drill and plug weld it into position on both sides of the joint, then be sure your root pass has full penetration into the sleeve and both sides of the joint. From there finish weld the joint and carefully grind smooth. Lug the heck out of the down tube where you plan to connect the Keystone plates and add cross bolt sleeves so the bolt pressure cannot crush the tube and lug. I have only built one Keystone frame and learned a great deal along the way. Probably the biggest thing I learned is that the Keystone plates need to be very rigid as they tie the whole frame back together. I used 3/16" plates and spreaders between the two plates.
 

indian22

Well-Known Member
Dec 31, 2014
4,725
7,711
113
Oklahoma
Solid advice Pat that I'll also be using, along with a grommet at the junction of the down & lower straddle tubes. If the manufacturer designs 5 mount positions I use them all if at all possible! Your explanation for triangulation of engine supports is excellent and your mounts are proof that you take your own advice seriously as well.

I bet you thought the Old guy done went hostile & destroyed your beautiful frame when you saw my posts and I don't disagree with that assessment (all except the hostile part). I made those cuts with regret, yet I knew on ordering the frame,it would probably come down to some form of radical alteration in order to meet my build requirements.

It's quite pitiful looking right now... as I earlier pulled the fork to put some heavy tack welds in to replace the Duct tape (duck) and "interrogation cuffs" that I used to subdue (zip tie) the truss elements during my mock up interview with the famous Flyer.

Over all I'ma 'liking it...especially your frame & I plan on making it the second Keystone that you can point out to customers & warn them against trying this at home...like this one crazy old dude over in Indian Territory....

Thanks again for all your input on this build Pat, it is valued.

Rick C.
 

indian22

Well-Known Member
Dec 31, 2014
4,725
7,711
113
Oklahoma
I tack welded the truss rods in place & finished the copper work on the top fork plate...I ended up putting a hammer finish on the bottom copper as well and attaching the two copper plates with brass Chicago bolts & the half moon bar risers with brass "acorn nuts". Small details for sure, but worth it to me as the forks & Keystone engine mount will make or break the build for me. Pat's tank & frame are known quantities that I'm certain of. It's up to me to support those elements with an equally appealing fork & engine presentation.

At the same time I've been working out my "Keystone" engine cradle/frame mount. The details Pat mentioned will be utilized. The cradle itself will incorporate a steel square tube back bone welded to heavy steel side plates which will lend strength as well as decorative elements to the finished design. The back bone tube will be formed following the contour of the motor And the side plates curved to preserve the drop loop frame effect.

I may use copper plating on the Keystone mount side plates as well & brass acorn nuts on the side bolting as trim.

The motor will be bolted to the Keystone cradle back bone at five points & to the frame tubes at three locations...upper straddle tube, seat & down tubes with Harley tube clamps on the two lower tubes. The motor virtually becomes a frame member lending structural strength to the frame not just being a load placing stress multiple stresses on it.

Rick C.
 

indian22

Well-Known Member
Dec 31, 2014
4,725
7,711
113
Oklahoma
I started cutting steel yesterday for the "Keystone" engine cradle mount. 1.5" & 1.25" heavy wall square tube for the primary backbone and frame connections (slip joint) & 3/16" thick steel plate. Plates & spacers will be welded to the cradle backbone & engine bolted to the whole affair.

Fork needs some minor fabrication additions, welding and cleanup before I add any more copper & brass so I'm moving most of my attention over to the frame and Keystone mount fabrication for awhile...fork work is quite simple from here on out.

Rick C.
 

indian22

Well-Known Member
Dec 31, 2014
4,725
7,711
113
Oklahoma
I was encouraged to review the Keystone engine cradle mount & frame connection, yet again, and so I did. This time with practical use in mind both the daily & the occasional factors involved. The reasons that HD & Indian adopted the design I'd already taken into account, but the practical considerations such as quickly dropping the engine for major repair at the race track aren't all that important to me, but ease of dropping while maintaining alignment of the engine to frame for re-installing is. Also I want a cradle that will balance the engine securely in the up right position once it's out of the frame. Motors that won't support themselves in running position are a pet peeve of mine. My Keystone design will be able to securely self support the engine assembly. Utilizing square tubing slip joint connections will ensure positive re-alignment of engine to frame on installation.

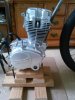
Installed height will be determined by what is necessary for rocker adjustment & valve cover removal, don't want to be forced to remove the engine for periodic adjustments, I want the engine to sit high enough to fill most of the available frame space...valve cover 2.5" to 3" below lower straddle tube.

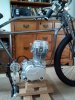
I see the frame down tube as a straight tube angled slightly to the rear with about 1.5" of tire clearance. Good mechanical connections properly welded of course & grade 8 bolt ups at the two removable points of cradle to frame connection. I also will have three points of engine to frame attachment on the upper three frame tubes using HD tube clamps on the seat & down tube & a weld tab on the bottom of the lower straddle tube. The down tube will have a gusset welded at the junction of the down & lower straddle tube as well.

Some minor adjustment of the engine left to right will be through the use of shims...no provision for front to rear adjustment in the mount.

Of course changes may occur along the path of fabrication. Rick C.
 

indian22

Well-Known Member
Dec 31, 2014
4,725
7,711
113
Oklahoma
Looks as though a bad back will slow me down for awhile. Not entirely a negative thing as it allowed me time to really review Pat's Keystone thread & also an old factory Harley Davidson JD frame circa 1925? not positive of that date but it's close.

Pat's engine cradle for his Keystone is much more robust than the HD V-twin design that said the HD held up to the flat tracks as well. If Pat goes into production of a "peashooter" Keystone his cradle won't be something the owner will have to fret about...it's stout!

My particular engine/transmission (5 speed integral) mounts are quite different from the Honda clones that Pat uses so my cradle will also be unique while still incorporating sound design and fabrication techniques. The goals are the same; no reinventing the wheel attempts, just variations to accept the factory motor mount locations to the Keystone cradle.

Hope to make build progress soon, as health permits. Rick C.
 

sportscarpat

Bonneville Bomber the Salt Flat record breaker
Jun 25, 2009
1,839
471
83
california
Hi Rick,
I don't use the engine as a stressed member. The keystone cradle on my bike is an extension of the engine mount on my other bikes so it carries the engine and is adjustable for chain tension. A guy once told me that the best way to avoid something breaking is to build it so it will never break. If your worried then it isn't strong enough! Anyway, yes I tend to over build things.
Pat
 

indian22

Well-Known Member
Dec 31, 2014
4,725
7,711
113
Oklahoma
Amen Pat. Strong is good & good is strong & your Keystone design is stout without doubt & designed for a specific engine/frame combination. I recall that you were looking into a "base plate" for use with the Briggs as well, which would be a nice option.

The CG 125 engine/transmission mounts were of course originally designed for specific Honda frames & therefore required no additional plates just frame brackets for bolt up. My Keystone cradle takes advantage of these 6 key engine mount locations to allow the motor case to become a frame stress member. Forces generated are spread & shared to the frame at these 6 points: bottom, top, front and rear. My selection of engine type primarily dictated my use of a stress member concept for motor to frame connection not any great insight on my part...that's for sure!

The Simplex Copper gator used a modified approach to mount the same type engine as a semi-stress frame member to which I incorporated a heavy steel base plate which was welded to the "dual tube" frame giving additional rigidity/support to the frame & engine.

My back seems a little better this morning so I'm hopeful & eager to do something. Missed a good car show this last Saturday & my favorite local area show & cruise is next weekend. Still happy, but bored.

Rick C.