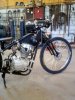
Yeah... Right... Umm: Got any more pictures?!?!

Seriously. Thanks for the write up. I'll decipher it eventually. I have been in contact with Pat and I think we have reached the decision his shaft reduction probably wont work on my build because his are made specifically for HIS frames and HIS motor and HIS motor location ect, ect, Mine will be different. I assume your using high speed sealed bearings in the quill reduction?
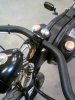
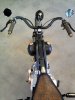
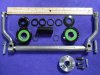
Yes lot of detail involved & quicker done by me than explained. Bearings yes, sealed just fine...selection up to you...as you see flip answers contain no data on which you can rely. You've seen Pat's bikes and I've shown photos of the bottom bracket, co-axle, pedal side and motor side sprocket carrier (in several posts since December of 2015) & described in 2 posts yesterday. I could take Pat's axle/sprocket carrier & easily adapt it to my Simplexish build but I've had decades of machine shop experience building really complex devices & with the parts from CMB the co-axle a relatively simple arrangement that just needs to be constructed & assembled properly or you will be disappointed with the results.
As to the reduction. Pat uses a larger sprocket on his carrier primary drive assembly, which is the outside sprocket & a considerably smaller sprocket on the inside (secondary chain drive) sprocket which provides a great deal of reduction to the rear axle sprocket. I recommend this for any single speed set up. Since I'm running a five speed gearbox it's not really necessary as the box provides 5 quick solutions to reduction from over drive to low, but as I stated earlier I like the idea of having two removable sprockets on the co-axle to fine tune power transmission on a single speed setup. Pat's done some really nice work with his setup.
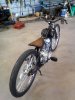
Custom MB, Pat & myself all use basically identical co-axle parts in the 2" American bracket, including all of the pedal side parts, small preferences appear such as cotter vs. a tapered axle shaft...mostly the same, but the big difference to you is that75% of the work is contained in that little CMB kit for about $100. What a bargain! Mine, Pat's and CMB's all fit a 2" shell... period. You can't possibly use the kit parts in a different shell without throwing away part of the kit and making or searching for parts. Buy the right shell: there are literally dozens of different sizes that are in use or have been used over the years. You can't use a 2" threaded shell without mods, 2" American press fit is the correct shell for the CMB kit. If you buy the kit determine the length of the shell which will house all the kit parts and still allow you fit the snap rings into their groves on the axle shaft. Steel shells are typically priced at $10. to $25. & are a bargain...call a REAL bike shop & have them hunt one down or pay some bandit machinist like I used to be (I've reformed) & pay an hours minimum for a few minutes of his time...you will wish you bought a shell off the shelf when you get his bill. If you happen to be using an American classic cruiser frame or a new copy of an old classic then you've a very good chance of having the shell already, if not find a real junker and cut it off. Re-purpose is good.
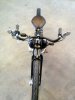
If you follow my lead you'll also buy a couple of go cart style jack shaft sprockets for a few bucks and stare at them after staring at the afore mentioned photos and reading how they go together. The kit has a 3/4" shaft & when you slide both these on the motor drive side of the axle you'll see where the bearings go & where the weld bead is to be laid. You will understand the explanations better with the kit and jack sprockets in hand. I'll also see if I have any photos not previously posted that would help or take some detail shots of my co-axle setup. Have fun! Rick C.
If I can help with any of this PM me any time be glad to assist & help clarify any questions


 156.5 KB Views: 104