Please drool on my panther

GoldenMotor.com

blackpanther

New Member
May 15, 2011
17
0
0
Noath Kakalak
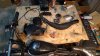
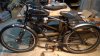
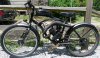
This here is the mod 4.

2008 schwinn panther aluminum alloy cruiser
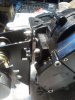
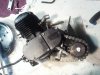
67cc grubee
dellorto carb with handlebar mounted choke
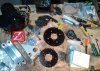
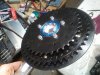
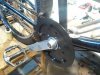
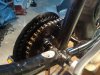
40 tooth aluminum sprocket (massive weight savings)
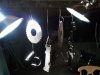
sturmey archer 90mm front drum + dyno powering...
...German made supernova led 800 lumen lighting system
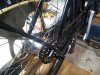
rear clincher brakes
sbp dual pull brake handle
sbp low profile air filters
sbp expansion chamber, tuned exhaust, exhaust wrapped
sbp engine mounts
sbp engine hardware replacement steel, uniform hex heads
iridium spark plug
fat 2.125 racing slicks
lots of black paint
*and a pos chain tensioner. fabricating new solution for mod 5.

The expansion chamber and carb function in unison to maximize fuel-air mixture and revs. 35mph uphill, redline 42mph level, fastest down hill bomb run, 52mph...coasting engine off. Charges up hill with the choke in 75% at high revs, pipe tunes-in tons of torque.

so far, I have 800miles on this engine, I get about 150mpg. Nothing but fun.
 

Attachments

Chitty

New Member
Jun 3, 2008
48
0
0
Souris Manitoba Canada
As long as you are happy with it who cares what others think. If we were worried what others thought, we would all ride Harleys. It looks like you did a good job on it, but it would be too fast for me. I only live a couple of miles from work, so speed is not a priority and I am 55 years old so it is time for slowing down lol. Have a good summer and ride safe.
 

LS614

Active Member
Dec 22, 2009
1,236
3
36
CT and MA
Nice bike, you might wanna wipe it off after I drooled on it :D Seems like you put a lot of thought and effort into making it a good build. A few suggestions. You seem like a speed guy, so I'll tell you now that the best flowing air filter you can get is a quadruple layer of pantyhose, held on with a ziptie. Also, watch out for those fenders, though if you have 800 miles, you must know what you are doing. Looks like a really smooth ride. Happy riding :)
 

LS614

Active Member
Dec 22, 2009
1,236
3
36
CT and MA
That's fiberglass header wrap. It is put there for the sake of heat insulation, but i bet it also does sound insulation.
 

blackpanther

New Member
May 15, 2011
17
0
0
Noath Kakalak
Thanks fo heppin me spitshine my baby. Yes the exhaust wrap is fiber glass and reduces heat and vibration so I don't get fuel lines hot or burn me leg. Kakalak is carolina.
 

blackpanther

New Member
May 15, 2011
17
0
0
Noath Kakalak
Update: Please drool on my panther

Chain tensioner finally killed my baby. I didn't have the bolts tight enough when I replaced the worn out pulley wheel. The tensioner tumped over towards the wheel dragging my chain against the wheel as we went. Luckily it popped just after i had started off out my driveway. Bang! and the chain was broken and wrapping around the back sprocket. Needless to say it totally wrecked shop, chomping out some gear teeth, bending the axle, and torquing the wheel. SO, screw the left side drive from now on.

Mod 5 is now in the works. SBP Jack shafting it, new tires (serfas drifters ....so sexy), air filter, throttle grip, kill switch, mirror, 415 chains, icewax.......and most importantly a 5 speed sturmey archer internal gear with a drum brake. yeah yeah yeah don't shift under load.

lacing it 4 cross, should be interesting to see how it works out with a 23T sprocket on the hub, and a 9T from the engine.

soon i'll post a pic of all the guts. surprisingly after about 800 miles all is still silver and shiney inside the grubee gt5 cylinder head and clutch.
 

Allen_Wrench

Resident Mad Scientist
Feb 6, 2010
2,784
26
36
Indianapolis
I have vibration problems. I am judt now starting to investigate ways to counter it. Explain the vibration dampening of the heat wrap please.
I hope I'm not being too nosey here, but you state you have vibration "problems". Assuming you have a 2-stroke, we know these things vibrate enough to let us know they're down there. But you seem to indicate that yours vibrates excessively. That may not be good.

Before I would hope for help from heat wrap, I would check things like engine mount tightness, maybe use a bracket to stabilize your muffler, check chain allignment fore to aft, anything and everything that might be vibrating first. That way your new heat wrap won't be damaged if some part of your engine falls off. Stuff like that sucks. Safety first.

But the heat wrap is a good idea, regardless.
 

LS614

Active Member
Dec 22, 2009
1,236
3
36
CT and MA
The only sure fire way to get a china pig to stop vibrating like a beast is to work on the crankshaft itself. It should be "balanced" by having the appropriate weight removed, and the runout should be checked to make sure that the two shaft pieces in the crank are centered in the crank circles. The easiest way to start reducing crank vibration is to switch to the cranks with solid weights as opposed to the three screw cranks. The chinese are NOT performance tuners, and the less parts you tell them to put into these engines, generally the more reliable and well tuned they will be.

bicycle Motorized BIKE ENGINE parts 66 70cc cc crank | eBay

That crank appears to be one piece, but I'd contact the seller just to be sure. also, I don't have a website up yet, but if you want to send the engine over to me and have me do the internal work I can do that. Just PM me. Peace :)
 

blackpanther

New Member
May 15, 2011
17
0
0
Noath Kakalak
Ok as far as vibration goes there are lots of things to check

1. Check to make sure your chain is tight and your sprocket and or wheel is true. This can cause all kinds of nightmarish vibration. When your drive sprocket gets a loose chain, the chain can rub all inside the cover, or jump over the teeth.


2. Check your engine mounts, if something is loose it will bounce around and vibrate. Also be sure you have your mounts are cushioned well against your frame, no sharp metal to metal contancts...Ill post a pic of mine with inner tube rubber isolators and aluminum shims.

3. Make sure your exhaust system is firmly fascined on more than just the port bolts. You should have it secured to something solid other than the engine. Mine is secured in 5 points. The port, the springs holding it up, to the frame with a u clamp, to the frame with wire, and to the frame with wire again. My first two exhaust pipes were not secured well and rattled to bits literally.

4. Make sure your clutch lever is properly tight. If its too loose when locked out from your handle bar lever it could rub the pads inside whilst coasting and cause some wierd vibrations.

5. Like LS614 said, and if you are so mechanically inclined and motivated to do so, do surgery. but that's a whole nuther ballpark of tuning.
 

blackpanther

New Member
May 15, 2011
17
0
0
Noath Kakalak
oh yeah,

The heat wrap dampens sound vibration like throwing a towel over a loudspeaker. It is fiberglass insulation and dampens sound minimally, making the exhaust pop less metallic and a bit more purry. It also keeps me from burning my thigh. It also keeps the pipes nice and hot so the exhaust burns and flows better. It also makes a nice contact point so that i can clamp it strate to my frame without metal parts rubbing.
 

blackpanther

New Member
May 15, 2011
17
0
0
Noath Kakalak
Build Phase 1

I am doing this from hind sight.

Oh man more guts.

Here is basically the whole shift kit from Sick Bike Parts. They are consistently back-ordered for a reason. I am so pleased with this, i totally understand why they sell out so quick, and feel quite lucky to have it. Certainly a MUST HAVE!

Solid parts, great sprockets, for real heavy duty freewheel...most of it MADE IN USA **** YEAH.

The sprockets look black, but they haven't been painted yet, just a reflection. The main assembly is primer coated and ready to take some paint.

And then I painted it all nice and patiently, it really is difficult to wait for paint to dry.

Next day, built the crank and freewheel chain ring. It fits together nice and snug, freewheel has a little bit of play though...expected. Only five bolts, super easy to swap out sprockets if need be...SPROCKETS ill talk bout those later. But, For now the kit comes with a 44T outer and a 36T inner.

The chain tension on the left side drive is more or less determined by the spacing between the engine and the jack shaft chasis. I had to custom fit that distance through trial and error adding and subtracting spacers and washers until it was just right. and by just right i mean until the chain would fit on perfectly tight and even linked.

By the way, the SBP instructions specified the number of links to make the chain for the left side drive, and that amount was spot on perfect. However, the aluminum spacer they provided was just a titch too big, and will probably require individual customization across the board...I just didn't have the tools to grind the block down 3 or 4 millimeters so i opted for my own spacers.

I chipped up a lot of my paint in the process. I think I took off and put back on this phase three or four times before i had it perfect and snug. I took my sweet time though and when I got it right BING! Anyhow i spot painted the chips after assembly and made it look proper again.
 

Attachments

blackpanther

New Member
May 15, 2011
17
0
0
Noath Kakalak
Phase II Hurry up and wait 2 weeks

So i did everything i could without the bike being present for two weeks while i had my rear wheel built.

Here's the Jackshaft assembled off the frame. This is how you know when your chain is properly tensioned...the sprocket teeth hold it in for you. As you can see the master link is out. On final assembly i broke and rebuilt the chain without the masterlink for added durability.

Meanwhile had to have spokes measured, ordered, shipped, wheel built. Anyhow the new brains of the beast is a Sturmey Archer X-RD5(W) 5 speed internally geared hub with a drum brake.

Sturmey Archer

I used an SA 90mm drum dynamo variant in my front wheel and found it an outstanding product. At MB speeds the dynamo will put out around 5 watts at 10 volts or tons of juice. I am currently running a supernova E3 triple LED lighting system off the front wheel and its bright as day, even in daylight.

rear hub, and SPROCKETS! ha. I started with a 23t sprocket bc i had done some gear math wrong in the parts odering phase. After a brief test ride and frustrating performance I immediately dropped to and 18t rear sprocket. I calculated the 2:1 ratio for the hub using a 44T drive chainring when infact it was actually 36. so 36:18 or 2:1 gave me much better (night and day) performance....and is the recommended set up for the hub.

so if you get an internal...make sure you keep that front to rear ratio at least at 2:1 not 1.56:1 like my 36:23 horror show.

The reason I first considered the 23T was also because of the steep hills where i live. I live in the mountains and need to be able to maintain speed on sustained climbs. With this hub, and the 36:18 setup i have no problems, the shift maps really are perfect. The 23T was simply toooo granny geared. Use Sheldon Browns gear calculator if you want to learn the math.

This hub has 2 underdrive gears 1:1 and two overdrive gears and is perfect so far for this application. I can climb steep hills in 3, cruise around 30 in 4 and on flats crouching hit 40+ in 5th. I have to be really flying in 4th before shifting up to 5th or it will bog. 40+_5 is really the terminal velocity of these engines regardless of gearing, simply put the drag created by wind speed is a factor of the velocity squared, the engine simply cant fight against that force curve indefinitely.

SHIFTING: Not sure how other people do it but the smoothest for me bc i have thumb shifters is...
In a single smooth motion.
1. Clutch in
2. Throttle Back
3. Shift
4. Ease out the clutch
5. Ease on the throttle
6. Go fast

The crank and chainring are ballin in black gloss.
 

Attachments