Old Guys Simplex moto-peddle bike

GoldenMotor.com

indian22

Well-Known Member
Dec 31, 2014
4,725
7,709
113
Oklahoma
I appreciate your comments Steve. I've been busy trying to tie the whole thing together for the look I'm searching for & it's been slow to no progress recently as I step back and look then change or abandon a certain addition to the bike. I too think the black jug looks better & I'm refining the rocker cover to match as well & the contrast from flat black to unfinished metal seems to work. The problem now is how much brass is just right when matched against the aluminum & black of the engine & eventually with the great expanse of the stainless steel fuel tank. Engine side plates also appear in need of some contrasting color/metal or both.

I'm also building a pedal side chain tensioner, spring loaded, to be mounted on the drive off stand instead of the chain stay & an adjustable Heim joint brace for the coaster brake lever. Of course I'll mount Pat's idler sprocket on the chain stay bracket of the Sportsman frame for motor side chain control as well.

Virtually every fastener on the frame and Keystone cradle will also be replaced with more suitable hardware. Small stuff which takes time and patience. Rick C.
 

indian22

Well-Known Member
Dec 31, 2014
4,725
7,709
113
Oklahoma
Installed chain all around & each run is straight. I'm running a torsion spring tension roller on the pedal side mounted to the drive off stand as a pivot point and the chain roller almost touches the small front sprocket...that small torsion spring is really stout & required tying down in order to adjust the rear axle. Mounted in this position and inside the chain stay it's really not going to be noticed by many. The need for the tensioner was necessary to prevent chain rub on the top of the chain stay during braking & of course helps setup of chain tension on the pedal side as well. The use of an extremely small pedal bracket sprocket for engine case clearance created the chain to stay clearance issue & the tensioner is my solution.

I went with the small nylon roller on the motor side cause it too is almost invisible inside the frame & the coaster brake Heim joint brace makes a simple device for securing and adjusting the rear axle position while using the existing tension bracket as a secure front mount. I'm not a fan of strapping the brake lever to the chain stay.

I ran out of time to size the primary chain so it's way loose in the photo. I'll get to it later. Rick C.
 

Attachments

  • Like
Reactions: Nightster

Harold_B

Active Member
May 23, 2012
997
246
43
Grand Rapids, MI
Nice! Thanks for the detailed photos and explanation once again Rick. Your planning ahead really pays off for you and chain alignment can be a challenge for a lot us. I'm slowly getting to the point of figuring out the final configuration for my chains/belt and will remind myself of your well thought out approach when I'm tempted to wing it. I like what you did there with the coaster brake arm anchor. I had used a Ridley arm on a build and the anchor bolt pulled through the arm allowing the arm to wrap around the hub. Maybe that's why the Ridley arm isn't available anymore.
 

indian22

Well-Known Member
Dec 31, 2014
4,725
7,709
113
Oklahoma
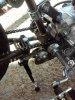
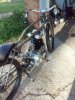
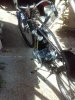
Thanks Harold, yet I confess that planning is often only the prelude to failure & ultimately to discovery. Just a day after disclosing I'd use the excellent Sportsman idler on the motor side I found that an extra bracket would be required to place the sprocket at the proper height or I could just use a smaller roller (or idler sprocket) partially hidden by the chain stay & the adjustment tab provided with the Sportsman frame, which worked out well.

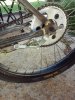
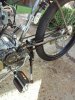
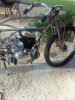
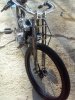
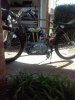
At first I was bummed out that I'd so misjudged the chain slope from the 14 tooth bottom bracket sprocket to the 40 tooth final drive sprocket which slope is of course much shallower than it was on the 56 tooth sprocket used on the Simplex build. The result was chain rub on not only the chain stay but on the side of the drive off stand as well. If you recall I had much the same issue on the pedal side but caused in reverse by the much smaller diameter pedal sprocket required to clear the engine case. On both sides of the bike I failed to recognize that chain slope angle was going to create problems. The good news on my chain setup is that I've got 90% of axle adjustment remaining at the drops and I've great side to side tire to frame clearance with the wheel true and centered.

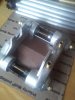
Harold I suppose a few posts regarding the basics of setting up the triple chains from a variety of builders would be beneficial to not only novices but experienced builders as well. I offer my previous explanation as proof that multiple chain setup can be a design headache even with planning. I've stated previously that I prefer my motor mounts to not adjust fore and aft. I want the motor & frame locked in position. I do use spacers side to side for initial motor alignment, but once spaced and bolted in the motor is not moved until major engine work is required. The Keystone cradle design of the current Harley Peashooter allows the engine to be dropped and left in the cradle for much bench repair & then reinserted into the frame with no engine to frame realignment required! The Simplex Copper Gator would require both front to rear and side to side motor adjustment of the 125 cc 5 speed case after removal from the frame.

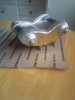
As to the coaster brake lever to Heim joint adjusters; I use these in all kinds of setups, big suspension links, throttle linkage, board track saddle supports etc. on automotive, trucking and bikes as well. Handy little critters that look trick as well.

My observation; no one knows even most of the tricks when it comes to things mechanical. Share something amazing & useful! Rick C.
 

fasteddy

Well-Known Member
Feb 13, 2009
7,454
4,920
113
British Columbia Canada
Rick, it's good timing that you mention planning is the prelude to failure and ultimately to discovery. I just went through that an hour ago.

The heim joints on the brake are genius and if you don't mind I'd use it for the tri car. The details in the build never stop and anyone seeing it will spend a lot of time marveling at them.

Steve.
 

indian22

Well-Known Member
Dec 31, 2014
4,725
7,709
113
Oklahoma
Props are welcome Steve. Heim joints on the coaster I think I actually borrowed myself can't recall, at any rate even if it was original all would be welcome to use. The Heims are quarter inch & I would highly recommend using grade 8 bolts to join the two Heims together as well as fasten to frame and brake lever.

I'll re size my primary chain today & pull the forks to lube the headset bearings and install new toggle bushings as well. I reviewed my hand shift design & believe I've found a way to properly mount the shift lever on the right side of the frame therefore leaving the clutch lever on the left hand side of the bars with front brake lever on the throttle side. I know Harley ran the lever on the left side of the tank but I'm thinking it will be safer for daily driving not to reverse my handlebar controls of brake and clutch. The lever is period correct but like the brass push rod tubes just reversed in location to an original HD. Remember it's not intended as an exact replica just built in the spirit of an early flat tracker that serves dual duty as a daily rider as well as a weekend track racer.

Still much to do. Rick C.
 

indian22

Well-Known Member
Dec 31, 2014
4,725
7,709
113
Oklahoma
The "chuckle head" rocker covers and side tubes part of the Harley Peashooter build has consumed more time than I'd imagined & today was no exception. The problem has not been just to make it look as though it's for real, but also since it utilizes a lot of individual pieces to achieve the believable look & is heavy to boot. Securely mounting the assembly to the engine & designing it in such a way that it can be quickly removed & reinstalled was also problematical, but I feel I've reached a workable solution, though I've yet to tackle the brass push rod side tube layout or put the finishing cosmetic touches on the rocker cover itself...we shall see.

Photos of inside & outside details of the rocker cover. Rick C.
 

Attachments

  • Like
Reactions: Nightster

indian22

Well-Known Member
Dec 31, 2014
4,725
7,709
113
Oklahoma
Rocker cover is now painted with High temp paint and securely mounted. I'll move on to complete the brass push rod tubes next. The little 125 cc really fills up the space & I have no doubt many observers will guess it's a 350 cc to 500 cc engine. That is if I can conceal the spark plug in what would be a really unbelievable position of...about halfway up the jug. Patience grasshopper.

Rick C.
 

Attachments

  • Like
Reactions: Nightster

Ludwig II

Well-Known Member
Jul 17, 2012
5,071
783
113
UK
That is going to have a lot of people bending over at funny angles trying to work it out.
 

indian22

Well-Known Member
Dec 31, 2014
4,725
7,709
113
Oklahoma
I've thought of adding springs & rockers but when the tank goes on all that will be covered. So no fun in that.

The way I've mirror imaged both sides of the "chuckle head" rocker cover side plates (unlike an actual H.D. knucklehead) would support a 4 valve appearance if I were to add two brass push rod tubes on each side of the jug. That kinda makes the dual exhaust port head more of a possibility as well, though we earlier nixed it as a power killer & not a straight bolt on for this particular Taiwan engine design variation.

This is really a fun part of the build that will indeed cause some to pause for more than a moment to sort out what they think they are seeing. Still just having fun! Rick C.
 

Attachments

  • Like
Reactions: Nightster

indian22

Well-Known Member
Dec 31, 2014
4,725
7,709
113
Oklahoma
Thanks Butch, it's coming together, I'm now deciding if my shift lever will be a tank style or a jockey shifter (behind the leg) or a hybrid position somewhere in between...I'm definitely sticking with the handlebar clutch setup regardless of shift lever position. Rick C.
 

indian22

Well-Known Member
Dec 31, 2014
4,725
7,709
113
Oklahoma
That Raleigh is nice. Tank shift mechanism is interesting, as is the engine. Simple layout & an elegant vintage bike. Rick C.
 

indian22

Well-Known Member
Dec 31, 2014
4,725
7,709
113
Oklahoma
Received word that my custom tooled leather saddle is being shipped. It is by far the most intricate design I've yet seen tooled in a bobber style. Over the top, deeply cut leather work depicting a helmet war mask. I'll post a photo, having trouble down loading for some reason after edit & re sizing. Rick C.