new guy with a wse on a phantom

GoldenMotor.com

rickenbiker

New Member
Aug 30, 2011
29
0
0
Bay Area, CA
No problem rickenbiker, just some inspirational photos. I really like the light set, the glass on that head light is something completely different from what I've seen before. Like an eyebrow. Do you know who it is made by?
I was planning on going with a fenderlight an removing the d-cell and replacing it with a high power LED or projector light from a car, but I am worried about it not aiming where I want it to.
I like the elctric panel too, I a thinking of something similar, but more like a box between the seat post and rear fender.

What kind of drum brake are you using? Could you add a clos-up of that?

Are you planning on putting a badge or chain guard on the bike?
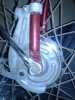
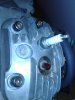
I picked up the light set on Ebay. It's NOS from 1945; called "Make-A-Lite". I couldn't resist the cool vintage look, and since my electrical system is magneto only, I wanted lighting to be independent of everything else.

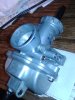
The red and black flask-shaped thingie mounted to the right seat stay is the generator. The taillight and headlights are very light-gauged stampings. It's obvious that the war effort was still on (VE day was still 4 months in the future when this was sold by Sears--the receipt was in the box!), because there was no plating (hardware is black oxide) and the headlight lens is vacuum-formed butyrate, not glass. It's shrunk and yellowed like butyrate does over time. I'm going to pull a vac-form mold from the lens and make a duplicate so the original one can be saved, as it's pretty brittle, and once gone, it's gone forever.

The stampings are very light gauge--I'm gonna say 24 gauge, and the paintwork is very thin. Wire is varnished cotton jacketed. But, still, I gotta say that the quality of "Made in USA", even during WWII, was pretty amazing. The generator itself is so far superior to the rest of the parts that I'm thinking it might be a design for the military--maybe the company had a bunch extra and decided to tool up for civilian lighting as a way to make a quick $$$.

The packaging for this set is loaded with vintage artwork, and the boxes will go on display in my office.

I don't think that a high-power car projector light would be a good idea--they operate on very high voltage and amperage. Even an ordinary OEM halogen bulb draws 7-10 amps.

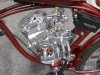
In truth, I wanted at least one damascened panel somewhere on the bike. Due to the way I've got the clutch cable mounted, there's no room for a box, so I did a quick lunch hour fab of the aluminum panel.

I'm gonna make a laser-engraved brass badge for it (maybe the old "Hennweigh" joke?), and the chain guard is an NOS Wald universal with the same crystal brass finish as the air cleaner and belt guard. Still have to make a bracket for it, and then there's partial disassembly and a trip to the powder coater.
 

rickenbiker

New Member
Aug 30, 2011
29
0
0
Bay Area, CA
Gun, as far as I know, it's a new Chinese-made replica of a 1950s bike drum brake (maybe Schwinn?). Got it on Ebay and mated it to a new alloy rim with new spokes.
 

younggun85

New Member
Jun 23, 2013
38
0
0
minnesota
Mason man I love the polish on your motor. How did you manage to get into all the tight spaces? Dremel?

Anyway I stopped in to snab the link to share with the guys over at the CABE and decided to catch up and update here. Since last time I received my complete whizzer kit and purchased a 1962 tandem which had a fork and drum brake from an earlier town and country tandem on it. So I plan on yanking the AS&CO drum brake for use on the whizzer which was the whole intention in buying it. It also came with a stem that has the AS bolts I might take that for the whizzer as well. Lastly I got a fander light cover off ebay which was only fair price, but atleast I've got one. Still need the rest of the light and the fender, but otherwise I am closing in on the parts I need. So far I have:
ENGINE PARTS:
WSE engine
Whizzer kit with:
Auto clutch -turns out it is a manual clutch
Rear Sheave
Belts
Controls -need an extra control for comp release to free up the brake lever
Carb -looks like a 22mm keihan
Tank
Electrical Harness
Exhaust pipe
BIKE PARTS:
1952 black phantom frame - now using a '51 canti frame
4 hole rack with stop light - adjustable 9 hole
stem w/ AS bolts
Heavy duty front AS&CO expander brake
Repop locking spring fork using original non-locking fork
Repop sring fork lock kit " "
Feather chainguard
Phantom sprocket
Handlebars (from '81 cruiser with extentions brazed on)
Schwinn deluxe seat for phantom

I need:
New Departure hub shell for heavy spokes (have many regular hubs and parts)
S2 Rims (have to decide whether to drill the ones I have or buy new ones
Front fenderlight fender/battery tray/switch/lens V V V V
Rear Fender (will have to notch one I have or buy new one) going fenderless for now
Horn (haven't decided what kind yet, might just go with a repop whizzer horn)
Heavy gauge spokes and nipples
Heavy duty tires
Pedals (would like to get Schwinn Deluxe blocks, but may settle for Persons)

Will post pictures soon.
 

Attachments

Last edited:

mason_man

Active Member
Jul 19, 2009
720
87
28
LA SoCal
Thanks younggun85, all the polishing was done by hand, 320 dry sandpaper, then with 400 wet. final was done with Blue Magic (Metal Polish Cream), was really pretty easy.

Your project looks to be getting real close, most of those parts can be found at the swap meets, we have a real good one here once a month in long beach.

Thanks again,
Ray

I'll look in the CABE and see if they like the new edition whizzer motor. they like throwing rocks sometimes.
 

younggun85

New Member
Jun 23, 2013
38
0
0
minnesota
looks like I will have to get sanding scratg
I started getting a good look at the two engines and am trying to figure out what I am going to need from the kit engine and trying to figure out what kind of clutch I have.
The WSE does not have the spring on the the back plate near the valve springs which I believe is used to hold the exhaust valve open to release the compression. Also the WSE has a valve on the top in the second hole.
The kit engine does have the spring and came with a bolt for the top to plug the other hole.
I will post pics soon.
 

younggun85

New Member
Jun 23, 2013
38
0
0
minnesota
The last few days I have decided to use the '51 canti frame I had without a project planned for it and decided to use it for the project and save the phantom frame to build a phantom out of.

Yesterday and today has been spent sanding and painting the frame and chainguard I will be using, next is the forks. Everything is getting a basic black rust converter spray job. I may go black with a silver accent. (because I already have black and silver spray paint. It can wear it's rattle can coat until I get everything else done and decide it is worth a new professional paint job, or I might just buy a nice original paint frame/fork/guard.

I've also managed to pull one of the seats from the tandem and start cleaning/restoring it. It has a black cover and I need a red one so I am getting this one ready to sell unless I can find a red cover, I was hoping the one I had would fit, but it is from a lightweight. Oh and I spent a bunch of time scrubbing the black paint off of that cover. (I can always use a lightweight pan too) Once the seats come off, then it's the handlebars, fenders and finally the wheels which I think I will be using for the time being. If they can be trued.

Then from there I will have most of the parts to assemble the bike and can start adding the engine and parts to it.

As far as the engine goes the only thing I have done is pull the carb and decided to pull the comp release.

I am wondering if anyone has thought about using that second hole as a spare plug holder. Fills the hole just like the bolt would, but makes sure you have a spare plug handy.

Also I included a picture of the carb I have. It looks like it is a 22mm keihin. Is this carb any good? I know I was looking for a 22mm or larger. One thing I noticed is the hole is slightly smaller then on the manifold. I would like to bore it out to make it just a little larger, would it make a difference if I made it about a mm wider on the carbs port?
 

Attachments

mason_man

Active Member
Jul 19, 2009
720
87
28
LA SoCal
Carb looks like a 20mm, if you uses it put in a #35 slow jet and star off with a 88 main jet, see what your plug looks like, needs more fuel or less, go form there. 22mm carbs are hard to get a hold of. the good one at least are.
i like the canti frames, plenty of room.
whats it look like now?

Ray
 

younggun85

New Member
Jun 23, 2013
38
0
0
minnesota
Thanks for the info, but I really think it might be a 22mm. I saw a post that these kits either came with the 22mm or 26mm, but the 26 was very rare. Also it is marked 22 on it. How would I measure to find out?
As far as it looks now it is still all in pieces I have the frame into primer and need to sand and possibly reprime then paint, sand possibly repaint, add the accents and repaint. I have one of the fork legs done and one of the struts. The struts are different and pretty bad so I decided to just paint them silver. I may end up getting a new pair depending on where I am financially when it comes time to assemble.
I picked up a phantom seat pan today, it came as a lot with 5 other seats for $20. So I basically paid $5 a piece for the other seats and got it for free, or paid $20 and got five seats for free.(^)
Here are some pics to keep the thread interesting though, until I get some better ones.


Last edited: