

What transmissions/gearboxes are folks using with these beasts, are their CVT's available for them? it just kinda sucks that the engine cylinder is pointed the the rear of the bike would be cooler pointed to the front . planning on picking one up today my girl got me $50 of gift certificates to HF so it will only cost me about $50 for the engine up front.
another 99 cc Predator build :)
- Thread starter jbcruisin
- Start date

It's possible to turn the motor around and reverse with the drivetrain.. I did it with a frictondrive jackshaft. You could also reverse rotation with a chain from motor to an idler and run a jackshaft sprocket in between them, on the OUTside of the chain.
Check out my thread of a Friction drive build
http://motorbicycling.com/showthread.php?t=30738
Check out my thread of a Friction drive build
http://motorbicycling.com/showthread.php?t=30738
Last edited:
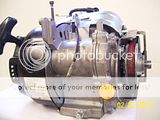
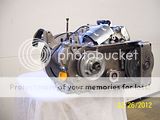
Soon ready to install it all. here's some pics of engine & drive stuff. The drive came out of the blue bike I posted a pic of in the first post & was attached to a 49cc Hua Sheng.


Last edited:
That's looking really good!
Did you have to modify the bolt holes in the EZM plate to match the Predator holes? Any modifications/ adjustments for parts clearance anywhere else?
I am really starting to regret getting the HuaSheng as I live in a very hilly area and it just doesn't have the grunt I want. It does great on flat ground and slight inclines though.
I am closely following your build and seriously considering upgrading to the 99cc and my HuaSheng isn't even broken in yet! It only has 45 minutes riding time.
All I did was drill 3 new holes & bolted it right on. The top front hole lined up. I did put an adjustable front pulley on it so I could easily adjust the gear ratio. I had to put an AX26 belt on it because it needs a longer belt with the adjustable pulley. Here's a link to the pulley.That's looking really good!
Did you have to modify the bolt holes in the EZM plate to match the Predator holes? Any modifications/ adjustments for parts clearance anywhere else?
I am really starting to regret getting the HuaSheng as I live in a very hilly area and it just doesn't have the grunt I want. It does great on flat ground and slight inclines though.
I am closely following your build and seriously considering upgrading to the 99cc and my HuaSheng isn't even broken in yet! It only has 45 minutes riding time.
http://www.grainger.com/Grainger/ww...uery=1X448&op=search&Ntt=1X448&N=0&sst=subset


Excellent. Looking from above, where is the oil drain plug in relation to the center line of the frame?
I got my engine a couple of weeks ago for $112.00 with shipping... pretty amazing. I've made my throttle linkage up, removed the governor and shroud covering part of the head. Thanks for your Granger link. I've ordered the pulley and belt which should be here mid week. This morning I pulled the H.S. engine and made alterations to the engine mount, extending the slots on the sides so the mount can go higher than I had it with the H.S. I was worried that the engine might not fit in a panther frame and was surprised to discover that it fits more easily than the H.S. did. While the Predator engine is wider and longer, the H.S. is taller and made installation dicey. I may be ale to use a normal sized pedal sprocket now instead of the small kiddie sprocket I needed to get as much vertical space as i could. Greatly relieved that it is going to fit and very much looking forward to trying it out, hopefully next weekend.
Thanks for posting the thread and also thanks to AzBill for his informative installation thread. I think this engine is going to be just right.
SB
The drain comes out the front & lines up with the front frame tube. My engine sits kind of high so that I wouldn't have to heat my cranks & bend them out further. Yeah, the engine is much shorter in height than the 49cc HS. I'm looking forward to the extra power. Check out the glass sediment bowl under the gas tank. I just installed that. A friend of mine makes an adapter for the newer Whizzer tanks to make the glass sediment bowl fit.
Thank you sir, that will help with the initial mounting of the engine. Did you need to alter the slots in the engine mount where the bolts fit through into the bottom of the engine?
Your fuel sediment bowl looks good. Really helps to give it a vintage look. Now that my Panther is getting the engine upgrade I'm thinking it is time to bite the bullet and try welding up an in frame gas tank. And I think it's going to need a nice fuel bowl like yours to go with it.
SB
Your fuel sediment bowl looks good. Really helps to give it a vintage look. Now that my Panther is getting the engine upgrade I'm thinking it is time to bite the bullet and try welding up an in frame gas tank. And I think it's going to need a nice fuel bowl like yours to go with it.
SB
I fit the mount to the frame & had it together with 4 vise grips. I was going to re drill the holes but welded it together instead. With bolts it sags in the middle if it's stretched too long. I used allen head bolts because the 2 holes on the one side were near the edge of the mount. The fuel bowl is made by Stens & I got one at a local lawnmower shop for $12.50Thank you sir, that will help with the initial mounting of the engine. Did you need to alter the slots in the engine mount where the bolts fit through into the bottom of the engine?
Your fuel sediment bowl looks good. Really helps to give it a vintage look. Now that my Panther is getting the engine upgrade I'm thinking it is time to bite the bullet and try welding up an in frame gas tank. And I think it's going to need a nice fuel bowl like yours to go with it.
SB
looks good Jay ")
are you gonna stick with the stock air cleaner ???
I think it is way to big for the little bit of air that can get through those small holes
I have been sick and haven't done much on my build yet
are you gonna stick with the stock air cleaner ???
I think it is way to big for the little bit of air that can get through those small holes
I have been sick and haven't done much on my build yet
Last edited:
I'm not running an air filter on it. I have 6 bikes & only the tandem has an air filter. I get better performance (air flow) without one. I know people will complain about me not running one but I've never had a problem because of it. Hope you get well soon Bill.looks good Jay
are you gonna stick with the stock air cleaner ???
I think it is way to big for the little bit of air that can get through those small holes
I have been sick and haven't done much on my build yet
Last edited:
Today I took it out for the first real test ride. I opened it up & it went up to 46 mph easily. It was doing 6000 rpm's according to my "Tiny Tach". Goes great up hills. I'm very happy with it.
Jay, How did you determine where to drill the other three holes?All I did was drill 3 new holes & bolted it right on. The top front hole lined up. I did put an adjustable front pulley on it so I could easily adjust the gear ratio. I had to put an AX26 belt on it because it needs a longer belt with the adjustable pulley. Here's a link to the pulley.
http://www.grainger.com/Grainger/ww...uery=1X448&op=search&Ntt=1X448&N=0&sst=subset
I'm at that point next and maybe what you did is simpler than what I'm figuring to do.
I got the engine mounted today and did away with the stock kit mounting plate as it was too great a stretch. I kept the cast iron pieces which attach to the front down tub and to the seat post tube and used two pieces of angle iron from an old bed frame. Seems to work fine. All that's left is running the exhaust, hooking up the throttle cable, joining the transmission to the engine, align drive chain and give it a go.
I put oil in it today and gas in the tank... gave it three pulls to get gas to the carb and it started right up. Going to be a little on the loud side I think.
I see in your most recent post that you got it up to 46 mph today. Not too shabby and faster than I want to go. I think this is a lot of motor for the money.
SB
It's a 26" Schwinn Cantilever frame with 24 inch wheels.Hey jb... What kind of bike is yours ?
When I bolted the front top hole to the engine I raised it until the drive hit the engine & lowered it a little & drilled the other 3 holes. I kind of measured & guessed their exact position & it lined up.Jay, How did you determine where to drill the other three holes?
I'm at that point next and maybe what you did is simpler than what I'm figuring to do.
SB
Thanks, Jay.When I bolted the front top hole to the engine I raised it until the drive hit the engine & lowered it a little & drilled the other 3 holes. I kind of measured & guessed their exact position & it lined up.
SB
silverbear, you can also use a sacrificial clear piece of plexi-glass or similar material to make a template. Drill your first hole and attach the 'glass to the engine. (This will also be the reference locating hole when transferring the hole locations from the template to the reduction drive backing plate.) Since you can see through the 'glass you can easily locate the other three holes and drill them to complete the template.
Attach the template to the reduction drive backing plate using one bolt through the reference locating hole and I know that you can figure out the rest....
Attach the template to the reduction drive backing plate using one bolt through the reference locating hole and I know that you can figure out the rest....