

The Rustoration Build Off
- Thread starter BarelyAWake
- Start date

Very ossum man - I can't wait to see it all bolted up and ready to go! 
Insofar as the Rollfast's progress... tank is waitin' for my buddy to have a lil time to get to it and I? Well, I'm sittin' and starin' out the window... /sigh

Patience is overrated

Insofar as the Rollfast's progress... tank is waitin' for my buddy to have a lil time to get to it and I? Well, I'm sittin' and starin' out the window... /sigh
Patience is overrated
True enough, unless of course it's an oncoming train. In this case it should be a UPS truck, so all is good.it's always nice to see the light at the end of the tunnel
SB
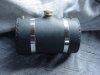
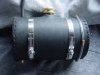
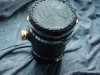
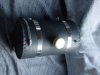
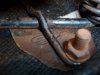
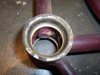
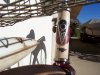
Here's the latest version of the juice can gas tank. Thanks to seeing BarelyAWake's hardware for his in frame tank, I got to thinking about how nice it would be to have a sight gauge, especially on a tank with a small filler. It's hard to see in there and you just about need a dip stick to know how much fuel there is, so this is my version of a sight gauge on a behind the seat round tank. The second little fitting at the top of the tank is for the black vent hose which will tuck under the seat. The sight gauge will be on the side facing the seat. I got some weird looks at the hardware stores when I asked about small gauge copper tubing for a sight gauge for a gas tank made from a juice can for my 1939 motorbicycle... "huh, whazzat?" Can't imagine why I'm the only one looking for some. I finally found what I was looking for at a heating/plumbing outfit and later realized I already had a chunk from a dead gas heater thermocouple. It's the next size down from 1/8", don't know what size that is, but it works along with the smallest gauge clear tubing from Ace. Thanks, Barely. My "fittings" aren't really fittings, but just short lengths of the small tubing fit into equally small holes top and bottom punched with an awl. The price is right and I'm the only kid on my block with one like it. I think I'll take it in to the hardware for show and tell. I also stitched up a matching harness leather cover for a funnel made from copper tubing and a little mushroom can. Designer gas stuff. Forgot to take a picture of that. I think maybe I have too much idle time on my hands with lousy weather. Come on sunshine...
SB
SB
Attachments
-
 228.5 KB Views: 152
 -
 227.8 KB Views: 131
 -
 225.2 KB Views: 147
 -
 236.5 KB Views: 135
 -
 231.9 KB Views: 143
A piece of art, man! Makes me want to try out the soldering again after my last soldering failure, just need the time for it.Here's the latest version of the juice can gas tank. Thanks to seeing BarelyAWake's hardware for his in frame tank, I got to thinking about how nice it would be to have a sight gauge, especially on a tank with a small filler. It's hard to see in there and you just about need a dip stick to know how much fuel there is, so this is my version of a sight gauge on a behind the seat round tank. The second little fitting at the top of the tank is for the black vent hose which will tuck under the seat. The sight gauge will be on the side facing the seat. I got some weird looks at the hardware stores when I asked about small gauge copper tubing for a sight gauge for a gas tank made from a juice can for my 1939 motorbicycle... "huh, whazzat?" Can't imagine why I'm the only one looking for some. I finally found what I was looking for at a heating/plumbing outfit and later realized I already had a chunk from a dead gas heater thermocouple. It's the next size down from 1/8", don't know what size that is, but it works along with the smallest gauge clear tubing from Ace. Thanks, Barely. My "fittings" aren't really fittings, but just short lengths of the small tubing fit into equally small holes top and bottom punched with an awl. The price is right and I'm the only kid on my block with one like it. I think I'll take it in to the hardware for show and tell. I also stitched up a matching harness leather cover for a funnel made from copper tubing and a little mushroom can. Designer gas stuff. Forgot to take a picture of that. I think maybe I have too much idle time on my hands with lousy weather. Come on sunshine...
SB
Greetings from a snow storm in Sweden. Also bedtime.
silverbear, that is a really good idea.
I'm waiting on the truck, too, but i haven't been staring out the window.
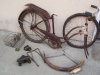
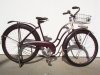
got my girl's Colson yesterday out of the UPS jail, and spent half yesterday and all day today taking it apart, cleaning it, and putting it back together.
the hash marks in the front fender and the dent in the rear rack support are thanks to lousy packing and crappy shipping, but it cleaned up real good.
it had some cool surprises inside, too.
there was an accessory list stuck in the fork tube, installation instructions on a tag under the seat, pink innertubes, and a piece of cork stuck in the downtube, inside the bottom bracket shell.
it's all done, and the only thing i replaced was the tubes. i re-used every bolt and nut, after cleaning them up.
don't have any pics, 'cause i finished after dark, but i'll post some tomorrow.
this ain't getting motorized, i'm gonna try to sell it complete. if i don't have any takers, i've got a line on a man's frame, just like my 24, only a 26, with the drop stand wings, so i could swap over all the parts. i dunno yet.
my other Colson Motor Bike frame and fork is scheduled to be here tomorrow (but i'm not holding my breath,) and then the real fun begins. but that bike's getting it's own thread. it just wouldn't be fair to have 2 (or 3) bikes entered in this build-off.
I'm waiting on the truck, too, but i haven't been staring out the window.
got my girl's Colson yesterday out of the UPS jail, and spent half yesterday and all day today taking it apart, cleaning it, and putting it back together.
the hash marks in the front fender and the dent in the rear rack support are thanks to lousy packing and crappy shipping, but it cleaned up real good.
it had some cool surprises inside, too.
there was an accessory list stuck in the fork tube, installation instructions on a tag under the seat, pink innertubes, and a piece of cork stuck in the downtube, inside the bottom bracket shell.
it's all done, and the only thing i replaced was the tubes. i re-used every bolt and nut, after cleaning them up.
don't have any pics, 'cause i finished after dark, but i'll post some tomorrow.
this ain't getting motorized, i'm gonna try to sell it complete. if i don't have any takers, i've got a line on a man's frame, just like my 24, only a 26, with the drop stand wings, so i could swap over all the parts. i dunno yet.
my other Colson Motor Bike frame and fork is scheduled to be here tomorrow (but i'm not holding my breath,) and then the real fun begins. but that bike's getting it's own thread. it just wouldn't be fair to have 2 (or 3) bikes entered in this build-off.
Attachments
-
 393.7 KB Views: 478
 -
 212.5 KB Views: 109
 -
 238.8 KB Views: 98
 -
 251 KB Views: 111
 -
 198.8 KB Views: 107
Mekano & Bairdco, thanks for the kind words. Mekano, maybe you'd better not master soldering. It's like I just learned how to play the piano and can't stop. I have three tin can funnels now, one in-frame tin can tank for a Worksman paperboy in progress and seven or eight prototypes of the behind the seat tanks in different sizes and configurations. Good thing the materials are cheap. Seriously, you'll get a feel for it as you go along. Just clean up the to be soldered areas really well, use silver solder with the appropriate flux made for that and experiment with the torch temperature. Do it something that doesn't matter until you're ready for the real thing. I'm at that stage right now with aluminum brazing rods, getting a feel for the materials. It's kinda fun.
Bairdco. Interesting how you are now the Colson man and I've kind of fallen into a groove with the Elgins. I like the step through you just got and can see it with a motor easily enough. I know you're thinking to sell it as an original which is kind of where I am with the 38 Elgin I recently got on ebay... complete and in pretty nice condition, so I think I'll just continue cleaning it up and bide my time before doing anything about motorizing. I may just list it on the website (still to be made)as it is and see what happens. You have a lot of good parts there to complete a man's frame. I especially like that rear rack. I think I told you that one of the rear drop stands with the hardware from the fender that holds it in place went for $99.99 on ebay. I see why people take these old ones apart to sell as parts, but it just doesn't feel right to me somehow when a bike is all there. I don't know. Anyway, nice score and I'll look forward to seeing pictures of the "new" Colson. What years are these? I'll also look forward to your new thread.
SB
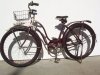
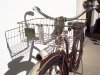
you're right, SB, i'm all about the Colson's. in my opinion, these are the best built, best looking bikes ever. i've got three now, one supposed to be here today, and a frame i'll probably get next week. and if i find any more...
i'm pretty sure it's a 1937, but i could be wrong. there's no real database, just people trying to decipher serial numbers. parting it out could make some money, but i really don't want to, since this bike's complete (except for new tubes.) there's a rear rack on ebay right now with 17 bids, 4 days to go, and it's $46 already...
if it doesn't sell for as much as i want, i'll convert it to a man's motor bike, probably. the enameled rims are beautiful, and i could just re-spoke them with 12 gauge and use 90% of the parts.
i cleaned it all up, using nothing but WD40, steel wool, and my new favorite tool, the 3M scotchbrite wheel. this thing is amazing. no more wire wheels, ever! strips rust off chrome effortlessly. shines rusty bolts to a mirror finish. not that good for old paint, but i like old paint.
here's some pics...
Attachments
-
 276.4 KB Views: 478
 -
 278 KB Views: 106
 -
 263.1 KB Views: 437
 -
 219.6 KB Views: 93
 -
 480.4 KB Views: 138
Bairdco,when I worked in different friends body shops those wheels were called whizzer wheels because the main use was getting paint off an area to see the damage or to chase rust out of an area. When they said whiz the paint off that, that is what they meant.
After I whizzed the back off my hand, I learned gloves are a good thing.
Steve.
After I whizzed the back off my hand, I learned gloves are a good thing.
Steve.
i just got my new frame, and tried out the "whizzer wheel" on it. works pretty good at removing paint, as long as it's not too thick.
i'm off to post pictures on my new thread...
i'm off to post pictures on my new thread...
Hey silverbear - I'm glad you came up with such a great solution for your fuel sight level, not only do I think it looks far better for your tank than the lil brass fittings I used, but I've been completely unable to get any answers from anyone I work with - they all give me the "I dunno" crazy look lol... that's what I get for usin' stuff outa the "junk drawer" I guess.
Your version is far more functional than mine too - given the size of the in-tank part of the fittings and the backings I needed to use (and the rear curve of the tank) mine are really only good for gauging "the point of no return" ...which is fine and all I really wanted, but yers is obv more functional w/a full range, nice job man")
The FedEx truck came and went, leaving me my goodies... and some problems as well. I didn't expect the dropstand to fit this build so there was no surprise involved when it didn't, but at least now I know it'll be yet another thing I'll hafta fabricate. I dunno if I mentioned this - but I decided to go w/the CNS instead of the Dellorto as I didn't feel like experimenting w/jetting too at this stage. I figure it'll be a nifty thing to check out and if I don't like it - it'll get passed down to the Schwinn. The problem arises that as the CNS is larger than the stock and as I didn't have it when I was making the tank - the air filter and the fuel filter want to occupy the same space... a touch awkward but not irresolvable, I just need my tank so I can figure out a solution.
Sadly the thing I was lookin' forward to doing will also hafta wait a while longer. I wanted to paint & detail my new fenders for a change of pace (and to give me that "progress" feelin' heh) but as it turns out they were damaged during shipping AND the rear fender isn't nearly the "full length" I thought it was. I suppose I could raise a stink about the dents and the busted off reflector - but I didn't want a reflector anyway and for $20 I think I'll just try again w/a different set. I hafta re-bend the sides of the front to clear the springer, so a "practice" fender is worth it I suppose.
So... after all that waitin' - I'm back to watin' again *shrug* Good thing it's still winter lol perhaps I'll bite the bullet and actually clean & paint the chainguard & rack this weekend? Perhaps...
Your version is far more functional than mine too - given the size of the in-tank part of the fittings and the backings I needed to use (and the rear curve of the tank) mine are really only good for gauging "the point of no return" ...which is fine and all I really wanted, but yers is obv more functional w/a full range, nice job man
The FedEx truck came and went, leaving me my goodies... and some problems as well. I didn't expect the dropstand to fit this build so there was no surprise involved when it didn't, but at least now I know it'll be yet another thing I'll hafta fabricate. I dunno if I mentioned this - but I decided to go w/the CNS instead of the Dellorto as I didn't feel like experimenting w/jetting too at this stage. I figure it'll be a nifty thing to check out and if I don't like it - it'll get passed down to the Schwinn. The problem arises that as the CNS is larger than the stock and as I didn't have it when I was making the tank - the air filter and the fuel filter want to occupy the same space... a touch awkward but not irresolvable, I just need my tank so I can figure out a solution.
Sadly the thing I was lookin' forward to doing will also hafta wait a while longer. I wanted to paint & detail my new fenders for a change of pace (and to give me that "progress" feelin' heh) but as it turns out they were damaged during shipping AND the rear fender isn't nearly the "full length" I thought it was. I suppose I could raise a stink about the dents and the busted off reflector - but I didn't want a reflector anyway and for $20 I think I'll just try again w/a different set. I hafta re-bend the sides of the front to clear the springer, so a "practice" fender is worth it I suppose.
So... after all that waitin' - I'm back to watin' again *shrug* Good thing it's still winter lol perhaps I'll bite the bullet and actually clean & paint the chainguard & rack this weekend? Perhaps...
Barely,
Thanks for the nice comment on the sight gauge. Today I'm removing the tank I had made before for the 39, will rip out the stitching for the leather and add a sight gauge to that one and then stitch it back up. During the cold snap I'm also making up a couple more for use in builds next summer. This is the tank I wanted and now I know what it looks like and how to make it. This forum is so cool in the way we help each other by example, with encouragement and suggestions. Rockenstein looks at an apple juice can and sees a gas tank. I look at what he has done and make my own. You fabricate an in frame tank (believe me when I say that it has inspired others) and show a couple little fittings for a sight gauge (I didn't even know there was such a thing) and I decide I want one, too. You watch... someone out there is going to add one to a kit peanut tank (one that has not had gas in it yet, I hope), all from your little fittings for a sight gauge. And it goes on. We admire and pat each other on the back for the improvements which come from here and there... chain tenshioners and engine mounts, ways of stripping down an old bike and ways to make a new one safer. I think it is really exciting about the after market parts becoming available... parts made here in America from guys like Pablo and Ghost, Jim at Creative Engineering, and Quentin Gunther to name just a few. I can see a point where these engines are truely Chinese Americans of a second generation. Cool stuff from a great forum. I didn't mean to wax eloquent there, but can't really contain my enthusiasm for this group. Thanks to all...
Regarding the rear drop stand... you know this will require another tutorial, don't you? I've been giving it some thought, too, and I hope others will contribute their own vision and knowledge so that we can make our own using different approaches, different skills and materials. One thing to think about is something I read from the classic bike forum (can'[t think of the name right now) where there was talk about how those stands tend to rattle at the fender catch as you ride (one reason so many are missing on pre war bikes). I noticed on my 38 Elgin recently purchased that the drop stand had a few turns of friction tape it, I would guess to make it quieter. So we have to not only figure out how to fabricate the stand, but also how to affix it to the fender in a more secure or at least quieter way. Maybe heat shrink or a section of vinyl hose... something. As always, I'll be watching to see what you do so that I can learn. This forum is like going to motor bicycle school. Finally I have found a school I like. Ha!
Colder than the proverbial witches ..., eh? In the teens here in Maryland and 20 some below back home in Minnesota. Must be right snappy there in Maine. Spring will come eventually. Stay warm, Bud.
SB
NP w/the "waxing eloquent" man - every word ya said is the absolute truth as I see it. I wouldn't have even thought of a vintage build were it not for this place and the examples ppl have shown - my "plan" was to build the Schwinn as a test platform then to move on to a full suspension "dirtbike" build... ofc this was all before I found the forum and was thereby enlightened by all the nifty toys
I've been a motorhead and general tinker all my life - but I'll be the first to admit I knew little to nothing about bicycles before this, my experience with them ended when I discovered motorcycles... when I was like 12 or so lol While it's tru that they're far simpler machines than I'm used to dealing with - it's just as tru that they have their lil secrets and complexities and I'm far better off with a place like this to learn from. I do so dearly love being able to learn from other people's mistakes - as cruel as that may sound heh
I may be inured to the oddities involved in attempting some half-baked scheme to build something different than anyone else I know - but I find much comfort in this forum where my ideas aren't nearly as "different" as I thought, nor I the odd one out
and yea - it's freakin cold
After thousands of miles of outright abuse, my Schwinn finally started to react to the neglect and general lack of maintenance caused by my current infatuation with an older woma... *cough" bicycle. Jealous despite the fact I use it everyday, it started squeaking complaints and exposed it's homicidal desire for revenge by refusing to stop when I suggested it might behoove us to avoid such things as gleefully hurtling out into traffic without so much as a pause.
*sigh* Dirty, dirty girl o.o

So... I spent the weekend consoling it and attending to it's various woes. In the end it was all minor - all examples of neglect and nothing that couldn't be easily repaired, or even prevented had I thought to take the time to do something about it in the first place. Dirty air filter, dry chains, worn brake pads, a layer of filth covering corrosion caused by constant exposure to the salt used so heavily on the roads around here - and perhaps my not-so-subconscious desire to "test to destruction" my first Chinese engine kit. As it seems far more interested in destroying me than any signs of quitting, I figured it would be best to do something about it
One of the many things on my endless "to do" list was to pull the SBP exhaust system off the Schwinn. While I've not had any problems with it, the hi-temp tubing only starting to signs of age - the relentless assault of winter usage was beginning to take it's toll and the head pipe in particular developing an excessive amount of rust. Nothing that a lil time spent cleaning and a shot of hi-temp paint wouldn't fix, I didn't bother to attend to it sooner as I plan on using just the chamber and silencer on the Rollfast with the pipe from another stock exhaust serving to eliminate the various chunks of copper tubing and whatnot, providing a "cleaner" look for the Rollfast.
As I didn't particularly wish to spend the full amount for just the expansion chamber (I've made my own silencer) I thought I'd be satisfied with simply downgrading the Schwinn back to stock... wow... I'd forgotten just how significant a gain that dang thing actually provided despite my fondness for that particular system. As the Schwinn now seems doggy like I'm pulling a heavily laden trailer I suppose come spring it'll get an all new one... it's just plain unacceptable to consider the local mopeds might actually keep up with me... gawd forbid they actually should be able to pass me after all my bravado
Nevertheless - I'm overjoyed at the overall reliability my "test platform" Schwinn has provided, justifying the expense and labor involved in building the Rollfast. Odd as it may sound and in direct contradiction to those that would slander these el cheapo kits - my motorized bicycle has proven significantly more trustworthy than expected, far surpassing even the various cars that my coworkers and housemates are using for their winter driving - every one of which has been down for expensive repair at one point or another (granted they're beaters - but still).
Eminently satisfied with the cost/labor/reliability of my first build - it's four thousand some-odd miles of faithful service providing vindication for the far more intensive Rollfast project, I'm actually relieved at the Schwinn's minor complaints
Now... if my buddy would just finish weldin' my freakin' tank I could get some real work done lol
Jealous despite the fact I use it everyday, it started squeaking complaints and exposed it's homicidal desire for revenge by refusing to stop when I suggested it might behoove us to avoid such things as gleefully hurtling out into traffic without so much as a pause.*sigh* Dirty, dirty girl o.o
So... I spent the weekend consoling it and attending to it's various woes. In the end it was all minor - all examples of neglect and nothing that couldn't be easily repaired, or even prevented had I thought to take the time to do something about it in the first place. Dirty air filter, dry chains, worn brake pads, a layer of filth covering corrosion caused by constant exposure to the salt used so heavily on the roads around here - and perhaps my not-so-subconscious desire to "test to destruction" my first Chinese engine kit. As it seems far more interested in destroying me than any signs of quitting, I figured it would be best to do something about it
One of the many things on my endless "to do" list was to pull the SBP exhaust system off the Schwinn. While I've not had any problems with it, the hi-temp tubing only starting to signs of age - the relentless assault of winter usage was beginning to take it's toll and the head pipe in particular developing an excessive amount of rust. Nothing that a lil time spent cleaning and a shot of hi-temp paint wouldn't fix, I didn't bother to attend to it sooner as I plan on using just the chamber and silencer on the Rollfast with the pipe from another stock exhaust serving to eliminate the various chunks of copper tubing and whatnot, providing a "cleaner" look for the Rollfast.
As I didn't particularly wish to spend the full amount for just the expansion chamber (I've made my own silencer) I thought I'd be satisfied with simply downgrading the Schwinn back to stock... wow... I'd forgotten just how significant a gain that dang thing actually provided despite my fondness for that particular system. As the Schwinn now seems doggy like I'm pulling a heavily laden trailer I suppose come spring it'll get an all new one... it's just plain unacceptable to consider the local mopeds might actually keep up with me... gawd forbid they actually should be able to pass me after all my bravado
Nevertheless - I'm overjoyed at the overall reliability my "test platform" Schwinn has provided, justifying the expense and labor involved in building the Rollfast. Odd as it may sound and in direct contradiction to those that would slander these el cheapo kits - my motorized bicycle has proven significantly more trustworthy than expected, far surpassing even the various cars that my coworkers and housemates are using for their winter driving - every one of which has been down for expensive repair at one point or another (granted they're beaters - but still).
Eminently satisfied with the cost/labor/reliability of my first build - it's four thousand some-odd miles of faithful service providing vindication for the far more intensive Rollfast project, I'm actually relieved at the Schwinn's minor complaints
Now... if my buddy would just finish weldin' my freakin' tank I could get some real work done lol
Last edited:
After thousands of miles of outright abuse, my Schwinn finally started to react to the neglect and general lack of maintenance caused by my current infatuation with an older woma... *cough" bicycle.
*sigh* Dirty, dirty girl o.o
So... I spent the weekend consoling it and attending to it's various woes. In the end it was all minor - all examples of neglect and nothing that couldn't be easily repaired, or even prevented had I thought to take the time to do something about it in the first place. Dirty air filter, dry chains, worn brake pads, a layer of filth covering corrosion caused by constant exposure to the salt used so heavily on the roads around here - and perhaps my not-so-subconscious desire to "test to destruction" my first Chinese engine kit. As it seems far more interested in destroying me than any signs of quitting, I figured it would be best to do something about it
One of the many things on my endless "to do" list was to pull the SBP exhaust system off the Schwinn. While I've not had any problems with it, the hi-temp tubing only starting to signs of age - the relentless assault of winter usage was beginning to take it's toll and the head pipe in particular developing an excessive amount of rust. Nothing that a lil time spent cleaning and a shot of hi-temp paint wouldn't fix, I didn't bother to attend to it sooner as I plan on using just the chamber and silencer on the Rollfast with the pipe from another stock exhaust serving to eliminate the various chunks of copper tubing and whatnot, providing a "cleaner" look for the Rollfast.
As I didn't particularly wish to spend the full amount for just the expansion chamber (I've made my own silencer) I thought I'd be satisfied with simply downgrading the Schwinn back to stock... wow... I'd forgotten just how significant a gain that dang thing actually provided despite my fondness for that particular system. As the Schwinn now seems doggy like I'm pulling a heavily laden trailer I suppose come spring it'll get an all new one... it's just plain unacceptable to consider the local mopeds might actually keep up with me... gawd forbid they actually should be able to pass me after all my bravado
Nevertheless - I'm overjoyed at the overall reliability my "test platform" Schwinn has provided, justifying the expense and labor involved in building the Rollfast. Odd as it may sound and in direct contradiction to those that would slander these el cheapo kits - my motorized bicycle has proven significantly more trustworthy than expected, far surpassing even the various cars that my coworkers and housemates are using for their winter driving - every one of which has been down for expensive repair at one point or another (granted they're beaters - but still).
Eminently satisfied with the cost/labor/reliability of my first build - it's four thousand some-odd miles of faithful service providing vindication for the far more intensive Rollfast project, I'm actually relieved at the Schwinn's minor complaints
Now... if my buddy would just finish weldin' my freakin' tank I could get some real work done lol
*headaches* yep, you got a really busy to do list!!!
we cleaned out the basement so my mom made me put my bike down there.... I haven't been making progress 'cuz I am "using all of my time (lol not really) on my electric biek for this years science fair.
Itz almost done, just need to weld on the motor
but the welder isn;t with me.. arrhhI haven't around to fixing the crabk, I just wanna toss that lil' sucker in the garbage!!!
Got yer bike project in the just-cleaned-out basement? Grab this golden opportunity to stake a claim and make yerself a lil shop area FTW! Bordered in black & yellow hazard tape anna few signs warning of electrical death to fend off the tool borrowers, a basement shop is ossum in the summer when it's stupid hot outside
Ofc the ocean ignores such signage and fears no man, intruding on mine from time to time... but I don't think it a concern w/yers lol
Ofc the ocean ignores such signage and fears no man, intruding on mine from time to time... but I don't think it a concern w/yers lol
Weekend fun,
As I recall a bike shop managed to get the bearing nut loose and repacked the bearings, but the pedal would not come off no matter what. If it were me and the only thing standing between me and being able to mount the motor... I'd cut that crank arm below the pedal and remove the whole assembly. A replacement crank is no big deal. A donor crank and bearings from another bike can be bent or get a shorter crank arm from a vendor or donor bike (a 20" bike will have a shorter crank) and cranks from newer bikes coming from Japan and China are usually wider. That's what I've done on a couple older Schwinns. What to do depends on what the problem is and what kind of engine is going in there. If it's a bump start then you just need a little more width so you can either bend one a bit or swap out one from an oriental bike. If you have a pull start or automatic then you need more room and a shorter crank will work well. Or you can buy a specially made extra wide three piece crank and an adapter to allow using it to replace a one piece crank. The last option is the most expensive, but an easy answer to the problem. It seems a shame to dump the project just because of that crank clearance problem.
SB
hmm...
K- so as much as I didn't wanna, I'm gonna hafta fab up some mounts and make a "proper" reproduction rear drop stand for my Rollfast, the aftermarket one just isn't gonna work (and I'm not fond of alla spring business, looks cluttered).
I've more than one "solution" screamin' for attention in me brain - but by far the simplest is to just make a weld-on equivalent of the stock option offered on various vintage bikes... like yers o.o
So I ask a favor of ya'll - if you've got a moment (and a bike w/the mounts lol) couldja take a close up pic or two and post 'em? Best yet (if it's not to much trouble) with a ruler held next to it for scale? It's not really needful ofc, I can jus' "freehand" something - but with a pic w/a ruler I can scale it in Photoshop and make an exact duplicate, if altered to fit my bike's slightly different dropouts.
Thanks guys