New BoardTrack Project w/Honda Engine

GoldenMotor.com
Jul 8, 2009
62
1
6
My Garage
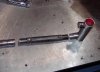
Thats a stroke of luck finding someone to bend just one piece, but in todays economy ya gotta take what you can get. I had called around in my area (Northeast Ohio) when I was ready to bend my 1" DOM tubing (one bend) and after a few sorrys and one $300 dollar set-up fee I quit looking. Yes that is correct on the price, I explained to them this not for the Space Shuttle.

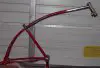
Looks like your moving right along..wee.
 

vrgt2003

New Member
Sep 10, 2009
96
3
0
Raleigh NC
We fabricated the top 6" extension tube using 1" tubing and 7/8" tubing to allow us to rosette weld the extension. After grinding and sanding looks pretty descent.

Cut the drop and loop tube to length, fabricated a piece to similar to the top extension and rosette welded the drop tube to the neck and welded on the inside and outside of the loop tube where its exits the hub.

Looks like we are pretty close to hitting the layout we had using the template. We are a little higher off the ground at the bottom of the loop however.

Centerline of engine drive and flywheel looks like it will be pretty close to center of the hub, maybe raised a 1/2" so we will have room to for chain adjustment.

Mike
 

Attachments

vrgt2003

New Member
Sep 10, 2009
96
3
0
Raleigh NC
Finshed the racing brace for the front fork. We changed from the 180 bend at the top fabricated previously to angling the tubing to meet at the top bracket. Think this looks closer to how they might braced the indian racer front forks.
Bike022.jpg
PDR_0126.JPG
Bike024.jpg

Lines are starting to shape up. We placed the seat on the frame for reference. We plan to cover it with leather and fabricate metal straps to attach the seat to the rear seat tubes and top tube.
Bike023.jpg

Seems small with the seat lowered like this, probably close to a 7/8 scale of an early 1920's model.
Bike025.jpg

Mike
 
Last edited:

vrgt2003

New Member
Sep 10, 2009
96
3
0
Raleigh NC
We fabricated the engine mounting bracket, added a few holes on the side to dress it up a bit.
Bike026.jpg

Engine mounting and mounting bracket will be painted the same color as the frame.
Bike027.jpg

Welded a component to the inside of the tube to support attaching the engine mounting bracket.
Bike028.jpg

Will tack weld the bracket in place while we check how the engine lines up to the frame.
Bike029.jpg

Engine looks like its sits low in the frame as we were hoping
PDR_0133.JPG

Mike
 
Last edited:
  • Like
Reactions: Mark Murphy

vrgt2003

New Member
Sep 10, 2009
96
3
0
Raleigh NC
Fabed up the tank out of cardboard. Went along the lines of the Excelsior as 'Board Track Racer'
had suggested.
PDR_0138.JPG PDR_0139.JPG

Added the tank & seat to the bike and took a look from ground level.
PDR_0140.JPG PDR_0142.JPG

Could use some help here. We are debating whether the tank is a bit heavy or fat looking.
Here is a rear shot.
PDR_0144.JPG

Thanks,

Mike
 

vrgt2003

New Member
Sep 10, 2009
96
3
0
Raleigh NC
Thanks for the nod. We are looking at possibly cutting an inch out of the width at the widest part. I think the ends of the tank are about right, I may have gone a little overboard in the middle.

Mike
 

vrgt2003

New Member
Sep 10, 2009
96
3
0
Raleigh NC
Adding the crank back will be the trickest part of the build. On the old BoardTrack racers, the crank shaft was used as a sprocket shaft as well.
Indian Board Track Racer.jpg

So, we are going to attempt to fabricate a custom crank shaft that will also serve to locate the clutch. We purchased a semi-automatic clutch. We will drive the clutch from the engine sprocket by chain, the clutch will rotate on the crank shaft. The pedals will have to be extended out to about 10 inches crank to crank. We hope we will be able to use the pedals primarily for starting the engine and braking. We will probably end up supplementing the braking, just haven't got that far yet.

Thanks for the feedback.

Mike
 

vrgt2003

New Member
Sep 10, 2009
96
3
0
Raleigh NC
We started fabricating the gas tank from our cardboard mock up. Cut out the individual pieces from 14 gage cold rolled flat stock on the band saw and sanded the edges to the outline.
PDR_0147.JPG

Layed out the top of the tank for the holes needed for the mounting bungs and filler tube.
PDR_0150.JPG

Fabricated the filler tube from 7/8 cold roll bar stock and used a SS 9/16-18 Hex Head Bolt with the head cut down and polished for the gas cap. Drilled small hole thru the center for venting.
PDR_0151.JPG

Fabricated the mounting brackets from EMT brackets. Cut down each side and radiused the ends. Will fill in the engraved markings with bondo.
PDR_0153.JPG

Welded up the 2 sides to the bottom piece.
PDR_0145.JPG

Hope to have a little more progress before the weekend is here.

Mike
 

vrgt2003

New Member
Sep 10, 2009
96
3
0
Raleigh NC
Fabricated the bung for the fuel petcock. Used 7/8 bar stock with 1/4" NPT thread. Have to find a nice vintage looking petcock. I may borrow Halcyon's 'ACE Hardware' idea. Looks pretty vintage.
PDR_0155.JPG

Tack welded the top in place. Still have to finish weld and add the front piece.
PDR_0157.JPG

Mounted the tank on the bike for a quick look. Will add the bottom tube after we get the spacing right.
PDR_0158.JPG

Need to look for a rear fender. love to find one that is ribbed. Not sure about the seat, just not very vintage.
PDR_0159.JPG

I think we got the top down look on the tank about right. Looks like it comes right from under the seat swoops out just enough for the filler tube and back to within the forks. Thanks to Halcyon for the pictures of your tank fabrication. They really helped alot gettin the tank laid out.
PDR_0161.JPG

Mike
 

vrgt2003

New Member
Sep 10, 2009
96
3
0
Raleigh NC
Finished the tank, will still need to have it pressure tested and add the additive to prevent corrision.
PDR_0162.JPG

Fabricated the lower straight bar and had to 'Fish Eye Cut' the ends to match it up with the down tubes.
PDR_0171.JPG

Used a trial method to cut the tubing to get the spacing under the tank right.
PDR_0167.JPG

Will tack weld the lower tube in place and finish weld later. Added the clamps using same modified EMT clamps as previously.
PDR_0169.JPG

Got a start on the drive system. Have simplified our original intention and will use the bottom bracket with 2" OD Bearings and a 3/4" jack shaft. Found bearings that fit right the races.
PDR_0170.JPG

Mike
 

dmar836

New Member
Jun 23, 2009
166
3
0
KC
Lookin' good. What are your plans for the rear wheel? You won't hear discussions about cush drives here as many bolt sprockets to their spokes. You know that won't work on this right? Nor will the Worksman hub - overall wheel strength is fine but the freewheel threads won't hold.
Just picking your brain.
Dave
KC
 

vrgt2003

New Member
Sep 10, 2009
96
3
0
Raleigh NC
Dave,

Thanks for the input, we could use a little insight on what has worked and what has not.

In our current design, our primary drive will drive a jackshaft located through the bottom bracket.
Two roller bearings fit the existing races and the secondary drive will be a centrifugal clutch located on the same side as the primary.
PDR_0175.JPG PDR_0176.JPG

We debated the pros and cons of driving the secondary on the other side of the bracket, but the setup looked so cool on the same side we would like to try to keep it this way.

We are leaning toward using a rear drum brake hub and flipping the hub around 180 and solid mounting either a 42 or 60 tooth #41 sprocket. Realizing the threads are in the wrong direction, we will need to come up with an adaptor to solid mount the sprocket.

Any ideas would be welcome.

Mike
Garner, NC
 

vrgt2003

New Member
Sep 10, 2009
96
3
0
Raleigh NC
Dave,

I meant to tell you your bike build was one of the primary motivations toward me starting this project. Your blog has been most helpful in getting us started, I wanted to thankyou.

Fantastic job on the build, my hat's off to you.

Mike
Garner, NC
 
Jul 8, 2009
62
1
6
My Garage
I flipped mine also, bored the hub large enough to fit over the threads and bolted directly to the hub.
I have not put an over abundance of abuse on this, so this application may still be in the R&D stages.
The picture shows an addition of a leftover bearing race I threaded on, not for anything really, only to fill in the gap. If your using #41 chain, you may be limited on that size of sprocket, but that depends on your frame. Mine is real tight with a 35 tooth.

Keep us posted.
 

Attachments

Last edited: