"kindalikeawhizzer"

GoldenMotor.com

silverbear

The Boy Who Never Grew Up
Jul 9, 2009
8,325
670
113
northeastern Minnesota
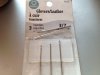
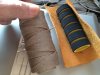
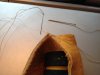
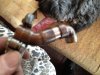
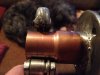
The thread I use is called sinew but is man made. Full thickness it is good for things like harness work as it is quite strong. It can even be braided together to make a bow string for a long bow. But what is nice for our purposes is that it can be separated into strands for smaller applications. I have taken it down to one strand which I cut to length at about a yard (hand to hand arms outstretched). (I would imagine that carpet thread would work, too.) I thread it onto two glover's needles. A glover's needle is for hand stitching leather and unlike a round pointed needle it comes to a triangular point which cuts into the leather rather than just piercing it. So one thread with a needle at each end.

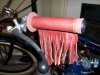
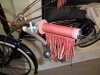
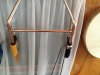
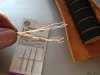
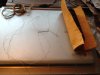
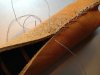
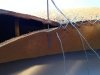
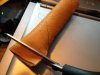
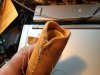
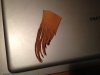
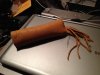
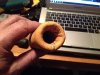
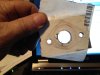
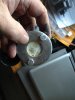
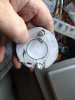
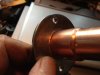
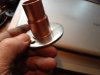
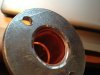
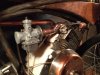
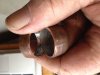
First I fold the leather over to see how it fits the foam handle. I put inside a piece of copper pipe (3/4" like handlebar size) to give it some body. You want the leather to just come together without overlapping. If we were welding this would be a butt joint. It will probably need a bit of trimming. If just a wee bit short of coming together you can stretch the leather a bit which is why we didn't glue it all down. For the stitching imagine you are lacing up a shoe so the shoelaces appear to make a laddered series of Xs. That's how your needles will be, going from side to side, one to the left and the other to the right, alternating. Don't try to use the same hole for both needles since you will likely end up slicing the thread. Those needles draw blood nicely, too, so take care.
(cont.)
SB
 

Attachments

Last edited:

silverbear

The Boy Who Never Grew Up
Jul 9, 2009
8,325
670
113
northeastern Minnesota
You can see where I managed to cut the thread in just the way I told you not to. I knotted it, tucked the knot under and pretended it never happened. The stitching will be on the bottom of the grip and is no big deal unless you cannot live with imperfections, in which case you'll have to start over. Keep stitching and when you get to the other end of the grip, trim off the excess leather, shape it a bit and if it is going to get fringe, this is where to insert it.

Cut a scrap of leather into thin strands, fold it over once and stitch it into the end. Pushing the needle through four thicknesses of leather is not easy so a small pair of needle nose pliers are helpful.
(cont.)
SB
 

Attachments

silverbear

The Boy Who Never Grew Up
Jul 9, 2009
8,325
670
113
northeastern Minnesota
I may remove the fringe from this grip, but I wanted to show you how to do it.

The last thing to do after you tie off the thread is to open up that can of contact cement again to dab a bit inside the open end of the grip, both on the suede side of the leather and onto the foam. After it gets tacky tuck the leather inside the end and press down. Now that wasn't so hard, was it? Your bike will look good and your hands will appreciate your kindness to them.

Time for coffee and then i'll be back for the intake manifold.
SB
 

Attachments

silverbear

The Boy Who Never Grew Up
Jul 9, 2009
8,325
670
113
northeastern Minnesota
As noted in a previous post, I'm using copper fittings to make up the intake manifold and have been a little worried about the marriage of copper and steel using solder to join the two in carbureted bliss.

First I tried making the steel face plate from flat stock. Tedious. The difficulty is the one inch hole needed. I don't have anything bigger than 3/4" in a stepped drill bit. Grinding and filing were taking forever so the next time I was in town I tried the local Ace to see if they had a flat washer large enough. They did. And for only a dollar and a half for one washer stamped out of steel costing about 2 cents. Ace is the place, alright.

Although a rip, it was the way to go. I made a little rubbing at the intake of the carburetor, glued it to the washer and drilled the two mounting holes. The central hole needed grinding out a bit for the copper reducer coupling (1" to 3/4") to fit snugly into the hole. I also ground out the edges to the hole to remove zinc coating the steel and to give a beveled edge for the solder to fill and bond to.
(cont.)
SB
 

Attachments

Last edited:

silverbear

The Boy Who Never Grew Up
Jul 9, 2009
8,325
670
113
northeastern Minnesota
The washer was the way to go. Thanks to whoever it was on the forum who got the idea. It is a good one.

A concern was the difference in thickness of metal and kind. Copper takes heat quickly, so I focused the flame of the propane torch on the steel washer rather than the copper fitting, knowing the heat would migrate to the copper. The solder bonded well with a solid union, or at least it appears to be. Once in use I know I'll be monitoring the whole manifold for any sign of trouble.

I'm leaving the washer as it is, not trimming it's outside edge to conform to the carburetor intake. I may end up drilling a mounting hole along the upper edge of the washer for a support to a bracket above. There are also a couple of alterations I have in mind to make to the copper part of the manifold to make it fit the space better. The new air cleaner should arrive today, so it too will help to determine final positioning. I like the way it has turned out so far.
That's it for now.
SB
 

Attachments

Last edited:

silverbear

The Boy Who Never Grew Up
Jul 9, 2009
8,325
670
113
northeastern Minnesota
Thanks, Dan.

I did some tweaking on the intake manifold altering fittings by addition and subtraction in making it sit lower and a bit closer to the engine. It is tied up at the moment to make the carb parallel to the ground. Nothing is soldered together and won't be until the engine is bolted in place with the final belt drive aligned. First the alignment, then drilling the engine bolt holes and then final alignment of carburetor... then solder it together. By then I will have figured out how the engine side of the manifold will attach. I have an idea, but a lot more staring at it over cups of coffee won't hurt anything.

To make it lower the 45 degree street elbow was replaced with a regular 45 degree elbow so that it could be extended by an inch or two. The carburetor was drawn in closer to the engine by a couple of inches by shortening two connectors, cutting a bit off of each one.

I like the position now and am pleased with how it fills what was empty space behind the engine. The air cleaner did not arrive today, but when it does I'll update with a fresh photo. I like looking at the bike, touching it with my eyes.

It seemed like there aught to be some practical use for the little copper bits cut off the fittings. I decided one of them would make a nice wedding band for the bear should he decide to marry for a fourth time. (Not likely.)
SB
 

Attachments

Last edited:

Intrepid Wheelwoman

New Member
Oct 29, 2011
2,830
61
0
Hauraki District, New Zealand
Wonderful show and tell Silverbear :) Your tutorial on making a nice pair of leather grips for tired old hands is very much appeciated and will be something I will be keen to try for myself.

I like your work on the intake manifold and using that big steel washer was a great idea. Leaving it round and not cutting it to shape looks much more organic and pleasing to my very much retro eyes and of course it has saved you a good deal of hand work too.
People tend to underestimate the strength of a well planned out soldered joint. If I remember correctly part of a 1930s Velocette motorcycle frame was soldered and I don't think they had a reputation for falling apart.
I think a simple hanger brace attached to the manifold flange you've made will be just the bee's knees and should take care of any problems with vibration :)
 

silverbear

The Boy Who Never Grew Up
Jul 9, 2009
8,325
670
113
northeastern Minnesota
Thanks for the kind words, Annie.

I sent a picture of the seat and grip to my X in a nearby town, thanking her for the hide she gave me to make them. I thought it was elk but she says it is moose hide. Could be since it was pretty thick. So I stand corrected. I'd rather it was elk, which are plentiful in parts of the country to the west. Moose populations are on the decline for unexplained reasons and my feeling is that there should be no hunting of them until such time they, too, are plentiful. My take on things is that we need more moose, bear and wolves and a lot fewer people. Some of my best neighbors have four legs. I believe in hunting out of need, but not for sport. Just my outlook. I don't expect others to see things the way I do.

I have a good feeling about the copper manifold holding up under use. I'll enjoy it while it does and fix it if the need arises. I'm glad you like it.
SB
 
Last edited:

silverbear

The Boy Who Never Grew Up
Jul 9, 2009
8,325
670
113
northeastern Minnesota
truckd,
As the commercial used to say, "Sometimes you feel like a nut, sometimes you don't". I don't know yet whether this set of grips I just made will live on the fringe so to speak or go without. I'll know when the bike is together sitting on the ground where I can stand back for a look. I remember when kids used to have plastic "streamers" I think they were called. They had a spring deal on the end that fit into the hole on the end of a rubber grip and were fringe-like. Kind of cool.
SB
 

silverbear

The Boy Who Never Grew Up
Jul 9, 2009
8,325
670
113
northeastern Minnesota
The air cleaner arrived today. I think the carb will look a little better lowered another 1/2" to 3/4". That should do it.

Also pictured is the one finished grip on the handlebar. I'm undecided about the fringe and will wait to see. In looking at the brake levers I think I may use a pair of all aluminum ones from an older bike. The black doesn't look right as it is too stark or something, but would be fine with black grips.
SB
 

Attachments

fasteddy

Well-Known Member
Feb 13, 2009
7,454
4,908
113
British Columbia Canada
Silverbear,

The air cleaner is the perfect finish for the great looking intake manifold. The washer as a mount for the carb was a very nice piece of engineering.

Aluminum brake handles will look better as you said. The black brake handles do stand out against the tan grips to much to look good.

Another sweet looking ride that will be ready for bike camp this summer.

Steve.
 

silverbear

The Boy Who Never Grew Up
Jul 9, 2009
8,325
670
113
northeastern Minnesota
Thanks Steve.
I can't take credit for the washer carburetor mount as it is something I saw suggested sometime in the past here on the forum, but yes, it is a really good idea. And I'm happy about how well the copper pipe bits worked out to solve a problem and look good at the same time.

I'm hopeful that by the time of summer camp it will be running. I very much look forward to experiencing belt drive for the first time. Winter is slipping by and spring is in sight, but still a long way off. And then bike camp... woohoo!
SB
 

indian22

Well-Known Member
Dec 31, 2014
4,725
7,706
113
Oklahoma
Thanks, Dan.

I did some tweaking on the intake manifold altering fittings by addition and subtraction in making it sit lower and a bit closer to the engine. It is tied up at the moment to make the carb parallel to the ground. Nothing is soldered together and won't be until the engine is bolted in place with the final belt drive aligned. First the alignment, then drilling the engine bolt holes and then final alignment of carburetor... then solder it together. By then I will have figured out how the engine side of the manifold will attach. I have an idea, but a lot more staring at it over cups of coffee won't hurt anything.

To make it lower the 45 degree street elbow was replaced with a regular 45 degree elbow so that it could be extended by an inch or two. The carburetor was drawn in closer to the engine by a couple of inches by shortening two connectors, cutting a bit off of each one.

I like the position now and am pleased with how it fills what was empty space behind the engine. The air cleaner did not arrive today, but when it does I'll update with a fresh photo. I like looking at the bike, touching it with my eyes.

It seemed like there aught to be some practical use for the little copper bits cut off the fittings. I decided one of them would make a nice wedding band for the bear should he decide to marry for a fourth time. (Not likely.)
SB
Silverbear your use of copper plumbing supplies is innovative & the results amazing. I've incorporated a lot of brass in my bike and automotive builds over the years & always "intended" to use a bit of copper yet have not to date. The copper tank is superb especially incorporated with the other bits. I know your a fan of "raw" metal as am I but wonder if you've ever considered using some of the architectural patina paints which mimic aged brass, copper wrought iron etc. stunningly when applied artfully to replicas. I think a steel frame or tins on a classic bike could turn out extremely well with spectacular effect! Hope the weather breaks early for you and gives opportunity to build on your ongoing projects...already in the 60's & 70's here in Indian Territory.
Rick C.
 

bluegoatwoods

Active Member
Jul 29, 2012
1,581
6
38
Central Illinois
Your bike is developing a very nice profile there, SilverBear.

It has at least as much style as a Whizzer. And that's saying something, since they are good looking.
 

silverbear

The Boy Who Never Grew Up
Jul 9, 2009
8,325
670
113
northeastern Minnesota
Bluegoat,
I like the profile, too, and think it looks better than I imagined it would. All of the long, creative staring over cups of coffee in the morning are paying off, I think.

Rick,
Glad you like the copper stuff,too. I feel like I may have over indulged a bit between this bike and the 1934 Elgin Velocipede to the point of almost becoming a copper miner. Along with the Indian Hiawatha this will be three bikes with copper gas tanks. For me it is the "poor man's gold" which I like all shined up pretty and also as the shine calms down into a more weathered and darker patina. Good both ways.

When I decided to use my old snow blower motor (Tecumseh 5H flathead) I didn't realize how good it would look all stripped down. I'd seen 5 horse Briggs engines transformed under the wizardry of msrfan, but didn't know the Tecumseh also had hidden beauty. I still don't understand why they aren't used much for bikes.

I also had no initial plans for a copper exhaust pipe or intake manifold which suggested themselves along the way as solutions to answer both intake and exhaust necessities with the additional benefit of looking real nice to my eye. If I were a competent welder I probably would not have considered copper. Necessity (as the saying goes) is the mother of invention. Copper plumbing parts are embedded in me brain from all the years of running a resort, repairing copper water pipes & fittings and running propane lines. Lots of soldering, too, from that water pipe work and from making leaded stained glass windows, having had a small studio for some years. Can't weld for beans, but I can solder. So you tend to go with what you already know and in my case these are the bikes that have resulted. Credit must also go to Tinsmith who is my copper gas tank guru. I ask and he answers. Having smart friends is a real good thing.

With some reluctance I took down the art show in my front window and have dismantled the "kindalikeawhizzer" into bits and pieces stowed into cardboard boxes. The frame has been painted with several coats of the mahogany brown and one wheel rim is also curing. Tomorrow will see the front wheel in paint and then I'll dig out the old fenders to clean up a few dents and surface rust before painting them as well. They are middle weight fenders from a 1953 Schwinn and may require making extensions on the whaddayacallems that hold the fenders to the axle... struts or supports or something. Fender dealies might be it. Especially with extra fat tires, (26" X 2.4" cyclops) the fenders will make the tires look even more substantial, which is how I want them to look, like a bicycle morphing into a light motorcycle. I found a can of bondo and will hope it is still good enough for a bit of dent filling body work before the fenders get stripped and painted.

I used to get my pants in a bundle trying overhard to make a paint job nice, but have gotten less anal about it in more recent builds after experiencing the inevitable (for me anyway) scratches, abrasions, scrapes and such that comes later during assembly and eventual riding. Such happens, so get used to it. I do try to use good paint (Van Syckles tractor enamel ) and try to lay it down so that it looks good with a lot of shine. But if there's an errant drip or run in a spot where the sun don't shine I let it go as good enough for government work. Years back I would have fussed over sanding out that drip and doing it over. Not now. Yet, I have every desire for this paint job to look nice and want to try my hand at two tone fenders with cream accents and pin stripes, just like the fenders when they were new. We'll see how they turn out. Anybody who looks at my bike from a few inches away just got run over, so I'm only concerned with the pass by view looking good. That's what all the shiny copper distraction is for. I remind myself that these are just motorbikes meant for riding and not to get too fussy. On the other hand, they are my bikes... and as the girlie once sang "It's my party and I'll cry if I want to..." Ha.

Pictures for show and tell will follow at some point. Focus is shifting over to the 34 Elgin Velocipede which has been sitting neglected in the back bedroom. Maybe she can sit in the front window for staring at over morning coffee. A good looking girl bike first thing in the morning would be nice to look at. Not as nice as a good looking girl first thing in the morning, but I am seventy years old now so there's that. A vintage bike is good and less hassle, I tell meself. Aaniimoosh The Wonder Dog grins in agreement, reminding me that she is my common law wife, so to speak (woof).

And spring thaw is indeed underway, early and a welcome thing. Today will be a balmy 58 degrees...!!! with real sunshine and blue sky, just like in the picture books. Snow pack is almost gone under the assault of recent sunshine. Looking forward to dirt and bare roads and yesterday pulled out the American Flyer for a dust off and look over to see what he wants before spring riding. I can hardly wait.
SB
 
Last edited:

cannonball2

Well-Known Member
Oct 28, 2010
3,682
221
63
Colonial Coast USA.
Great looking build SB! Glad to see the old Secumski(as many of the locals pronounced it) has found such a good home! Very nice job on the carb/manifold install, flows right along with the bike. This thing looks pretty racy just sitting there. With 5hp on tap should get up and go if you want it to. Cant wait to see it finished!
 

bluegoatwoods

Active Member
Jul 29, 2012
1,581
6
38
Central Illinois
"I used to get my pants in a bundle trying overhard to make a paint job nice, but have gotten less anal about it in more recent builds after experiencing the inevitable (for me anyway) scratches, abrasions, scrapes and such that comes later during assembly and eventual riding." --SilverBear.

I know exactly what you mean. I used to agonize over little flaws and spent so much time and effort trying to improve.

Until I realized that I was spending far too much time on spraying. Coat after coat. Drying time, etc,. Besides that, bicycle parts are so small that you have to deal with far too much overspray.

These days I brush it on with a 1 inch paint brush. I don't even paint where I'm holding the part. Let it dry, hold onto the other end and paint again. Two coats is going to be enough to discourage rust. If it doesn't look perfect, well that's too bad.

It's made life a lot easier.

For that matter, paint that doesn't look professional doesn't matter very much for another reason; I don't put much effort even into keeping my bike clean. That's too time consuming, too.

I give my bikes frequent Armor-All spraydowns. I've always aimed for weekly. But I don't keep up that average. This protects finishes and discourages grime build up.

I just don't have time for more.
 
Last edited: