Fixing chain line with guide?

GoldenMotor.com

jeffyh

New Member
Nov 28, 2015
53
0
0
Madison, NJ
So I still haven't finished my build yet... I have one last functional problem to deal with.

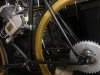
I finally got the motor mounted in a "proper" way but the engine height and tilt makes for a impassable lower chain line. Getting rid of the front mount isn't an option. Without some sort of spacer to raise the engine height, the crankarm hits the engine.

I was thinking of mounting a chainguide on the engine sproket cover to raise the lower chainline some. Not the one in the picture. That's just to demonstrate the idea. Thoughts? Bad idea, passable idea?

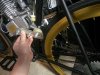
I'd probably get something like this or something like this
 

Attachments

Last edited:

Chaz

Well-Known Member
Jun 3, 2012
1,004
72
48
Vancouver, British Columbia
Ideally you could use a block type spacer in the front between the cnc mount and the engine block. This would help to bring your carb close to level. As for the tensioner, with luck you can shorten the chain so that you don't need a tensioner at all. I see you have horizontal dropouts which might give you the leeway needed.
 

2door

Moderator
Staff member
Sep 15, 2008
16,302
175
63
Littleton, Colorado
Both of those tensioners you liked are made for the pedal side chain. Not sure how long either of them will last with the engine driven side.

In your other thread we suggested you lower the engine in the frame. If your pedal crank is hitting the engine you might want to explore a wider crank or even bending the crank to clear. Where is the interference and how much is it?

If possible, post a side view of the bike. It appears from the two photos above that your carburetor angle is extreme which can cause float level/operation problems. The carb should sit as close to level as you can get it.

You also might want to check your fuel filter. I believe, if I'm seeing it correctly, that it is installed backwards. The fuel should come in on the outside of the filter element, pass through it then out to the carb.

Tom
 
Last edited:

jeffyh

New Member
Nov 28, 2015
53
0
0
Madison, NJ
Both of those tensioners you liked are made for the pedal side chain. Not sure how long either of them will last with the engine driven side.

In your other thread we suggested you lower the engine in the frame. If your pedal crank is hitting the engine you might want to explore a wider crank or even bending the crank to clear. Where is the interference and how much is it?

If possible, post a side view of the bike. It appears from the two photos above that your carburetor angle is extreme which can cause float level/operation problems. The carb should sit as close to level as you can get it.

You also might want to check your fuel filter. I believe, if I'm seeing it correctly, that it is installed backwards. The fuel should come in on the outside of the filter element, pass through it then out to the carb.

Tom
Hey Tom,

Disregard the fuel filter, I haven't really hooked up everything yet. I was planning on finding/making some sort of chain tensioner with a stronger spring and cog that will fit a 415 chain. I just wanted to get input on the validity of the idea.

I removed the cnc from the rear to direct mount the engine as recommended, and given the angle of the flush mount, that's the best I can do. I could file an angle to the rear mount, but how do you account for the stud angle so the rear seat is flush?

If i flush mount the engine, the crank overlaps the engine by 1" height-wise and 3/4" laterally. I wouldn't be opposed to crank bending, but where could i even get that done?

I mocked up some red lines to give a rough idea as to how much I could level out the engine. The engine wouldn't really lower any but the carb would be more level and the chain line would be slightly better, but still not enough to clear the lower bolt of the engine cog casing...

I really think that a chain guide would be the easiest solution if mechanically sound.

I understand that I'm making this really difficult and "stupid" but I really want to build THIS bike up. If this were one of you and you were married to the idea of this build, how would you approach this?
 

Attachments

Last edited:

2door

Moderator
Staff member
Sep 15, 2008
16,302
175
63
Littleton, Colorado
Thanks for the profile photo. It helps. The carburetor angle doesn't appear excessive and I don't feel it will be an issue.

If the position you now have the engine works as far as pedal crank clearance it might be okay. Have you tried installing the chain yet? You might find that it will clear the engine case with no further issues.

Chas suggested you try running without a chain tensioner. They really aren't necessary if you have another way of adjusting/maintainiong chain tension. Horizontal drop outs are a big factor here. Having the ability to move the rear wheel is a plus. As long as you can keep the chain from touching the frame you really won't need a tensioner.

I'd suggest installing the chain to see how it aligns with the rear sprocket at this point and if there is any interference with the engine. If there is, show us where.

Tom
 

jeffyh

New Member
Nov 28, 2015
53
0
0
Madison, NJ
Okay, so I just picked up a chain breaker from harbor freight for $20 that says it goes down to #420 chains. Luckily it worked great cause finding a chain breaker that actually says it'll work on #415 is impossible without spending $100.

@2door: So I tried putting the chain on and adjusted the wheel back and eyed the line with just a little chain slack and the bottom of the chain clears the engine casing by 2mm. I won't need a chain tensioner but is that little clearance dangerous? I feel like the drive under load will cause the chain to keep slapping the engine case.

@Chaz, thanks. I'm trying to understand which bottom bracket I need to fit my bike. I think this 153mm may fit and be the route i go with a front engine mount on sick bike that would give me the clearance to let me mount my engine lower. This should fix all chain line issues completely.

Can one of you help me understand how to match the mount seats actually flush. Any type of filing of the mount will cause the studs to not be perpendicular to the downtube which will make the backpiece sit at an angle. Do you bend the studs?

If that's the case, I could technically shave the rear engine mount spacer at an angle, bend the studs, and the engine will be more level. This will also let me keep the engine high and the stock crank and give me enough lower chain clearance.

With all your helps, It's so close, I'm getting really excited!
 
Last edited:

maniac57

Old, Fat, and still faster than you
Oct 8, 2011
4,484
22
0
memphis Tn
The easy fix would be to swap the crank arms for a pair with offset arms. Simple fix often needed on skinny tire bikes.
The offset arms give you the 1/2 you need with no problems.
Get them cheap from any old parts bike with 3 pc cranks
 

jeffyh

New Member
Nov 28, 2015
53
0
0
Madison, NJ
The easy fix would be to swap the crank arms for a pair with offset arms. Simple fix often needed on skinny tire bikes.
The offset arms give you the 1/2 you need with no problems.
Get them cheap from any old parts bike with 3 pc cranks
I was looking for them, but couldn't find them online easily... You missed me by 4 minutes. I just placed an order for a bb tool, crank arm puller, 153mm bb, and engine mount.

Still really curious on how you handle the stud angle/mount backing plate situation when you adjust the mount angle if you know.
 

KCvale

Well-Known Member
Feb 28, 2010
3,966
57
48
Phoenix,AZ
Here is what I see...

You took the easiest perfect frame for dropping a 2-stroke in with all stock kit parts on it, and then tried to 'mod' around a thinner than usual 3-piece bottom bracket crank shaft width and arms because the pedals hit the engine, and whatever it was you did with the rear hub to mount a sprocket.

My suggestions?
Start over opposed to continuing to try to mod around the one simple issue you had that prevented you from just dropping the engine in a perfect frame with ease.

Steps:
#1 Pull the engine back off.
#2 Pull the bottom bracket out.

You will need two specialty tools, a crank arm puller and cartridge socket.
Here are both for ~$10.
http://www.ebay.com/itm/like/161723760696?ul_noapp=true&chn=ps&lpid=82

Cartridges come in various widths, usually varying with the left site lengths as the right side is usually fixed and the side that goes in all the way first, with the left side adjustable.

Measure the entire shaft length and add whatever mm wider for what you need on the left for a new one.
~$20 from your local bike store.

#3 Pull off that front mount.
The engine front mount should fit perfect unless you front is too wide, then get a SBP front as it is adjustable by it's angle and has spacers and such to fit it just perfect with your back mount at true 90 degree flush mount to the seat post which is the most crucial part.

http://www.sickbikeparts.com/catalo...ducts_id=74&osCsid=ressq077crlqfftdf0qgf0qrp6

You need the exact diameter of your front tube to order.

#4 The back sprocket.

What the heck did you do?
Looks to me like took some disc brake wheel from something else as the frame has no disc brake mount, then welded a sprocket to the screw in rotor mount.

This will not work.
It has clockwise threads which tighten with clockwise force.
Drive force is CC and that sprocket will just unscrew and come off.
Since you have no rear brake anyway, just get yourself a Coaster Brake wheel and use the kits sprocket mount so you at least have something in the rear for brakes.

Just my opinion, and I hope it helps you get back on the right track as it should have been an easy cheap install on that bike if it was all stock.
 

jeffyh

New Member
Nov 28, 2015
53
0
0
Madison, NJ
@KCVale - I bought the bike stock like that. It's a 6KU nebula-2 with 68x103 BB. I also bought all the parts you mentioned last night after reading up on BB standards and finding out that I could easily switch mine. Most likely going to use that SBP front mount and the wider BB

#4 : it's a 32h hub so no ragjoint or hub adapter will fit. Instead of the cost of building up a new wheel. Figured I'd give this hackjob a try. It's a flip flop hub. I took off the fixed cog and had a machine shop cut the teeth off, widen the hole on the 44T sproket, and weld it to the fixed gear cog. A jig was cnc machined to make sure everything was centered while cutting and welding. The fixed gear cog is right threaded, but there's a left threaded lock ring. The 44T cog is perfectly centered and no latteral wobble and lines up perfectly with the engine gear.
 

KCvale

Well-Known Member
Feb 28, 2010
3,966
57
48
Phoenix,AZ
@KCVale - I bought the bike stock like that. It's a 6KU nebula-2 with 68x103 BB. I also bought all the parts you mentioned last night after reading up on BB standards and finding out that I could easily switch mine. Most likely going to use that SBP front mount and the wider BB
Cool.
You didn't need my help and on track.
Good for you dude, you'll be riding in no time.

Just make sure you don't skimp on brakes, it is no fun to wreck because you can't stop in time in an emergency.
 

jeffyh

New Member
Nov 28, 2015
53
0
0
Madison, NJ
Cool.
You didn't need my help and on track.
Good for you dude, you'll be riding in no time.

Just make sure you don't skimp on brakes, it is no fun to wreck because you can't stop in time in an emergency.
hah, whatever it is, I appreciate the help. Wouldn't have been able to do this without yours and the others helping me. Regarding brakes... I was thinking about fred flinstoning it for a while.
 

KCvale

Well-Known Member
Feb 28, 2010
3,966
57
48
Phoenix,AZ
Regarding brakes...
I was thinking about fred flinstoning it for a while.
Please tell you are just kidding about no brakes...

My best friend since high school that worked in my shop for a year so an experienced MB rider just got of the hospital yesterday with 3 cracked ribs and a concussion because a driver cut him off last Thursday night.
And he had brakes, just not good enough ones, so now he is broke in 2 ways...
His body AND his bank account.

If you think good brake are expensive, wait till you see what even a little wreck costs.

The basic rule of thumb is don't ride any faster than your brakes can stop you in 10'.
That is like 5mph just using your feet to stop.
 

jeffyh

New Member
Nov 28, 2015
53
0
0
Madison, NJ
My best friend since high school that worked in my shop for a year so an experienced MB rider just got of the hospital yesterday with 3 cracked ribs and a concussion because a driver cut him off last Thursday night.
I was half joking... I'm all too familiar with how important good brakes are from DH racing and riding crotch rockets. Regardless, I am seriously sorry to hear about your buddy. I've been in way too many crashes at speed so I wish him a speedy recovery :)

I have a single front brake right now with good stopping power with the lever on the right hand like a motorcycle. I figured I'd use that until I figured out how best to handle a clutch and brake lever on the left.
 
Last edited:

KCvale

Well-Known Member
Feb 28, 2010
3,966
57
48
Phoenix,AZ
I figured I'd use that (front brake) until I figured out how best to handle a clutch and brake lever on the left.
Simple, you don't put another lever on the left.
Just replace your right lever with a dual pull 'teeter-totter' brake lever on the right for $12.

http://www.sickbikeparts.com/catalo...ducts_id=41&osCsid=ppsj21em5umjnsvqq8p09vlqv1

Some dual pull brake levers do not account for different pull lengths, even with the same kind of brakes, the force and length may differ.

This applies equal force to each brake by it's demand even for different kinds of brakes like this one doing a disc and V brake on the same lever.
The V needed more pull than the disc.


The circles show how much pull was needed on actual cable end and how the teeter-totter adjusts.

Cool and Easy huh?


http://motorbicycling.com//www.pinterest.com/pin/create/extension/
 

2door

Moderator
Staff member
Sep 15, 2008
16,302
175
63
Littleton, Colorado
I've never tried a 'dual'pull' brake control but I can't help but be concerned about those times when you hit a patch of sand or pea gravel when coming to a stop.

They 'sand' the streets here in Colorado and after a snow there are always patches of sand and small gravel in the area of a stop sign or intersection. I don't touch my front brakes when I hit that sand. Too much chance of the front wheel locking up with the expected results. I much prefer to have full control over which brake I'm applying, especially in the situation I described above. Any thoughts?

Tom
 

jeffyh

New Member
Nov 28, 2015
53
0
0
Madison, NJ
@2door I'll let you know, mine came in the mail last week... I'm mixed on the idea. I'm used to riding motorcycles where you mainly use the front and downhill bike racing where you use none :) or mainly the rear. Either way, I can say that 50/50 is never a ratio I've gone for.

Anyways, I was checking out gasbike again tonight and came across my idea for the front chain tensioner but done right.... check it out. I'm going to pick one of these up. I'd like to run no tensioner, but I can't get both the pedal and engine drive chains to both have the proper slack.
 

2door

Moderator
Staff member
Sep 15, 2008
16,302
175
63
Littleton, Colorado
I'm not a fan of spring loaded chain tensioners. They have a place in some industrial applications but on our bikes they allow slack when you least want it. If there is any misalignment between the sprockets a spring tensioner will only make the problem worse.

I much prefer to see the chain and sprockets aligned perfectly and proper tension achieved by moving the sprockets further apart. You said above that you can get the engine drive chain tensioned but have problems getting both chains right. I'd suggest you look at adding a tensioner to the pedal side chain. Bike shops sell them or they can be easily fabricated.

Tom
 

jeffyh

New Member
Nov 28, 2015
53
0
0
Madison, NJ
btw, I got that dual brake on SBP that KCVale posted... great product. I can finally stop. Was able to actually set it for ~ 70/30 braking force by adjusting the tension on each line so the front closes just before the back. That gif you posted demonstrates it perfectly.