Another Chopper Build

GoldenMotor.com

thegnu

New Member
Sep 15, 2011
982
1
0
freedom pa
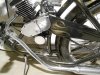
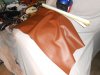
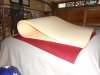
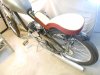
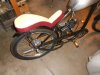
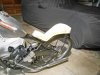
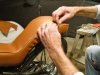
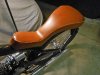
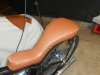
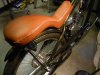
wow , there is so many things about that bike that I love right now , that muffler is over the top , an maybe dont use upholstery on that seat pan or very minimal that just gives a nice old look to that build , had an idea i suppose your going to polish the side case covers on that motor . if so after the polish etch a logo or the name of the bike into them an really bring out some detail there .maybe polish all the fasteners too... jus sayin .......
Gary
 

2door

Moderator
Staff member
Sep 15, 2008
16,302
175
63
Littleton, Colorado
Thanks Gary. I had to laugh when I read your last sentence because I'd just come in from the garage where I'd been polishing some stainless steel button head allen screws that hold the rear fender braces and chain guard on.
The engine covers are already polished too.
Great minds think alike :)

Going to try my own upholstery on this one. The handgrips that came on the bike are brown leather with big saddle type stitching. That's the look I want for the seat.
I'll probably need a little more padding for my bony butt. When the Denver Area Riders get together 50 to 75 mile rides are the norm. I don't think I could take it with a hard seat.

More to come.
Tom
 

silverbear

The Boy Who Never Grew Up
Jul 9, 2009
8,325
670
113
northeastern Minnesota
I had to laugh a little at Gary's suggestion to leave the seat on the bare bones side. Young guys don't mind a little discomfort in trade for cool, but we old guys value a comfortable seat, riding position and for me comfortable grips. I do my personal seats with plenty of foam under the leather and make my grips the same way with elk hide hand stitched over foam grips. These old hands need taking care of. And so does me bony old butt. I'm guessing that once again the upholstery guy is dragging his feet promisning to do it by the twelth of never. Might as well do it yourself since you know how. Your last one turned out nice.
SB
 

2door

Moderator
Staff member
Sep 15, 2008
16,302
175
63
Littleton, Colorado
Yeah, Silverbear. The upholstery guy called a couple of days ago and said he was ready to start on my seat. Three weeks after he said, "a couple of days". I told him thanks but no thanks, "I'm going to do it myself. You waited too long". He wasn't happy but after last year and the trouble I had with getting the seat done I wasn't going to go through that again.
I have my plans and I'm confident they'll come out to be what I want.
I'll keep you posted with photos when I start on the saddle.

Tom
 

2door

Moderator
Staff member
Sep 15, 2008
16,302
175
63
Littleton, Colorado
I did a little experimentation today. I found some gold metal flake powder at a local arts & crafts store. I mixed it with some clear, used my air brush and masked off some flames on the chain guard. It was only a test so I didn't take my time and really make the flames the shape and size I want but the results were exactly what I had in mind.
I want to do the fuel tank and chain guard with these gold metal flake ghost flames.

Next step is painting the tank gloss black then I'll start masking the flames I see in my little pee brain.
I'll keep you posted.

Tom


EDIT: While I was painting today I tried some levitation that Dan said would work...it didn't :(

Tom
 

Attachments

Last edited:

Dan

Staff
May 25, 2008
12,765
115
48
59
Moosylvania
LOL Tom.

I never said it would work. I just implied it.

That guard looks awesome! Is that air brushed?
 

F_Rod81

Dealer
Jan 1, 2011
1,031
2
0
Denver, CO
That sucks about the upholstery guy... again. Good move, I would have done the same thing and took it. He deserves a bad Angie's List review... :p How's the seat coming along now??
 

2door

Moderator
Staff member
Sep 15, 2008
16,302
175
63
Littleton, Colorado
I suppose I should bring this up to date.

I've been a little slow on progress because of the cold. It takes a lot to keep the garage warm and utility bills dictate that I ease back on heating.
I picked up some pipe insulation for the glass packing of the muffler. It's a firm, tightly woven fiberglass wrapped in a fire retardent foil material. It fits the inside of the muffler perfectly as well as the louvered inner main pipe. My hope is a muffled but throatier sound. Time will tell.

I did get the muffler hanger made today and I'll weld it to the outer housing tomorrow. I like swoopy-curvy shapes so I took my time cutting this 1/8" thick bracket that attaches to the coaster brake mount on the frame. I'll TIg it for good looks.

I also went to the upholstery supply place and got some vinyl and foam for the seat. I didn't buy the most expensive vinyl that looked and felt like real leather but instead some stuff that is the color I want but a little cheaper because I don't want to take a chance on wasting the high priced stuff until I see if my hand stitching comes out okay.
The foam is what they call, 'Motorcycle Foam'. It's very high density foam rubber that will make a soft seat even if only 2" thick. I'll probably make it 3" just for added cushion for my tail bone.
More to come.

Tom
 

Attachments

2door

Moderator
Staff member
Sep 15, 2008
16,302
175
63
Littleton, Colorado
Started on the seat upholstery. Got the foam cut and glued to the pan and the edging which will soften the sides a little. I'm hand stitching this thing so it's extremely labor intensive. My fingers are getting sore from pushing that needle.
More to come.

Tom
 

Attachments

2door

Moderator
Staff member
Sep 15, 2008
16,302
175
63
Littleton, Colorado
Looking nice Tom. What width is the back tire on that machine?
Dan,
Rear tire on the Switchblade is a 24 X 3. They call it the Nirve Fatass, available at Nirve dealers.


Finished the hand stitched saddle today. I feel lucky. Only poked my finger twice with the needle. When it was all done I gave it a coat of dark brown Kiwi shoe polish to darken the threads and the puckers around them for an old saddle look. It came out okay but now I'd like to try it with some real leather. There's two days of labor stitching this one. I'll give my fingers and back a break before starting another one.

Tom
 

Attachments

Last edited:

Dan

Staff
May 25, 2008
12,765
115
48
59
Moosylvania
Lookin' awesome Tom!


Started on the seat upholstery. Got the foam cut and glued to the pan and the edging which will soften the sides a little. I'm hand stitching this thing so it's extremely labor intensive. My fingers are getting sore from pushing that needle.
More to come.

Tom

Wish I had known, I would have sent you a sailpalm. It is a very old devise used for patching sails. Will send you one as soon as I find em. (been packed away for years) It is a loop of leather that slips over your fingers and rests in the crotch of your hand between the thumb and pointer finger. A cup in your palm is used to push the needle. Works amazingly well and is uber simple.

https://www.google.com/search?q=sai...79,d.b2I&fp=77ef558e8e3c3212&biw=1024&bih=499

Thanks Wightboy,
Heh, heh, maybe it'll play some funky music :)

Tom
Har, LOL, snork

(KC and the sunshine band?)
 
  • Like
Reactions: motorhedfred

Tinsmith

Well-Known Member
May 15, 2009
1,056
259
83
Maryland
Thanks Tom. That's a good suggestion from Dan to use that palm thingamajig. I have a friend who is a leather worker and have seen him use one. I just use a thimble which is a big help. The old arthritis makes it pretty hard to push a needle through leather. I think the last time I did leather I used a small punch and went around the piece and pre-punched all the holes and then laced it up. I don't know if that is proper leather technique but it worked for me.

I think I'll try to mount my 3" tire and tube on my chopper when I'm up and running again. It'll required some adjustment for chain clearance I think, but I should be able to figure that out.
Dan (Tinsmith)