

SB, just die grind the bearing at an angle to miss the roller. once through one side of the outer race just split it with a chisel or die grind the other side and it will just fall off! Remove the balls and do the same to the inner, being careful to contact the shaft as little as possible. 5min tops, done it a zillion times in equipment repair.
American Deluxe hybrid trike
- Thread starter silverbear
- Start date

Since I have ordered the splitting tool I'll wait for it to come and then will feel like I didn't waste my $12.00. My hope is that I'll be able to reuse the bearing when it is time to put the shaft back into the mower in it's new life as a jack shaft. Good to know there are different ways to deal with the problem, though. I can see where Curtis' method would work, too. Or is the bearing cheap enough not to worry about re-using it? One thing that concerns me a little is the sizing of things in old stuff from Britain. Some wrenches and sockets are Whitworth, neither metric nor standard stuff. I used to have a set of Whitworth wrenches to work on my MGTDs. Don't know if the British measurements extends to bearing sizes, shaft diameters, etc. Simplest way is to reuse the same stuff and remain ignorant. Ha!
SB
SB
Last edited:
If there is a #on the bearing you can get the china version ( I have used them on my mower deck)at O'Rilley auto for $4 or a good parts store can mike it. I think I set you a site not to long ago for bearings should be able to find it on there. The main thing is grease you can get a small injector like needle to fit grease guns, small pick lift the seal,inject it with some high temp grease(not much in them when new). I got mine at farm supply but should be able to get them anywhere that sells grease guns
My mower deck has grease fittings so I take the inside seal right off....only way to mow.....ride..............Curt
My mower deck has grease fittings so I take the inside seal right off....only way to mow.....ride..............Curt
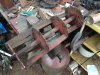
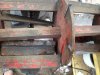
Yesterday I removed the cutters from the cutter shaft using a side grinder with cut off wheel. The remaining nubs were ground away with a stationary grinder. That's done and ready to go back into the mower.
SB
SB
Attachments
-
 261.2 KB Views: 232
 -
 233.9 KB Views: 207
 -
 235.7 KB Views: 221
 -
 218.5 KB Views: 232
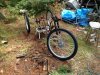
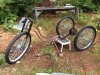
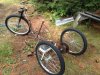
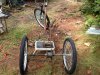
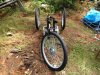
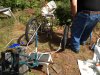
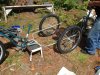
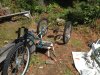
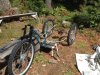
Today I did some mocking up using a similar frame (1952 Schwinn) with the front fork from another build (kindalikeawhizzer) and the rear wheels finally mounted on the differential. The mockup is for the purpose of figuring out how far back the differential needs to be and to start visualizing how to modify the rear triangle for the new rear end. I like the footprint, being longer and wider than a usual trike conversion. Tires look good. I like it.
SB
SB
Attachments
-
 366.9 KB Views: 255
 -
 363.8 KB Views: 253
 -
 354.3 KB Views: 257
 -
 358.4 KB Views: 242
 -
 369.7 KB Views: 253
Lookin good. I like it! Wheels are still impressing me! I have the same Schwinn frame. by the SN its a 1953.
canonball,
Your 53 Schwinn step through frame would be a good candidate for a trike build. I've debated back and forth between my 52 and the similar, but more snazzy 63 American Deluxe frame. I'm going with the 63 because I like the fake gas tank in it. I suspect however that the frames on our 50's balloon tire Schwinns might be a little more robust. They were certainly well made back then. I think for a trike conversion the only sensible frame is a girl's step through... too much difficulty trying to swing your leg over a wide trike rear end. Hard enough on a two wheeler. Steppin' through's the thing to do!
Over lunch yesterday Steve and I were doing the "creative stare" at the old 52 with those wheels you & I both like sitting there and are thinking that a really nice heavy duty trike could be put together with mostly store bought parts for under $500.00. We'd go with the 79cc Harbor Freight for $99.00 on sale now and then... lots of grunt for going 20mph or so. A new Peerless differential axle from Northern Tool for around $120.00 (1" diameter axle 38.5 inches long). Instead of salvaged wheel cores buy the same thing new from Central Supply; 4" long keyed shaft connectors for a 1" diameter shaft at just $7.00 each. You'd still have to make the wheel flanges and lace them into rims, but the main expense there is the spokes if you buy new 11 gauge ones. Vintage steel rims would be plenty good. You could make nice wheels using older moped rims & spokes or from a light motorcycle... something stout. A pair of 24" front wheels from Worksman or Husky would be good for the rear.
Adapting the rear part of the trike would be a lot simpler if we weren't using this Atco Mower assembly. With a predator engine it wouldn't take up much room. You'd need to make up a rear end to accept a jack shaft with pillow block bearings to support that long axle. Staton sells a freewheel adapter so that you can use a salvaged freewheel from a Shimano hub to accept the pedal chain and mount it where you want on the axle. Disc brake rotors & calipers for go karts are made for 1" axles.
I'd like to see someone do it using a common 79 or 99 predator or even an electric version... but with the differential axle, stout wheels and suspension front end. A real motor trike for big people. I want to set mine up for a second rider using a heavy duty rear rack from an old Schwinn (padded & upholstered)... plenty strong enough to make into a seat. I'll post photos of one next. Along with a couple of foot supports it would be nice to be able to give a good old girl a ride. "Hang on to the old bear tight, darlin". Ha! I may be too old for some things, but not everything! This trike is gonna be fun...
SB
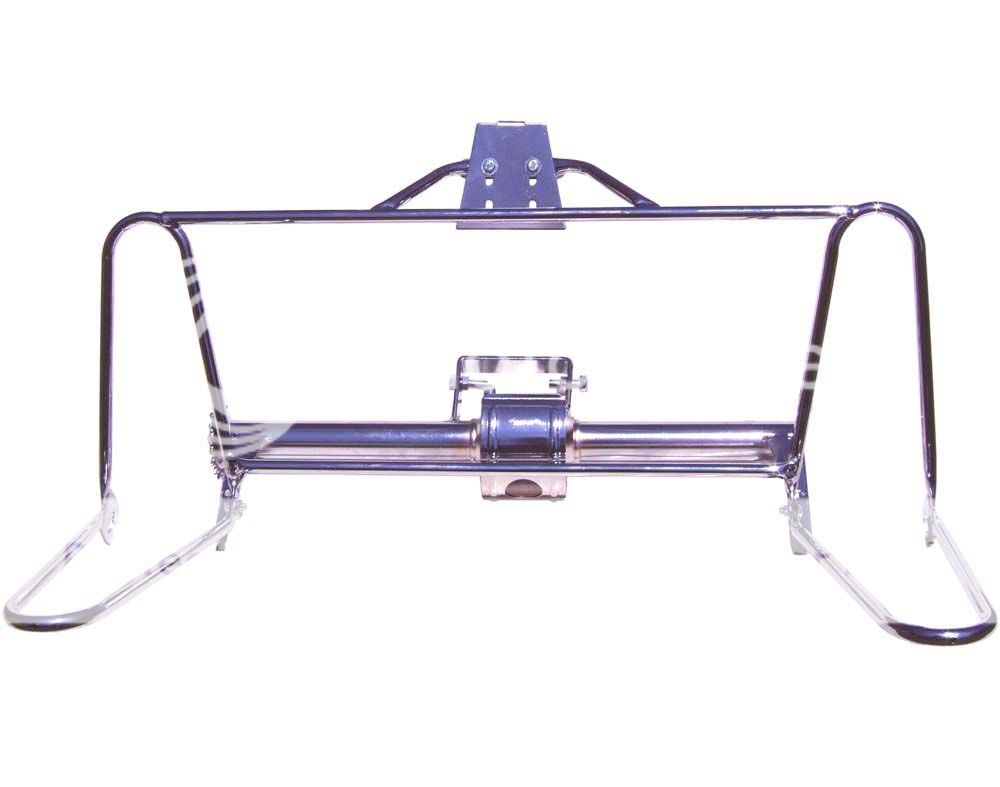
The rear rack pictured comes from a 1960's Schwinn. I have one on my American flyer with the canoe sidecar and it is very well made, quite strong and I think can easily become a seat for a second rider. It may get some plywood to widen it out a bit (maybe not) and certainly needs foam padding and upholstery to match the driver's seat.
The seat I'm using also comes from a Schwinn, 70's era I believe. One's from the 60's were torture, but this one is a very comfortable seat. Notice all of the little springs inside it which, along with the ample padding are kind to me nether parts.
The seat post is one of the old kind from a 1938 Elgin. It is too small a diameter for the newer seat post tubes, but with the right kind of shimming can be made to work fine and be secure. It took me a few tries on how to shim it. Now I've got it down pat. You need to find two copper pipe connectors in the same size as the post. They are hard to slip on and you will need to slit each one anyway. so they can compress when the seat post clamp is tightened. Not shown is the next size up in copper water pipe connectors. You will need to not only slit it, but to remove about a quarter inch slice out of it end to end. Now you need a hose clamp and tighten it down so that you can slip the compressed connector inside the seat post tube. Once in remove the hose clamp and push it on down into the seat post tube leaving an eighth inch or so above the top of the seat post tube. Now slip the lucky seven post into it and you'll find that the connectors affixed to the seat post will slide snugly inside . Tighten the seat post clamp and it is secure. Sometimes you can find these old lucky sevens on a donor bike or ebay for pretty cheap. They are solid steel and can make a good lay back post.
SB
Attachments
-
 353.9 KB Views: 238
 -
 356.2 KB Views: 242
 -
 352.2 KB Views: 239
 -
 269.6 KB Views: 213
 -
 250 KB Views: 228
Last edited:
Lookin good SB! I bought a solid lay back form a seller in ebay that is a forum member I believe also. He will make almost any size/combo. I have one on my Maytag bike. I looked at originals but they were $$! Great tip on shimming. Something to add. I had an aluminum shim(purchased) that would slip no matter how tight. A piece of 320 wet/dry sand paper slipped in between it and the post solved the problem.
Years back I built my kids a gokart with a lawn mower 5 speed transaxle. Worked real well. Allowed the use of the cheap/easily found vertical engines. That thing would go anywhere over any thing in the lower ranges.
Years back I built my kids a gokart with a lawn mower 5 speed transaxle. Worked real well. Allowed the use of the cheap/easily found vertical engines. That thing would go anywhere over any thing in the lower ranges.
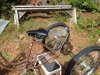
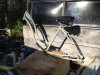
Fasteddy worked on some serious "creative staring" today with the help of a donor frame of similar proportions and design to the Schwinn American Deluxe we'll be using. With the rear portion cut off and the addition of some tubing from an old TV antennae he was able to mock up the lower support portion of the new rear end. Using a conduit tubing bender he approximated the bends he wants for his son in Vermont to make out of steel tubing of a more substantial diameter.
But even having just this much visual aide to go on the ideas start flowing. No need to go into that now, but with just this old aluminum tubing clamped into place we are forming a plan for the rear layout design, using what materials, knowing where the differential axle will go, how the pedal freewheel will line up and how the upper supports will reach back to tie things together. We want for this new rear triangle to be quite strong, so don't let the flimsy aluminum tubing fool you.
We discussed this over a sandwich and cold beer supper this evening. What we are building is not a trike with a motor. This one is being designed and built as a motor trike, with nothing wimpy about it. The kits out there on the market are for converting a pedal bike to a pedal trike, even if a sprocket is included for a motor it is still a pedal trike with a motor attached. We fully expect this machine to behave differently. That's the intent anyway.
SB
Attachments
-
 307.1 KB Views: 227
 -
 336.4 KB Views: 217
 -
 332.6 KB Views: 214
 -
 334.8 KB Views: 219
Over the past couple of days I have finished priming the trike frame and followed up with Ford gray tractor enamel. I like the color, a kind of pearl gray. I also cleaned up the chrome fake gas tank which originally housed a bike horn with aluminum foil wadded into a ball and rubbed against it to clean it up and remove light rust. Does the job well, I find. I also added the American Flyer head badge originally created for all of their high end Schwinns coming out of the Louisville Cycle bike shop. Classy looking head badge I think and jumps right out of the gray background.
At some point the rear triangle will get removed and some new painting will be needed, but doing this now helps me to visualize and get psyched about how cool this trike is going to be.
SB
At some point the rear triangle will get removed and some new painting will be needed, but doing this now helps me to visualize and get psyched about how cool this trike is going to be.
SB
Attachments
-
 230.4 KB Views: 217
 -
 211.8 KB Views: 229
 -
 199.4 KB Views: 221
 -
 193.5 KB Views: 230
Last edited:
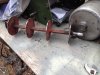
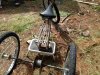
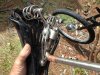
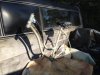
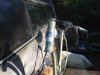
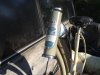
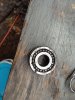
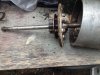
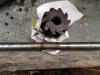
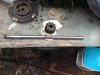
The bearing splitter arrived today and in short order was able to remove the bearing without damaging it so that it can be re-used. Photos pretty well tell it all. Twelve bucks well spent. The shaft is 3/4" in diameter so finding a sprocket to fit should not be a problem. What size sprocket will take some study by someone smarter than me.
Question. It could be that I would not need to remove the gear sitting midway on the shaft, but what if it happens to be right where the sprocket needs to go in order to align with the differential driven sprocket? How can it be removed? Can it or do I need to make friends and get used to it being there?
Since there is no key way midway on the shaft (formerly roller shaft and now jack shaft) I've been thinking about how to affix the sprocket. I suspect that cutting a half way accurate key-way into the shaft with hand or power tools would be difficult. I'm picturing a dremel tool with maybe a cutting disc and grinding bits. That shaft has to be really hard steel, so I'm guessing that approach might not work out so well. Having a machinist put in a key-way might be possible, but also expensive. What about grinding and filing a flat where the Allen bolt or bolts would touch the shaft? And what if I were to drill a shallow bit of a hole where the Allen bolts touch, to give a more positive grip on the shaft & then use lock tite on the Allen bolts... would that be adequate?
My questions give evidence of an extensive lack of knowledge about this stuff, so some guidance would be much appreciated.
SB
Attachments
-
 231.2 KB Views: 233
 -
 210.8 KB Views: 228
 -
 235.2 KB Views: 227
 -
 247.5 KB Views: 211
 -
 230.7 KB Views: 219
With patience & some skill (both of which you obv have lol), you can cut a keyway into a shaft with a dremel without too much trouble, giving yourself a steady working surface helps - like the shaft in a vice with some sort of elevated platform in front of it to brace your hands/tool on.
Then again, any decent machinist/metal working shop would likely cut that keyway for about $20, likely less if they know how cool the project is")
Then again, any decent machinist/metal working shop would likely cut that keyway for about $20, likely less if they know how cool the project is
Yep if you find a privet shop guy with a hart. If you do it by hand it don't have to be very long slot,not as long as the sprocket. Half moon keys are not that long.
Also the old Briggs used the drilled dimple for set screw methed for years on there small engines..................Curt
Also the old Briggs used the drilled dimple for set screw methed for years on there small engines..................Curt
Thank you guys for the input.
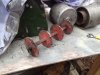
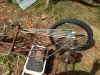
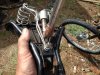
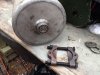
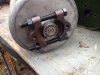
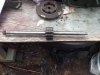
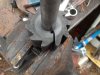
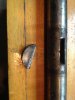
Last evening upon closer inspection of the shaft we noticed there was a thin washer at each end of the gear on the shaft. Each was removed and it was clear that there was a keyway with a half moon key holding the gear in place. I tried removing it this morning without luck and Steve suggested cutting it loose with the side grinder and a cutting wheel. Slick!
Removing the key was not easy, but it finally came out.
So, now we have a jack shaft free of encumbrances. It would be nice if the key way happened to be just where we need one for the driving sprocket, but what are the chances of that? We'll see. If it doesn't then I'm going to try making the slot for a half moon key with the Dremel. I can do it! (He says...)
SB
Attachments
-
 203 KB Views: 207
 -
 239.2 KB Views: 226
 -
 209.3 KB Views: 220
 -
 180.6 KB Views: 202
Curtis (or anyone),
Do you have any idea what size chain those peerless differential sprockets would run? I'm now looking for a possible sprocket for the "new" jack shaft and am thinking to experiment with either 12 tooth or 15 tooth to start with, but want to be sure the teeth and chain are compatible with the Peerless sprockets. I have three different sized differential sprockets, so can do some fiddling with trying one or the other to determine what will work well.
If we use the whole sprocket configuration on the Atco mower I'm afraid I'll get lost trying to find the final gear ratio. I noticed that the roller was able to walk the mower along slowly even at idle and with the throttle opened up it made for a brisk walk to keep up with it. The roller is good sized, so having a sprocket at say a third to a half of that diameter should make for a pretty quick rotation going to the differential sprocket. I'm looking for a cruising speed of 15 to 20 mph with a top speed of perhaps 25 mph. If I get anywhere in that ballpark I can switch sprockets around on the differential or if need be change the sprocket on the jack shaft up or down in size.
Anyway, what size chain would that be running? Could I just try #41 roller chain on the differential sprocket to see how it fits or is there a better way to determine chain size?
Do you happen to have a used sprocket in the 12 to 15 tooth range from one of those mowers? Shaft bore needs to be 3/4". Thanks, Curt. How are your projects coming along (lake cabin sale, bike build and no doubt a list of honey-do projects)?
SB
Last edited:
Wow! It's been a wirl wind summer so far. Am on the road again for a week. Sunday went to swap meet sold a bunch of stuff 2 mopeds 6 bikes 1old Kawi motorcycle,and a bunch of car parts. Prolly won't put the for sale sign up till spring,lots of work to get done before.
About the differential I believe it was #40 chain that's what most snow blower and mowers have,wwern't thinking could have sent some along in the box,tossed some out not long ago.
I think you would like a 15:1 ratio you can come close by deciding the teeth.like 12 into 36=3:1 and pulleys 2" into 6" =3:1 ratio put the two together and will give 6:1,there is the rpm factor that has to be figured also to get the exact speed,but for us close is good. And if it is off just a tad just change a sprocket. What is the biggest sprocket on the differential? I may have a bigger one I could send if you are not in to big of hurry. Also you might think about going to a #35 chain you can get more teeth coun't in a smaller size and just tack weld it to the side of one of the sprockets you have,but maybe you can get by with what you have. I don't a small 12 tooth but have others sizes ,so when you get it figured out let me know...............Curt
It's very interesting to see the design process and progress you're making with your trike SB. My own Hercules has a lightweight custom rear axle which only drives on one side and after much experimentation and fettling it now has extra bracing struts to stop it bending in the middle. When I still had the 250 watt motor wheel fitted on the non drive side of the axle I found I didn't really have many problems with the pedal drive being offset because I had everything setup so I would pedal to assist the electric motor wheel which kept everything nice and balanced in the drive department. At the moment the Hercules is unmotorised with a single speed Sturmey Archer coaster hub on the drive side. it's ok for pottering along on grocery fetching trips, but I do eventually intend to motorise it again once I'm a little more well.
I totally agree that your setup using the Peerless diff is the best solution though. Lightweight axles like the one I'm using are not really up to the job.
Without additional bracing, better driveshaft bearings and improving the way the drive sprocket is secured these axles are a disaster waiting to happen. And what's more you definitely don't want to try driving them with a motor of any kind
It will work well with an electric motor wheel on the right hand side (non drive side) so long as one does not go crazy and use too powerful a hub motor. If one is experienced with driving a sidecar outfit in an intrepid fashion, then one will have the necessary skill to also drive a tricycle at a bracing speed, BUT this is not to be recommended to anyone of a nervous disposition or those who possess a fragile skeleton.
I totally agree that your setup using the Peerless diff is the best solution though. Lightweight axles like the one I'm using are not really up to the job.

Without additional bracing, better driveshaft bearings and improving the way the drive sprocket is secured these axles are a disaster waiting to happen. And what's more you definitely don't want to try driving them with a motor of any kind
It will work well with an electric motor wheel on the right hand side (non drive side) so long as one does not go crazy and use too powerful a hub motor. If one is experienced with driving a sidecar outfit in an intrepid fashion, then one will have the necessary skill to also drive a tricycle at a bracing speed, BUT this is not to be recommended to anyone of a nervous disposition or those who possess a fragile skeleton.
Curtis,
I'll probably just stay with #40 chain for the final drive. I'll measure both the roller diameter and the differential sprockets at next opportunity. Today is going to be a busy one as a neighbor is driving Steve and me to town to pick up a part at NAPA for the camper/van while I have to pick up groceries, hit the library and stop in at the bank about a truck loan. My Silverado died a couple of weeks back due to the automatic transmission giving out while creeping rust makes further investment a case of "throwing good money after bad" as the old saying goes. My brother is selling me his pristine 1981 Ford f-100 with 26,000 original miles on it. No rust, straight 6, 2 wheel drive. I'll have to go to Iowa to pick it up next month, so with Steve's camper down we are without wheels (plenty of bikes, though).
There is no hurry on anything regarding this trike. It will get done when it is finished, running on Indian time just as I do. Good way to live, I find. I get ahead of myself sometimes with thinking through this build, stewing over the final drive ratio when the frame isn't even together yet. Summer is now autumn and when (and if) we return from our trip to the east coast Motor Bicycle Summer Camp (for boys who never grew up) will shut down with Steve's return to Vancouver. Already there are signs of leaf change with yellowing in the under-story, sumac turning red and now and then a leaf falling to earth. Jack Frost's big annual art show is coming to a town near you and sooner than you think!
My hope is to have the trike together enough to continue tinkering through the winter. With the frame base bent by Steve's son he plans to take those parts with him to Vancouver and then weld up the rear triangle so that it can be sent to me and then joined to the trike down here. I'd like to be getting the drive lines squared away and then focus on the electric aspect of the trike, figuring out a front disc brake, building the batteries with help from Cannonball2 and setting up the controller, throttle and such.
In back I'll still have the disc brake to set up, get the axle supported with the pillow block bearings you sent me and... and... and... (you know how it is). This isn't a simple build, but I'm hoping it turns out to be a solid one which lets me ride ten years from now without having to continually fix this and that. I want to just step through the frame, sit down on a comfy seat, set the choke on the Villiars, give the electric front wheel a bit of throttle to get rolling, engage the Atco dog clutch to get the Villiars turning over, shut down the choke once it catches, let off on the electric front wheel, give the Villiars gas and go putt putting away.
One other thing I'll be needing if you run across any as you're cleaning out is 3/4" collars for the axle. Old and salvaged is just as good as new. You've saved me a good bit with those old pillow block bearings, the differential axle and such. You've got your name all over this build, Curt, and I thank you for that. Anything I have which you can use... please let me know, my friend. I'm clearing out my stuff, too. Too much stuff and it is best to either sell it or give it new homes now rather than having it carted off to the dump in twenty years when my junk is getting tossed after I've gone HOME if you catch my drift. It's just stuff unless you need it for what you're doing and then it is treasures.
Hope things slow down for you and that you can find time for tinkering with your bike build. Maybe when snow comes you can spend more time out in the shop. Take care of yourself, bud, we're in this for the long haul. We need to go for a bike/trike ride next summer.
SB
Hello Anne,
I appreciate your input and it is good to have you here for this project, looking over our shoulders to see what we're up to. You are an experienced triker, while I am not, so any insight you can offer is appreciated.
You also have more exposure to Villiars motors and are one of the very few on this forum owning a Villiars midget, the same engine which will power your cyclecar project. And as I recall your cyclecar is to be of delta design, essentially a motored trike, not so very different from this build in that you will have the same villiars gas engine and also an electric motor. And yours will have pedals as mine does. True, they will be put together differently and will not look at all similar as mine will appear to be more closely related to a light motorcycle and yours will be much more the light and vintage car/automobile. Yet they will be cousins, let us say, and will share a family resemblance. So, it is doubly good to have you here as this trike comes into being.
I keep forgetting that it is winter in your part of the world and as autumn has come to my forest home with snow soon to follow you are on the cusp of spring with flowers and many sunny days ahead. Each day here grows darker as yours grow brighter. Big world, it is. Good thing there's gravity or we'd be in real trouble. Ha!
SB