

98cc Villiers on a 1945 Sears Roebuck
- Thread starter Harold_B
- Start date

Thanks Moto. And thanks again for the deal on the sheave. It took some effort but it shines pretty nice. Most of the stuff on the surface wound up in my beard and I looked like Santa after a few soot lined chimneys. One of these days I'll get in the habit of wearing a bandana whenever I break out the buffer.
At a glance it might be hard to tell that I've been busy but I have been. One thing that bugged me was the lines of the bike didn't look right to me after adding the section for the transmission and the beefier tubes for the rear triangle. I think it was the way the the top tube flowed into the rear triangle before I cut it and the gap it left when I welded on the new parts so today I fudged in a tube from the lower top tube and bridged that to the rear triangle. There's a slightly bigger tube slipped over the end at the down tube to make it look a little bit like the brazed and flanged tube on the opposite side. Also got the seat brackets welded on. Lots of clean up to do again.
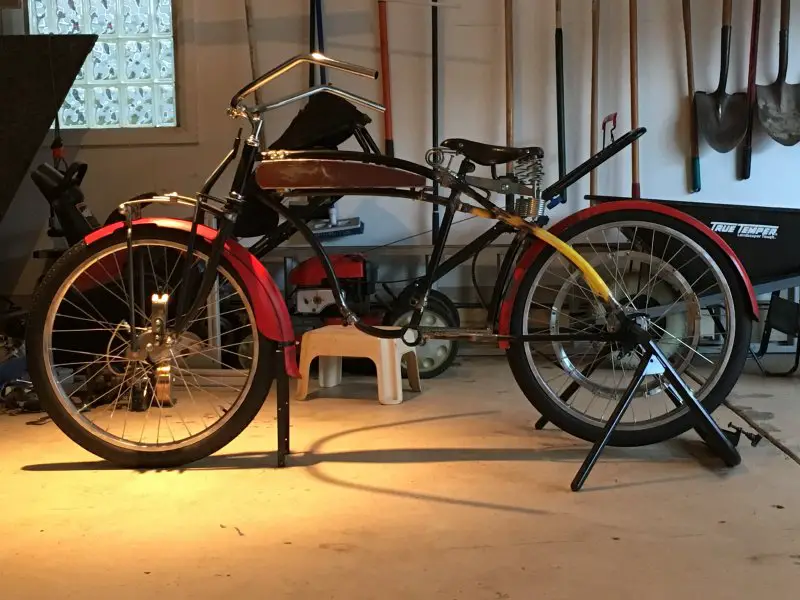
Maybe this shows it a little better but then with the quality maybe not but the idea is there.
Maybe this shows it a little better but then with the quality maybe not but the idea is there.
Last edited:
Harold,
That's one of the things that the builder notices but other observers miss until it's mentioned. It does make the frame lines flow together better. A beautiful build and I enjoy watching it come together.
Steve.
That's one of the things that the builder notices but other observers miss until it's mentioned. It does make the frame lines flow together better. A beautiful build and I enjoy watching it come together.
Steve.
Thanks Steve. I assumed that the gap was only an issue for me or if it was noticed by anyone else they weren't likely to mention it. This forum is full of constructive feedback, helpful instructions and encouragement from fellow builders which is why I like posting here. One of these days I should move the bike so there's not so much clutter in the background.
Or move the background, LOL Looking at your build i think the yellow stay should be a little straighter, they seem to have a bit of a kink in them. Flow a bit better with the rest of the curve, just my thoughts.Loving it otherwise ...........CurtThanks Steve. I assumed that the gap was only an issue for me or if it was noticed by anyone else they weren't likely to mention it. This forum is full of constructive feedback, helpful instructions and encouragement from fellow builders which is why I like posting here. One of these days I should move the bike so there's not so much clutter in the background.
Whew. Just spent the entire day moving everything in my garage to the other side. My wife is now parking outside but thems the breaks! Ha! It could happen....
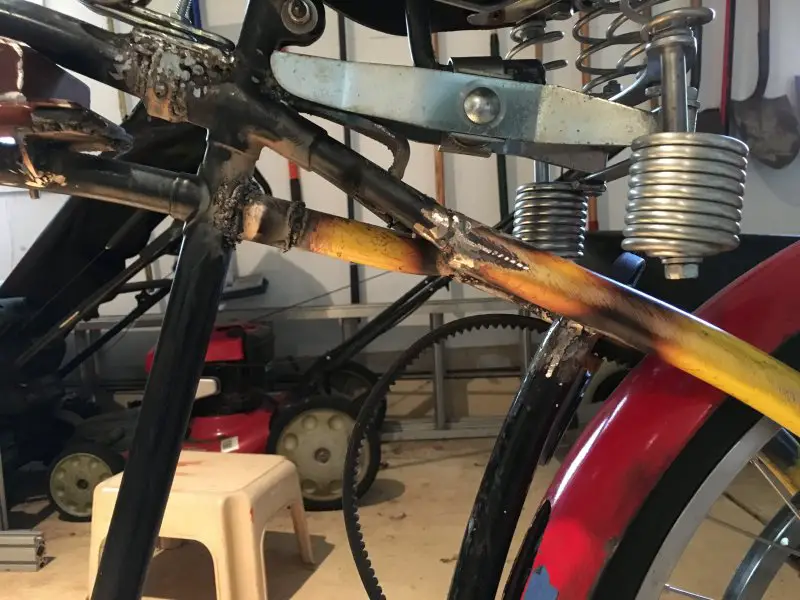
I'm guessing you're referring to the area where the yellow tubes are welded onto the existing black tubes. I struggled with that a bit compromising between blending the lines and getting the wider spacing for the hub correct. I plan to continue to add gussets and the like to make some areas stronger and perhaps that will help blend that area as well. Thanks for the feedback!
I'm guessing you're referring to the area where the yellow tubes are welded onto the existing black tubes. I struggled with that a bit compromising between blending the lines and getting the wider spacing for the hub correct. I plan to continue to add gussets and the like to make some areas stronger and perhaps that will help blend that area as well. Thanks for the feedback!
Harold, your wife is parking outside and winter is coming on. There's a fine line between bravery and tempting fate. I'd say your straddling it.
I noticed the curve but my thought was that with the piece you added it looked natural and once it painted it's will blend in. There are always a trade off in a build where you do something to gain something else.
Steve.
I noticed the curve but my thought was that with the piece you added it looked natural and once it painted it's will blend in. There are always a trade off in a build where you do something to gain something else.
Steve.
Guys if the radius is to be consistent along the entire top tube it appears to me that the entire tube would need to be replaced from head tube to the drops and if that were done perfectly there would be a noticeable gap between the fuel tank & straddle bar. Of course I like the look of the small tubes leading into the bulky seat stays & the change of radius kinda helps that transition in tube diameter work with the other changes Harold's already made. Rick C.
I'd be willing to bet that, once you paint the frame all one color, to any observer but you it will look like it was meant to be exactly that way. And it will look great to all of us here, I'm sure. And already, I can't wait to see the finished bike. This thing is looking pretty sweet now.Harold,
That's one of the things that the builder notices but other observers miss until it's mentioned. It does make the frame lines flow together better. A beautiful build and I enjoy watching it come together.
Steve.
I'd be willing to bet that, once you paint the frame all one color, to any observer but you it will look like it was meant to be exactly that way. And it will look great to all of us here, I'm sure
For sure, i just wanted to point it out. That bright yellow does not blend with the rest, prolly won't be noticed ................Curt
For sure, i just wanted to point it out. That bright yellow does not blend with the rest, prolly won't be noticed ................Curt
All the feedback is really appreciated. The yellow and black transition does make it hard to envision what the bike will look like once it's painted all one color. It gives me a lot to think about when it comes to color choices. One day I'm leaning toward a vintage light blue and the next all black and then all red and around I go again. One of the considerations is hiding some of the so-so welding and along with the hodgepodge of tubes that make up the frame. The yellow tubes were from the little Schwinn Gladiator and pretty beefy but are already bent to shape. Sort of they are what they are so I've made the best of it with the idea that if I don't like it I can alway change it. That was really the reason I wanted vintage steel so that it could be welded easily unlike the aluminum frame of the previous build. That I could not do myself. I'll be removing the paint and putting primer on over the next couple weeks if things go well so let's see how the frame shapes up.
You could probably hear the smack of my palm on my forehead all the way across the pond! It's raining and 42 degrees F here today so there's not much going to happen but it's supposed to warm up in the next day or two. I think I have a can of black primer and I can just buzz it in the yard.
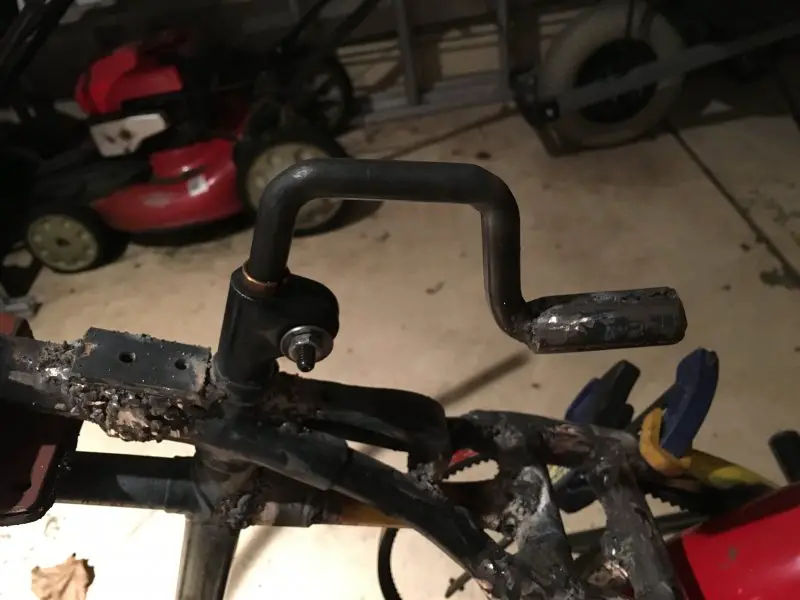
So I've offered to post a bit more detail on how I'm mounting the Leper Primus Saddle a little further back and lower on the frame for Gilbert's build and for anyone else interested. As a bonus you'll appreciate my butter smooth welds. Actually they have a lot of grinding in their near future so it's more like butter that's been dropped on the garage floor. So first things first. I had made a seat post from 1/2" rod with a short section of pipe slipped over and welded onto the end to fit a modern seat clamp. I then took a torch to it and bent it so that it would be parallel to the ground and wrapped around the seat post clamp. The brass bit is a bushing with a slit cut lengthwise and slid into the clamp. Next I cut a couple of pieces of steel and drilled and tapped 1/4-20UNC holes in them. One for in front of the seat post clamp with two holes and one longer "bracket" that fits between the seat rails that is welded on behind the seat post clamp.
I unbolted the double spring at the front of the saddle and slid the seat clamp onto the post.
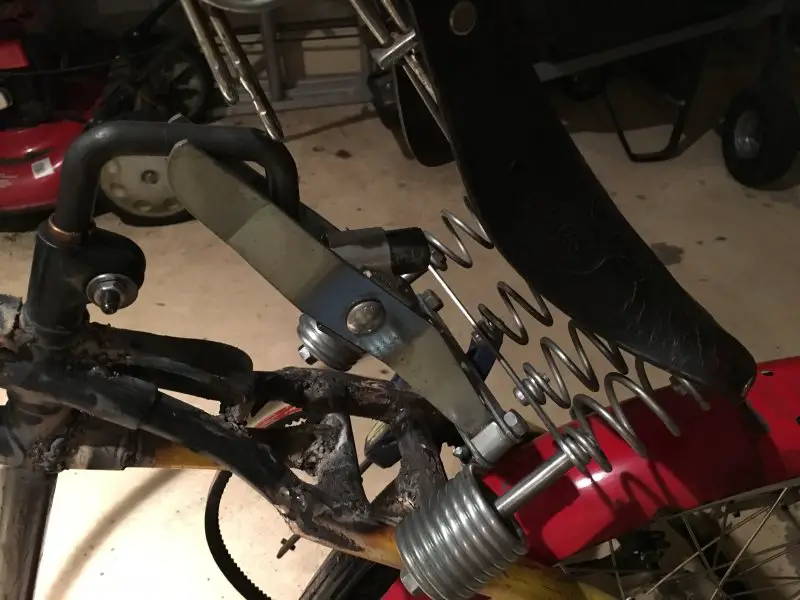
From there I swung the saddle over the seat post clamp and bolted the double spring onto the top tube using the front plate and the seat rails onto seat stays with the back bracket. My plan is to cut threaded rod to length and use acorn nuts so that it's as pretty as it can be.

I had used the plate in the Leper seat rails as a template for drilling and tapping the holes.
I unbolted the double spring at the front of the saddle and slid the seat clamp onto the post.
From there I swung the saddle over the seat post clamp and bolted the double spring onto the top tube using the front plate and the seat rails onto seat stays with the back bracket. My plan is to cut threaded rod to length and use acorn nuts so that it's as pretty as it can be.

I had used the plate in the Leper seat rails as a template for drilling and tapping the holes.
Last edited:
Thanks Rick. The seat connection to the frame is much more robust than just the clamp. The serrations on the face of the rails and the clamp are not very effective anymore when it comes to keeping the saddle level. I guess that's what happens after 30 or so years of service at least for this saddle.
You'll notice everything is right back where it was. Sometimes bravery is another word for foolish! Actually my wife is super accomidating of my hobby. She understands that it gets me out of my own head and just how important that is to me. So the clutter is still behind the bike in the photos but aside from moving junk around I tried to get back at finishing the fork. The previous build used this same fender with a skirt and it was always tough getting the wheel on and off. I was fortunate that I never flatted on the road because I have no idea how I would have changed the tire/tube without laying the bike down. There were a lot of bikes (mostly Brittish I think) that had a drop stand that was also a fender brace on the front. I like the idea so I've decided to try to make one for this build. This is making for more clean up but so far I'm happy.Harold, your wife is parking outside and winter is coming on. There's a fine line between bravery and tempting fate. I'd say your straddling it.
Steve.
Another view...
Last edited: