52cc Stage 2 CAG CVT powered X-Games Motobike

GoldenMotor.com

16v4nrbrgr

Active Member
Mar 17, 2012
1,728
4
38
North Bay
I got an air leak (cylinder base gasket I think) last ride and the piston had a burnout, bummer. Fortunately, this is a cheap motor to mod, so I ordered a cylinder kit off Ebay with vertical fins on a round one piece head vs the two piece on this thing. I also ordered some jets for the carburetor, so I can fatten the heck out of it to ride this winter. Running 91 octane in these things with the high performance head kits, you gotta run a lot of fuel as 'coolant' and then run a hotter plug to get it to idle. I'm gonna try and run it without a base gasket next time if I can.

I'm thinking about doing a staged reed modification too, to help the bottom and top end with bleed holes and multiple layers.

Edit: ordered some copper base gaskets so if I need them I'll have them. I also ordered another CF reed petal, I have something in mind for a bypass reed setup.
 
Last edited:

16v4nrbrgr

Active Member
Mar 17, 2012
1,728
4
38
North Bay
I put another cylinder kit on yesterday, tried breaking it in today with a 75 (.030") jet, and all was well until after the second heat cycle I found a stripped head bolt. This motor is testing my patience for sure, now I gotta pull it apart and make sure this doesn't happen to all four head bolts, prolly have to buy studs and double nut the things inside the case.

WTF, this ticks me off because otherwise this bike is ready to ride, just can't keep an engine together for more than 20 minutes.

Edit, got some helicoils to put in, $ching$ching$ :(
 
Last edited:

16v4nrbrgr

Active Member
Mar 17, 2012
1,728
4
38
North Bay
Gonna have to pull this motor apart and put studs with nuts through the case. The motor has a lot of power potential if jetted right, as long as it'll hold together.

I'm really disappointed in this motor, because its made from such soft material. All of the fundamentals for up to 8 hp are there, but its case thread strong enough to hold the standard 2 hp, barely. Its just getting worse and worse, so this case might not be savable since helicoils aren't strong enough.

I think the cag engine is a good idea for a racing engine, but to bolt a stock modded engine up, it just won't last. They need all the racing style safeguards just to hold together.
 

Intrepid Wheelwoman

New Member
Oct 29, 2011
2,830
61
0
Hauraki District, New Zealand
That reminds me of the British Anzani outboards that were used in racing. They could produce the horsepower alright, but it was necessary to have steel straps around the crankcase and the cylinder head secured by long hi-tensile studs and nuts to hold them together.

I actually own a British Anzani twin cylinder outboard engine, but have always felt a bit nervous about trying to put it in anything.
 

Attachments

16v4nrbrgr

Active Member
Mar 17, 2012
1,728
4
38
North Bay
Wow, that's one heck of a motor! I was thinking about snowmobile engines at one point but worried about how to cool it.

Tonight I went over a bunch of different scenarios and what parts are involved since I don't want to spend much more than I have to on this engine. I'd rather get it to the point that I can at least learn from tuning for the next one. I've been through this scenario before with the cag engine, as my friend back home put one on a Razor dirtbike after its electrics went out. I kinda feel like a fool because I've relived a lot of mistakes we made with building that bike as an electric and later as a gasser. We had tons of problems with the head studs, and I remember the same scenario of wrenching on it all afternoon just o have it ffft out after a short ride.

Head studs from McMaster would be $4 each, and I can get head bolts for a fraction of that cost. I think I'm just going to try to put jam nuts inside the case and use the bolts. This project has been the king of nickle and diming.

I have an idea for a special racing engine for this bike, but it'll take a lot of money and preparation. My goal right now is to get a runner that can hold the hp it makes and figure out tuning this particular engine. I think I'll be better off saving money and making do with what I have if I can get the head to stay sealed. I was thinking about buying a new engine or a bottom end, but this one is worth experimenting on first. I know it will work awesome if I can get it to stay sealed, it just needs jet and reed tuning from there.

I can see how this bike is gonna be now, and I should stop holding it to a high pedestal, as it requires major R&D since its such a dinky machine. I don't think these motors are necessarily crap just yet, but I think they're worth nutting inside the case for the head bolts. I'm wondering if its possible to even step up to 8 x 1.25 studs like the HT uses. I have a dead HT sitting here I could scavenge, lol.
 

16v4nrbrgr

Active Member
Mar 17, 2012
1,728
4
38
North Bay
Here's the cheap aluminum cap that I changed out the leaky plastic one for


I took the engine all apart today and the cases aren't worth saving, as the bosses for the head bolts were just crumbling out. It would be nice to start with known good parts, so I ordered a new case off eBay for about $20. One thing that's nice about these engines is that you can afford to have failures or make mistakes, since its a simple motor of few cheap parts.

There is some room on the inside of the case to jamnut the head bolts, as well as the lower cylinder flange, so everything is sandwiched together in steel. I think that will help keep the cylinder from walking.

I also ordered some Dellorto PHVA 6mm jets for this Runtong Del replica carb. There's a drilled 75 in there right now and its too rich so I ordered a 66, 68, and 72.

This weekend I'll weld the 11t cassette sprocket onto my motor sprocket, alongside the 14t. 1st gear will max out at about 25 mph, but that's okay since its shifting pretty well now.

I might also make the staged reed petal mods so when I get the cases I can put it together right away. The motor came apart easily with a couple three jaw pullers, so putting it back together and on the bike should be another afternoon or so.
 

Intrepid Wheelwoman

New Member
Oct 29, 2011
2,830
61
0
Hauraki District, New Zealand
That sounds a good strategy. I think tying the engine together well with locknuted steel bolts will go a long way toward keeping it together.

After following your adventures with developing one of these engines I'm finding it difficult not to get one and try something similar myself. Only I really do need to get my other projects finished first or else I'm going to end up with the garage full of half completed bike builds again.
 

16v4nrbrgr

Active Member
Mar 17, 2012
1,728
4
38
North Bay
LOL yeah that's where I'm at, need to thin the herd in the coming months. Prolly going to sell the KTM chopper if I have to, it will make somebody really happy anyways...

I think if you're going to try one of these motors its worth getting one of the stock ones with the one piece cylinder head and an aluminum pull start housing. I've really had a lot of issues with the two piece head, and the only reason I'm sticking with it is because it makes fantastic power, if it can contain itself, well that remains to be seen! lol

You reminded me that I should try to get some metric jet nuts, which are all steel lock flange nuts, those would nice to use because they are so small and stay very tight. They're used on airplanes and race cars sometimes. Usually the metric ones are oxide coated while the standard AN ones are yellow cad plated. I think they might be small enough to fit inside on the ends of the head bolts.
 
Last edited:

16v4nrbrgr

Active Member
Mar 17, 2012
1,728
4
38
North Bay
I'm going to work on the engine and drivetrain this weekend, got some new bottom end split cases with bearings and seals so I can start fresh and bolt that ***** together like a pressure vessel to keep it from stripping the case threads and losing compression.
 

16v4nrbrgr

Active Member
Mar 17, 2012
1,728
4
38
North Bay
Thanks Intrepid Wheelwoman, it's certainly an experiment getting this thing together! I went to the local used bike parts shop today and bought a broken shimano freehub so that I can cut the splined part off that holds the cogs, and weld the shortened stub axle to my motor sprocket so that I can lockring the 11t cassette cogs to the transmission to make switching worn out motor cogs a simple procedure rather than having to weld up a new one from scratch every time. Of course the reality of running errands and attending to my schoolwork, and diagnosing my KTM50 on the other bike is probably going to postpone the Cag engine build, if I have the energy this weekend I'd like to make some progress though. I always start off with ambitious plans that take a lot longer than I expected, lol!
 

16v4nrbrgr

Active Member
Mar 17, 2012
1,728
4
38
North Bay
I finally got the chance to start rebuilding the engine with the new bottom end cases. The top end kit is practically new and not broken-in completely so this is basically a new motor, the full circle crank with rod were still almost new as well since I haven't had much luck so far! lol

I JB'd some sleeves into the cylinder base to help the bolts to dowel the cylinder, to prevent it from walking around.

Had to shave the sleeve of these jetnuts down with the belt sander, had to sand the flanges off the nuts completely on the clutch side to clear the case half bolt heads.

Here's the starter side

...and the clutch side

This is all kinda overkill, I think with lower gearing with the new 11t motor sprocket and jetted right this motor should last a lot longer than previous attempts. The cylinder pressures were too high before due to lugging it from takeoff, even jetted rich. Now the engine will be able to zip up from a stop so in theory it should work well, and these nuts on the head bolts will be just a fail-safe. I'm hoping this engine works well and lasts me until the summer, at which time I'll maybe try some different parts for higher performance, and bolt the cylinder on slightly different to see if I can make around 8hp reliably and keep it held together.
 

Attachments

16v4nrbrgr

Active Member
Mar 17, 2012
1,728
4
38
North Bay

Lightened the clutch arms by drilling some 3/16" holes through and installed it along with the flywheel tonight. This same procedure can be done on the aluminum clutches to raise the stall speed to 7000+ rpm, this one is cast iron so this mod should raise the stall to about 4-5K rpm for taking off without lugging. I put antie seize on the pivot pins because they had rust on them and that can cause the clutch to act inconsistent.
 

Attachments

16v4nrbrgr

Active Member
Mar 17, 2012
1,728
4
38
North Bay
Merry Christmas folks!

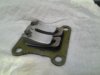
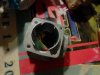
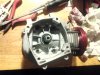
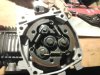
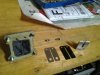
I'm using the day off to get work done on the Motobike. Here's the "Boyesen-inspired" staged reed I made to fill out the powerband. The CF reed is progressively stiff, but seems to flutter a bit at low speed, while the stock metal reeds are good for low end but tend to flutter at high speed. This staged reed will open up the drilled primaries at low speed, and at high speed they should slap together and work as a single unit. My friend and I did a similar mod to his cag engine that he put on a burnt out Razor dirtbike to help the low end flutter that causes the A/F ratios to fluctuate and hurt acceleration, and it seemed to help a lot. The Black Widow "Triple stage" reed setup is a bit different, in that it uses a fiberglass reed which is stiffened by CF fingers for the high RPM flutter which fiberglass ones suffer from. The stock metal reeds suffer from metal fatigue when used alone, but in this setup, the metal reed will not deflect as much at high rpm, because of the bypass holes, so they should last significantly longer. They are also half the price and much easier to get stateside than the CF reeds, which I order from the UK. I think a drilled "snap-proof" CF reed would eventually snap around the bypass holes if I drilled them out. The reed stop is shaved back for the upside-down intake to work on my bike which is upside down, which has a nice benefit of opening the reeds in the airflow downstream of crank rotation, rather than the stock upstream. The full-circle crank in this stage 2 engine then acts like a low pressure supercharger of sorts, since it fills the case almost completely and has a pocket which acts to scoop out "chunks" of airflow with every crank rotation. I hope this thing doesn't bust my knuckles pull starting it, it has mad primary compression even with the spark plug out! I calculated the cylinder head compression online to be around 9.5:1, should be okay with premium pump gas.

Unfortunately the CF fingers on those setups tend to snap off, which is very bad. A cheap DIY mod you can do is to back the composite reed with a cut-down metal reed that acts as stiffening fingers, but that has the drawback of causing the composite main reed to fatigue unevenly and get curled around the stiffening fingers, which then causes a loss of compression, also not good.

Boyesen reeds use a staged bypass system to optimize airflow and atomization throughout the revs, by stacking multiple reeds. I might take my other metal reed and make a "rev-plate" but I want to try this out first and see if there is top-end flutter first, because the rev-plate fingers will limit top end airflow a bit by stiffening the actuation of the stacked reeds. Like they say in racing, if you're going to copy, base your design off the best.
 

Attachments

Last edited:

16v4nrbrgr

Active Member
Mar 17, 2012
1,728
4
38
North Bay

Here's the stub of a cassette freehub welded onto the sprocket, if the 11t cassette cog wears out, its easy enough to remove the lockring and toss another one of them shyts on there.
 

Attachments

16v4nrbrgr

Active Member
Mar 17, 2012
1,728
4
38
North Bay
Dang, nothing just bolts up does it? rotfl 
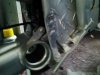
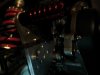
I had to turn the diameter of the Dellorto jets down, and rethread them to 6x1.0. I also had to turn down the outer diameter of a flange nut for the expanding sleeve for my right mirror, I fixed the left one a while back, the tapered nut they supply is made of pot metal and the mirrors used to loosen up all the time and then it stripped, so a steel one is the fix. I got that squared away and then went on bolt up the engine, and found that I gotta clearance the engine frame for the new chainline with the 11t which sits inboard from the bigger motor sprocket. That's okay I guess, since the 1st gear chainline will be a straight shot, and the chain will last longer. I also gotta clearance the right side peg plate, and put a spacer under the nut on the axle that hold it to the bike, so the chain doesn't grind away on the nut. The last thing I gotta do (knock knock) when thats all done is fix a bad connection in the digital tachometer/hour meter, since it has been intermittent, and I've isolated it down to a bad connection from squeezing the case and seeing it work again. Bleh, aint nothing easy when you start going custom, it's all gotta be customized...
 
Last edited:

16v4nrbrgr

Active Member
Mar 17, 2012
1,728
4
38
North Bay

Well, there's that. I also made the gas tank easier to take off by slotting the back of it and putting a semicircle cutout in the seat plastics, the things you find when you gotta take the bike apart out of order from how it went together initially...
 

Attachments

16v4nrbrgr

Active Member
Mar 17, 2012
1,728
4
38
North Bay
Thanks Lowracer, after thinking about whether to try a different engine, and looking around for different ones that have the same basic shape and not finding any, I looked around on pocketbikeplanet forum and there are a lot of guys who have had theirs last a long time, the key is gearing it low enough so you don't overwork the engine. The guys who had the best luck with crate engines were geared for about 30mph max on a pocket bike, and the gurus shooting for high speed around 50mph overgeared were doing the inside case nuts and other durability mods. Big shouts to EPR and CAM2 over at the pocket bike forum for archiving their work and advice.

Here's the finished cloysterfuken, took all day to get it all somewhat happy. The chain is going to rub the aluminum peg plate a bit in 1st gear, but it should wear a "happy trail" where it goes in 1st gear soon enough. When I warm up the bike I'll gas it and clean out the aluminum dust before I ride. rotfl All the other gears will clear fine, and with the higher stall clutch and lower motor sprocket gearing, 1st gear might not need to be used all the time anyways, its basically there to make up for the lack of pedals so the bike will accelerate strongly and not PO drivers.

For all new to the thread, here's what it looks like all together.

I think the next bike I build is gonna be a way more straightforward motorized bicycle, maybe even use a Happy Time and see if I can polish that turd into a diamond.
 

Attachments

Last edited:

16v4nrbrgr

Active Member
Mar 17, 2012
1,728
4
38
North Bay

Well, my clever reed mod wouldn't breathe well enough to start the engine, bummer. So I had to take the reeds out and flip them around, and bend the metal reed back to be a "rev-plate" like on the Boyesen setup in the picture above, but with a single stage reed. I can turn it over a lot easier now, so hopefully it will start.
 

Attachments