Alternate Broken Stud Fix

GoldenMotor.com

killercanuck

New Member
Dec 17, 2009
1,748
6
0
47
Wallaceburg ON
Hi all. So a few weeks ago I was able to pick up a "previously loved/hated" 66 HT for cheap. It was bought sight-unseen by a friend and driven an hour to its new home.

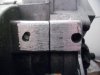
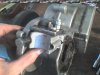
Opening up the box of parts there was cut-up rubber matting mixed in... uh oh... Sure enough, both rear studs were sheared off, and deep. One had even been drilled out and retapped to a 5/16", and that had sheared deep too.

At first I tried an easy-out, which angrily snapped off in there. Further attempts to drill a hardened stud next to soft aluminum didn't end well.

So after some thinking I came up with this:

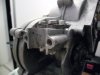
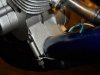
pic1 - completed, notice the stud holes in the spacer are tapped with 5/16" for normal mounting to frame

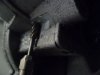
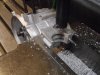
pic2 - what was left of the studs, and my failed attempt to drill. Surface is cleaned for JB Weld

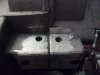
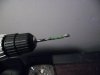
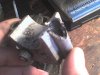
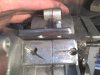
pic3 - New holes drilled and tapped for 6mx1 bolts. There's enough meat to get a good 5/16" deep into the case. The hole on the left is a little high, and ended up into the case bolt a hair. If done again keep it a little lower.

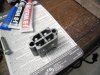
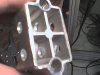
pic4 - Mod to the spacer for the longer bolts. Surface cleaned with sander for JB Weld

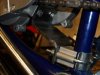
pic5 - Top view, used allen bolts in case. No clearance for normal heads.


Even without the JB Weld under the spacer yet it is very solid. I'd have preferred to use a solid 3/16"+ plate, but had to use what I had kicking around for now.

I'll update how it holds after the JB Weld and a couple miles on it.
 

Attachments

YoungRatRod

New Member
Oct 19, 2011
157
0
0
29
Wichita, Kansas
Hey killer i recently had both my studs broke, they're still in the case. Easy out broke, they're not comin out.
I really like what you did here. but how is it going to mount to the bike with that one stud still in there?
 

killercanuck

New Member
Dec 17, 2009
1,748
6
0
47
Wallaceburg ON
Thanks, both studs were still in my case too. In pic1 up top, I've threaded the holes in the spacer with a larger tap for mounting to the frame. It'll mount with a normal bracket on the back of the post. Albeit with larger bolts.
 

killercanuck

New Member
Dec 17, 2009
1,748
6
0
47
Wallaceburg ON
Got it on the winter bike and out for a boot today. It held up good :) no cracks in the JB weld. Will put it through the tow-test tomorrow to see how it fares after hauling a load of groceries/beer... to simulate a 200lb rider :p

btw, she screams! While it was apart I trimmed the skirt(intake side), cleaned the transfer ports(slag heaven), matched the intake/exhaust(as close as those get), intake was a mess, welds at the bend leaked insiside-cleaned that up. Pretty vibe'y at wot, but the jb weld held, so I'm thinking its just the way the engine is. May have to balance the crank in the future.

So yea, so far so good on the mount. I rode it like I stole it for a good half-hour to see if it would hold. It did.

*hear's ppl digging out old cases from junk piles* :D

edit- oh, btw I'm running no head gasket either, *after lapping head/jug from 220 down to 1500* no leaks there either.
 
Last edited:

YoungRatRod

New Member
Oct 19, 2011
157
0
0
29
Wichita, Kansas
Good to hear! Sounds like I need to make a trip to Menards tomorrow.

Can you help me make a checklist of sorts?

What size bolts? What size tap did you use?
 

killercanuck

New Member
Dec 17, 2009
1,748
6
0
47
Wallaceburg ON
Sure sure np, do you have any taps around at all? You know how to tap a drilled hole, right? :p If Not I can explain, or a pro will jump in while I'm typing that part. :) (long story short you can use a vise-grip just keep it level and keep pressure while you "turn a 1/4 to cut, turn back an 1/8 turn 1/4 to cut, etc" aluminum is more forgiving than steel) Just keep concentric(straight and centered) while you go.

Well, the bolts into the case are our standard M6x1, everything aside from the magneto cover is M6x1, (jug/head studs can be different, M6x1, M8x1, M8x1.25[1.25 is 8 threads per cm 1 is 10], so you know for future reference)

But anyways,

That's for the tap. Now for the bit, you're supposed to use a 1mm size less than the tap. I only have imperial bits around, so the closest I could find to 5mm is 13/64, I tried 3/16 but it was too tight for the tap. (Reference)

All that was for the holes/taps into the case itself, k.

The only other spot I tapped was in the spacer itself where the studs usually go through. An M8x1 tap didn't fit 'out of the box', but a 5/16NC18(this will tap the 'default' holes nicely) did, plus I had the tap and proper bolts handy. So I used that instead of drilling for the M8x1.

D'oh, sorry if this is getting confusing. I was just using what I had handy. But if you have to go and buy each piece, lets go with this:

In the case you could use M8x1's, just move the holes down more(post1 pic3 ref) and drill the spacer for the same size.

In a nutshell said:
So in short(if you're going shopping), you want:

a- 7mm drill bit
a- M8x1 tap

and bolts to match.
Case bolts only go in 1/2" depending on spacer.
Oh yea the spacer...diatribe incoming... depends what you use. Use a piece of scrap iron if you have one, but if its 3/16" you'll need that much extra length on your bolts going in a 1/2" in the case.

For the spacer bolts even 1/2" long will do.

know what I mean? I feel I'm over-complicating this, lol.

The holes/bolts going through the side of the spacer can be whatever, just use washers.


kk, I'll re-read this to maybe cut some fat, but that's the jist of it :)

If anyone wants to chime in, I'd love to have any perspective on improving this overall technique.

Sorry to mix imperial lengths with metric widths, but hey, that's how Canadians got started, eh?


Let me(us) know if anything isn't clear.

Thanks for the interest btw. gl.
 

Ibedayank

New Member
Oct 29, 2011
1,171
0
0
Columbia Tennessee
left out the use of tap/thread cutting oil and bottom taps.....sloppy sloppy work


this will teach ya to ask me if you got to technical...lol
 
Last edited:

killercanuck

New Member
Dec 17, 2009
1,748
6
0
47
Wallaceburg ON
d'oh,
well learn the difference between to and too. :p

Thanks for the heads up, but aluminum is soft enough to cut without oil as long as you do 1/2 in 1/4 out 1/2 in 1/4 out, etc.... save the $$ and drill an extra 1/4" with your normal tap instead of getting bottom taps :p
 
Last edited:

Al.Fisherman

New Member
Sep 9, 2009
1,966
5
0
Calera, Alabama
Here are some fixes I came up with to repair broken mounts. These cases were donated to my for this experiment, as I have never broken a stud...

One of the studs broke the mounting hole...
.....

Here is a case where the mount actually broke off. Front mount
.......
 
Last edited:

killercanuck

New Member
Dec 17, 2009
1,748
6
0
47
Wallaceburg ON
You mean like what I did? I haven't had the motor off since I put it on like that, didn't need to. Its holding up good. Haven't had it off for a closer inspection, but why fix what isn't broken, eh? :p
 

crmachineman

New Member
May 24, 2012
259
2
0
New Hampshire
Hi everybody.
I was about to post a new thread about a new rear mount that I've been trying out for some time, when I stumbled upon this thread. I have had numerous problems with rear mounting stud breakage. I realized that rear mounting studs break often. It is also a really difficult thing to fix well. So, I came up with this rear mount that gives you two other bonuses, as well as solving the stud breakage problem.
I'm going to make a small batch of these rear mounts in case somebody else would like to try.
So far, I have not had any problems with my other test bike that is running the same type of rear mount.
This rear mount pushes the engine forward to allow bigger air cleaner.
It also provides a left offset so you can run the extra large Kenda Flame tires.
These images are not too good, but it's a Walmart Cranbrook cruiser bike I picked up for $94.00. This frame has a significant curve in the bottom tube which tends to change the angle of the motor quite a bit. This looks cool, but it didn't end up giving much extra room, if any for a large air cleaner, unlike my other test bike.

-Fred
 

Attachments

killercanuck

New Member
Dec 17, 2009
1,748
6
0
47
Wallaceburg ON
Hey all! Quick update on the original post. It lasted 4 years longer than I thought it would. Went with 1/4" plate this time, should hold for another 4. :) You can see what was left of the old studs, they broke deep. I tried cutting a groove and using an impact driver on them, no luck. :(

.bld.
 

Attachments

2door

Moderator
Staff member
Sep 15, 2008
16,302
175
63
Littleton, Colorado
Greg,
Good to see you back.
You're getting your money's worth from that engine. Keep us informed as to how the steel plate does. Certainly looks strong. :)

Tom
 

crassius

Well-Known Member
Sep 30, 2012
4,032
158
63
USA
Did a rear today on which poor guy drilled crooked for a planned heli-coil. Used a front mount flat plate & drilled & tapped a new stud into rear.

P08-26-15_12.17.jpg

P08-26-15_12.18.jpg

P08-26-15_12.18[1].jpg

seems solid enough (sorry about miserable camera)