Motorized Bicycle: Engine Kit Forum  

Sponsors


Go Back   Motorized Bicycle: Engine Kit Forum > Motorized Bicycle > Paint Booth & Chop Shop

Paint Booth & Chop Shop What really makes a motorized bicycle stand out is the customized work, fuel tanks and paint jobs we give them. We'd love to hear your ideas and have a look at your customized work.

Reply
 
Thread Tools Display Modes
  #1  
Old 12-03-2009, 02:40 PM
bairdco's Avatar
bairdco bairdco is offline
a guy who makes cool bikes
 
Join Date: Aug 2009
Location: orange county, ca
Posts: 4,665
Default how i made an extended front motor mount

on a lot of cruiser frames, the front mount needs to be extended, and i've been trying to figure out a cheap, simple way to do it, and i did.

(caution! the use of a seatpost is involved. )

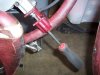
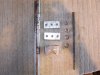
the pics pretty much explain it all. the first one was my first, lousy idea that i rigged up just so i could get the rest of the bike put together. the studs were bending before i even had the bike together. if i woulda left it like this, there'd be a motor by the side of the road somewhere.

so, here's what i made with basic hand tools.
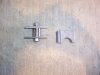
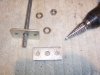
the materials are:

(picture 2)
regular motor mount and bracket

old seatpost

3/8 stainless allthread, 2 nuts, and a lockwasher

2 "large frame adapters" (if you don't have two of these, any piece of steel will work, but you gotta do some more cutting and drilling.)
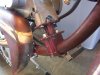
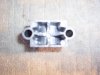
(pic3)

first, drill out the center hole in the adapter plates so the 3/8 allthread fits.
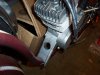
(pic 4)

grind out enough room in the stock motor mount so the nut fits. ( note: a lock washer and nut won't fit inside, so it's just getting a nut.) be careful, these mounts grind easy. you don't want to take out anymore than you need.

measure how long you need to make yours, and then measure it again. if you get two different measurements, measure again...

see next post...
Attached Thumbnails
Click image for larger version

Name:	motormount.jpg
Views:	714
Size:	287.0 KB
ID:	16812   Click image for larger version

Name:	front motor mount 003.jpg
Views:	442
Size:	459.3 KB
ID:	16813   Click image for larger version

Name:	front motor mount 004.jpg
Views:	339
Size:	361.2 KB
ID:	16817   Click image for larger version

Name:	front motor mount 002.jpg
Views:	340
Size:	145.6 KB
ID:	16818  

Last edited by bairdco; 12-03-2009 at 02:44 PM.
Reply With Quote
Sponsored Links
  #2  
Old 12-03-2009, 02:43 PM
bairdco's Avatar
bairdco bairdco is offline
a guy who makes cool bikes
 
Join Date: Aug 2009
Location: orange county, ca
Posts: 4,665
Default Re: how i made an extended front motor mount

when measuring, be sure to take into account the width of the two plates and the motor mount.

(pics 5 and 6)

this is how it looks all put together.

i use grade 8 allen head socket cap bolts, and this will help your installation, because depending on how short your mount is, it's gonna be tough to fit the bolts in.
picture 6 shows how i did mine.

pic 7 is done, mounted, and plenty strong.
Attached Thumbnails
Click image for larger version

Name:	front motor mount 005.jpg
Views:	253
Size:	335.8 KB
ID:	16819   Click image for larger version

Name:	front motor mount 006.jpg
Views:	286
Size:	393.3 KB
ID:	16820   Click image for larger version

Name:	front motor mount 007.jpg
Views:	454
Size:	267.5 KB
ID:	16821   Click image for larger version

Name:	front motor mount 008.jpg
Views:	607
Size:	243.1 KB
ID:	16822  
Reply With Quote
  #3  
Old 12-03-2009, 03:05 PM
Cabinfever1977's Avatar
Cabinfever1977 Cabinfever1977 is offline
Motorized Bicycle Elite Member
 
Join Date: Mar 2009
Location: Upstate,NY
Posts: 2,292
Default Re: how i made an extended front motor mount

Looks good, thats why i keep spare parts in a box for, always good to see diffrent ways to mount something.
Reply With Quote
  #4  
Old 12-03-2009, 05:49 PM
2door's Avatar
2door 2door is offline
Super Moderator
 
Join Date: Sep 2008
Location: Littleton, Colorado
Posts: 7,550
Default Re: how i made an extended front motor mount

Bairdco,
Very slick. I like it. Thanks for sharing.
Okay, now for the critisizing...Ya just gotta do sumpin' with that shiney motor. Maybe go to a gun shop and pick up some antiquing material for steel. They call it 'Browning' not the brand name but for what it does to gun metal. It stains it a nice old brown color so the metal looks old. It is applied with a brush or cloth, left a few minutes then wiped off. Something like wood stain but made for metal and is very durable. It lasts forever. That would give the aluminum engine a nice patina that would match the bike and look like it was supposed to have a motor. But...that's just my opinion. The bike is still an awsome build even with a shiney engine.

Tom
__________________
Age and Treachery Will Always Triumph
Over Youth and Skill & "Charlie Don't Ride"
Reply With Quote
  #5  
Old 12-04-2009, 03:08 AM
BarelyAWake's Avatar
BarelyAWake BarelyAWake is online now
Super Moderator
 
Join Date: Jul 2009
Location: Maine
Posts: 5,620
Default Re: how i made an extended front motor mount

ZOMFG bairdco - it's a chunk of handlebar! It's gonna bend

Seriously tho, as usual you've come up with a great solution with some stuff ya just had kickin' about - lookin' good man!


Quote:
Originally Posted by 2door View Post
...Ya just gotta do sumpin' with that shiney motor. Maybe go to a gun shop and pick up some antiquing material for steel. They call it 'Browning' not the brand name but for what it does to gun metal...
Tom
o.o

oic... ya give this awesome tip to bairdco and here I've been wonderin' how in heck I'm gonna "age" my motor *shakes fist* i r stealin' it trufax Hmm... now that ya got me actually thinkin' - I wonder how that fake gun bluing stuff would look o.O I will hafta experiment, thanks Tom
Reply With Quote
  #6  
Old 12-04-2009, 10:09 AM
Norman's Avatar
Norman Norman is offline
LORD VADER Moderator
 
Join Date: Jan 2008
Location: pampa texas
Posts: 2,685
Default Re: how i made an extended front motor mount

STOP the seat post/handle bar abuse send me $5000.00 to help stop the abuse the next handle bar or seat post could be yours.
looks good to me.
__________________
norms-iron-works.tripod.com
Reply With Quote
  #7  
Old 12-04-2009, 01:01 PM
bairdco's Avatar
bairdco bairdco is offline
a guy who makes cool bikes
 
Join Date: Aug 2009
Location: orange county, ca
Posts: 4,665
Default Re: how i made an extended front motor mount

if i'm ever stranded on a deserted island, all i need is a seatpost and some handlebars to survive...
Reply With Quote
  #8  
Old 12-04-2009, 02:32 PM
BarelyAWake's Avatar
BarelyAWake BarelyAWake is online now
Super Moderator
 
Join Date: Jul 2009
Location: Maine
Posts: 5,620
Default Re: how i made an extended front motor mount

can't forget beer...

cans ofc
Reply With Quote
  #9  
Old 12-06-2009, 09:47 AM
Dan's Avatar
Dan Dan is offline
Super Moderator
 
Join Date: May 2008
Location: CT, U.S.
Posts: 7,403
Default Re: how i made an extended front motor mount

Purty awesome Baird.

Tom, gonna try that. What was the oven cleaner one? To alter the surface
__________________
=============================


I want 2 ride my bicycle

Meet Life with a warm smile, a strong back and a clenched fist.
Reply With Quote
  #10  
Old 01-09-2010, 09:02 PM
exavid exavid is offline
Motorized Bicycle Elite Member
 
Join Date: Dec 2009
Location: Medford, OR
Posts: 163
Default Re: how i made an extended front motor mount

I had to extend the front mount on my bike too, I used the extra motor mount section which added about an inch and a quarter or so. I double nutted the front mounting studs and removed them and replaced them with a piece of 6mm all thread I purchased at Ace Hardware. Just double nut them and screw them in. I used a die grinder (could have been a hacksaw) to cut off the excess length. I've replaced all the nuts on the installation with elastic stop nuts except for areas that get hot such as the exhaust and intake manifold.
Reply With Quote
Reply

Thread Tools
Display Modes

Posting Rules
You may not post new threads
You may not post replies
You may not post attachments
You may not edit your posts

BB code is On
Smilies are On
[IMG] code is On
HTML code is Off


All times are GMT -5. The time now is 08:49 AM.


Sponsors

Powered by vBulletin® Version 3.8.7
Copyright ©2000 - 2012, vBulletin Solutions, Inc.
Motorized Bicycle Engine Kit Forum