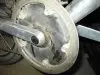
I put togther a MB several weeks ago with a HD shift kit. Everything runs great, except, I'm blowing apart the HD freewheel on the front crank. I just blew apart the second one an I am still under 80 mi. on this bike. I originaly installed the Jump Stop backwards causing catastrophic chain deraillments (chain hooks around sprocket locknuts) that may have tweeked the whole crank causing the freewheel to come apart.
A new freewheel and rebuild with careful attention to alignment, extra inner chainguard and spacers, no more deraillments yet it came apart again (another long walk home).
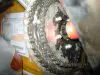
I know that pedaling hard on the crank to start engine can damage the freewheel when the crank/engine do not want to turn over. It is the new engine? A tight build with high compression and occaionally I do have to push hard to start it up. I'm always trying to be gentle as possible yet the freewheel still spun apart while out on the road, simply puttin' along doing its "break-in".
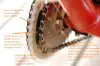
My thoughts as to why this is happening are: Is it the hills putting too much torque on it? Is it the occasional second or third hard start crank? Is it pedaling too hard to assist engine while under power, perhaps on a hill or to get a boost of speed? I know the chain tension on the Jack shaft-front chainring is not too tight. The alignment is, I think, fine.
What is going on? Is anybody else having this problem? If so, how did you resolve this issue? Who services these freewheels? This one may be to damaged to service. New freewheels aren't cheap.
Thanks to everyone who has thought or ideas on this.
A new freewheel and rebuild with careful attention to alignment, extra inner chainguard and spacers, no more deraillments yet it came apart again (another long walk home).
I know that pedaling hard on the crank to start engine can damage the freewheel when the crank/engine do not want to turn over. It is the new engine? A tight build with high compression and occaionally I do have to push hard to start it up. I'm always trying to be gentle as possible yet the freewheel still spun apart while out on the road, simply puttin' along doing its "break-in".
My thoughts as to why this is happening are: Is it the hills putting too much torque on it? Is it the occasional second or third hard start crank? Is it pedaling too hard to assist engine while under power, perhaps on a hill or to get a boost of speed? I know the chain tension on the Jack shaft-front chainring is not too tight. The alignment is, I think, fine.
What is going on? Is anybody else having this problem? If so, how did you resolve this issue? Who services these freewheels? This one may be to damaged to service. New freewheels aren't cheap.
Thanks to everyone who has thought or ideas on this.
Attachments
-
 85.8 KB Views: 244
Last edited: