Really Cheap Trail Rider.

GoldenMotor.com

cannonball2

Well-Known Member
Oct 28, 2010
3,682
221
63
Colonial Coast USA.
Notice I didn't call this a bike. That's because it will not have pedals and from a purists stand point its not a true MB. However its is an assemblage of bicycle and motor.

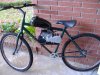
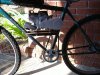
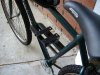
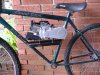
Had wanted to do a CAG build. Maybe I enjoy misery. I had one of the highly tuned CAGs that didn't last long at all before it began to pull the cylinder studs run lean and smoke the piston. Lowracer wound up with it for parts. Based on the fact that some kids down the road are baby sat by a small CAG powered 4 wheeler and the fact it seems to always be running I decided to go for it. I bought a stock engine with a 3:1 reduction chain box for $81 shipped. Its going on a MTB a neighbor was throwing away, a very rough candidate but usable. The object is to get a running bike for less than $125 complete. Even the motor mounts are from a salvaged bed rail.

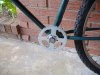
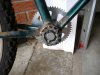
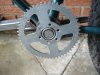
It will be a shifter using the stock derailleur system, which will be run through the bottom bracket. Feet will go on foot pegs. Pedals are no longer required in my state. The starting ratio must be low for good pull away and my gearing calc. says just over 30:1. That should do it. Am now waiting on the rest of the needed drive sprockets and chain to get the CAG hooked to the bottom bracket. Its all stock bike stuff on the other side.
I know this has been done before but low $$ is the focus. Heres a beginning rough out, details as they emerge.
 

Attachments

Ludwig II

Well-Known Member
Jul 17, 2012
5,071
783
113
UK
I see you are using a small exhaust box, I'm using one on a CAG on the Cooper & Ludwig machine, and the mounting holes re closer together than the studs on the CAG. Is yours the same, and how have/will you overcome this?
 

cannonball2

Well-Known Member
Oct 28, 2010
3,682
221
63
Colonial Coast USA.
Actually the holes on the muffler I bought were 40mm in spacing. This muffler was for a 49cc engine of the "weedeater" design. They don't tell you in the listings you really need a 38mm spacing for the CAG.
A bit of judicious filing with a 3/16"(sorry about the mm) chain saw file yielded a fine fit. Some where down the line if the thing hangs in there a tuned pile may be applied. The box muffler was the cheapest option.
I am amazed at the weight of the engine/chain box. Im pretty sure I could throw it across the road in front of our house(which is a great option if it preforms as suspected). Should make an ultralight build.
 

mapbike

Well-Known Member
Mar 14, 2010
5,502
109
63
Central Area of Texas
I like it..... Ill be enjoying seeing this all come together.

Id call it a Motorbike, yeah its not a motorized bike, but its a bike with an engine than will allow it to motor around.

Bike looks like an excellent candidate for the build, frame looks solid and plenty of room.

Ive also come real close to pulling the trigger on one of the stock CAG engines myself, thought about building a couple of small home built 4 wheelers for the grandkids to play on when they come to visit, we have 5 grandsons and 5 granddaughters and papaw wants them to enjoy these kinda things as they grow up so they know something other than that devilvision we call TV and Video games.
 

cannonball2

Well-Known Member
Oct 28, 2010
3,682
221
63
Colonial Coast USA.
Thanks Map!
The kids down the street sure use theirs. Gotta be pretty tough, don't imagine it gets much care. Is always parked in the weather when not in use. Love to see them riding it. As you say at least they are outside.
 

Intrepid Wheelwoman

New Member
Oct 29, 2011
2,830
61
0
Hauraki District, New Zealand
Hey that's a cool project you've got there CB :)

I've always wanted to try one of those engines as a FWD on a bicycle. If I remember correctly Lowrider did that on one of his bikes. Like you I would want to stay with the box stock engine though to make sure it doesn't self dismantle while out on the road.
 

mapbike

Well-Known Member
Mar 14, 2010
5,502
109
63
Central Area of Texas
Thanks Map!
The kids down the street sure use theirs. Gotta be pretty tough, don't imagine it gets much care. Is always parked in the weather when not in use. Love to see them riding it. As you say at least they are outside.
they're so cheap its not like its a big loss if one flies apart or cooks down, but it seems in basically stock form they do hold up fairly good.

Im excit3d for you on this project.... makes me want to do one myself but to many irons already in the fire that Im having trouble finding time to finish...lol
 

silverbear

The Boy Who Never Grew Up
Jul 9, 2009
8,325
670
113
northeastern Minnesota
Signing on to the thread...
Has a motor and was a bicycle, so I call it a motorbike. For a lot of us the pedals are just foot rests anyway.
SB
 
Last edited:

Ludwig II

Well-Known Member
Jul 17, 2012
5,071
783
113
UK
I'm capping performance on mine, and looking at ways to get the clutch to bite earlier for the projected use. For kids to use quads/bikes, there are restricted twistgrips available,and if the kids are clever enough to derestrict, then a hidden plate in the inlet tract will slow them up.

I might commit surgery on the one exhaust mounting hole and fit a wider spacing tube inside the silencer box, I don't, for all that I'm a barbarian in some mechanical respects, want to place any stress on repeatedly heat cycled studs.
 

cannonball2

Well-Known Member
Oct 28, 2010
3,682
221
63
Colonial Coast USA.
The hole size in the muffler I got was a bit oversize so I just had to remove a small amount from each of the captive crush tubes in the muffler. Mine is welded into a unit so there was no opening it to mod it. File it or trash it. In retrospect I could not find a proper muffler.

I don't remember much about the clutch except its a 3 shoe and prone to spring failure. I had another project with a similar design and I also wanted earlier engagement. I drilled, tapped, Loctited and installed Allen set screws to increase the shoes weight. Worked very well.
 

cannonball2

Well-Known Member
Oct 28, 2010
3,682
221
63
Colonial Coast USA.
A bit more rough out on the CTR as the parts trickle in. Mounted the P-nut tank I had from a long used CG kit. Turns out to be a 3 liter, fuel will probably last longer than the engine! May swap it for the 2liter on my 3speed 66cc hub shifter bike.

I seem to have the best of dumb luck. I am welding the primary sprocket to an extra left side BB bearing race that will thread the sprocket to the BB shaft. Turns out the center hole on the sprocket is exactly the right size to self center on the shaft for welding. It actually might work with out welding as the driving of the sprocket will tighten the race and the sprocket to the other race/washer in the BB. Since the bike freewheels on off throttle the sprocket will have no tendency to loosen.

Next thing is to weld the sprocket on the BB shaft on the other side and the drive is basically done and so is the basic build.

Just too easy!!
 

Attachments

Ludwig II

Well-Known Member
Jul 17, 2012
5,071
783
113
UK
Increasing shoe mass is how I was going to bring the clutch in earlier. I'd even thought about reversing them and filing the leading edge to ease the bite point, but it might be just a bit too sudden.
 

cannonball2

Well-Known Member
Oct 28, 2010
3,682
221
63
Colonial Coast USA.
L2, that was the purpose of the allen set screws. I just kept adding them until the engagement was where I wanted. Only took two per shoe.

Got the chain today. Established a very good chain line. I will have to trim the frame mount in the chain area a bit for clearance but that's no problem. The engines mounts will be welded to the frames mounts once every thing is aligned. After that its time to set up the right side chain line and get the derailleur set up for shifting. Will be done with a 6speed indexed thumb shifter on the right.
 

Attachments

cannonball2

Well-Known Member
Oct 28, 2010
3,682
221
63
Colonial Coast USA.
The whole BB power drive is made from strictly rearranged bike parts save the pocket bike sprocket. It is nice that bike parts do seem to do what I want them to do with a simple juggling of them around.

I welded the CAG drive sprocket in place while centered and tightened to the BB, then flipped it around for better chain alignment. The derailleur drive side was a little more fussy(at least the way I did it). I cut the center out of the pedal sprocket, centered and welded it to the13t sprocket. It had to be welded inside so the welds wouldn't interfere with the chain. I ground matching slots in the pedal shaft to accept the welds. The driving forces are handled by the weld/slot interface.

So its time to position the engine, weld the mounts and finish the bike.
 

Attachments

cannonball2

Well-Known Member
Oct 28, 2010
3,682
221
63
Colonial Coast USA.
Got the mount completed. Cut a relief for the chain, set the line and welded the mounts with the engine in place so things stayed aligned. The chain was set pretty tight with loosening in mind. Should be just right after a bit of run.
From this point the bike will be torn down, given a rough prep and painted with Rustolem flat black. Since this frame is so weathered Im not going to spend a bunch of time on it. Should have an industrial look.
My wife bought a badly weathered Schwinn Point Beach. She doesn't know she is donating the aluminum rims to this build in return for me rebuilding the PB. She will receive freshly painted steel rims from the MTB.
This build will be very light. The last detail to work out will be the foot pegs. I have considered a banana seat with BMX pegs off the rear axle but the seats are too pricy for this build. Not fond of the feet forward position either. Have to figure this out next.
 

Attachments