New Build

GoldenMotor.com

magwa

New Member
Jul 14, 2015
61
0
0
Coarsegold, CA
After a ton of reading, tutoring by folks on the forum, YouTube viewing, and a couple of "live" lessons from engineer pals
that also dabble in Lipos with RCs, I started a new build.

Tha main thing for me was the power...understanding it, understanding how to safely manage and apply it, etc.

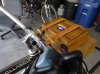
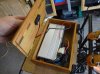
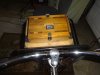
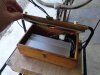
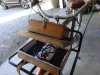
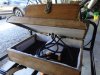
So, I first bought two honking 6s 20ah Lipos, power supply, a ton of monitors, two balancing chargers, charging bags,
about ten voltage monitor/alarms (one was bad...had to send it back), and misc other stuff...Connectors, serial connector,
XT60-XT90 adapters for the chargers.

Then, ...or maybe it was before that...I found an old (but nice) Schwinn Sierra. It was a 26" whhel, 22" frame.
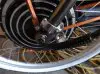
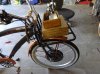
Waaaaay too big for this short-legged old man. But, I took off the 48V 1000W hub, torque arms, SLA batteries,
a few extra goodies, and I'll will find a home for the bike.

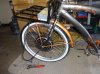
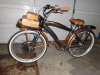
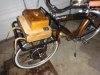
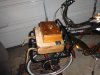
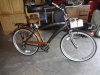
Next, was a bike for the test. I didn't want to spend a bunch of dough, not on the bike at least, until I checked out the power train.

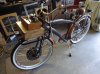
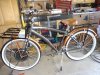
So, Hollandia 5 speed with front and rear rack from Amazon. Got it yesterday.

Here it is at an early stage.

I'll post a bunch of pics to smugmug and come back with the link in a while.
 

Attachments

magwa

New Member
Jul 14, 2015
61
0
0
Coarsegold, CA
Thats gonna be a really nice bike! Looks like an aluminum frame. Should make a lighter build which is nice.
I like the aluminum frame and steel forks combo.

Without your (and your partner in Lipos...along with a few other Forum Members...but special thanks to you and L-Cookie)
leading me down the info path, this build would be quite different.

I'm heeding the weight distribution thing....But with all packed on that mammoth front rack, it seems really flickable. Not mountain bike flickable...
But, I bought a few wooden boxes on line today...we'll see how it works in real life before I have to change the design.

Those 6s 20s are under ten pounds total. For a 15mph road ride, it might work. But, again, we'll see. Gotta go to the lowest common factor of safety...
....so, I may have to move everything around.
 

Attachments

Last edited:

magwa

New Member
Jul 14, 2015
61
0
0
Coarsegold, CA
The mfg. sent me a few parts that were scratched on the bike in shipping. No questions asked...No $$$$. Good for them.

I worked on some fork clamps today for the thrust arms (2). Lots of garage time at the grinder. But I like them better than
using hose clamps. No biggie.

The first box is on the rack. The batteries fit nicely and I padded the area all around them. On the floor of the box is some
more substantial rubber. The other stuff seems to hold its shape pretty well.

Three holes in the back of this box; two for the balance plug extensions for the reading of and alarms for the batteries; and
one hole for power out to the controller.

The controller will sit in a 9 x 6 wooden box on top of this one. I'll punch a bunch of holes in that box's bottom and back
for heat extraction.

Here are a bunch more pics:


https://magwa.smugmug.com/Electric-BikeController/
 

Attachments

Last edited:

cannonball2

Well-Known Member
Oct 28, 2010
3,682
221
63
Colonial Coast USA.
Coming together nicely! Great attention to detail. The biggest pain is the wiring and how to neatly install/disperse it. On the few "nice" builds I have done I laboriously shortened the wires to be as invisible as possible. With everything up front you should be able to hide it all neatly.

Just cant get over the batteries. By lipo standards they are massive, but by other standards quite small for 20ah. Should give you a good kick in the seat of the pants fully charged. You will get addicted to the quiet rush of power. Might even want to climb the voltage ladder!
 

magwa

New Member
Jul 14, 2015
61
0
0
Coarsegold, CA
Coming together nicely! Great attention to detail. The biggest pain is the wiring and how to
neatly install/disperse it. On the few "nice" builds I have done I laboriously shortened the wires to be as invisible as possible.
With everything up front you should be able to hide it all neatly.
Thanks. I'm working on that now.

I'll have to solder and shrink wrap all the little wires from the hub and from the throttle. The rest of the wires that will exit the
box will consist of + and - from the battery cable to the volt meter, and the two balance connector extensions that will run out of
the back of the battery (bottom) box and up to some point of direct line of sight.....

The upper box (9"x6") that I'm going to use for the controller is supposed to be here tomorrow.

Today, I tried to de-Chinese the bike. Pulled (almost) every fastener and replaced them with stainless allen button heads.
Nylocks or blue locktite throughout.

The fender supports (stays) are pathetic. Whereas some of the hardware is 60% - 75%. But most of the "bones" of the
bike (frame, bars, front forks, rack(s), seat post and clamp) are top-notch.
 
Last edited:

magwa

New Member
Jul 14, 2015
61
0
0
Coarsegold, CA
The (second/top) box came today.

So, I'm in the middle of the design/wiring.

Here are some pics.

https://magwa.smugmug.com/Electric-BikeController/

The top box with the controller in it has been drilled at he underside after I put some wooden "skids" on it
with the hope that air would flow under there directed by the leading edge of the two boxes while on the move.

I also drilled a bunch of holes on the back of the box to let the hot stuff out.
I don't know if that was overkill...I don't ride a full blast most of the time. And, we're not talking mega amps here.

The top box's "top" will carry a volt meter that will be wired in to the main battery feed to the controller. I'll put a little switch
on it's fine wire to turn the thing off at a time that I may be stopping for coffee or whatever, and don't want to disconnect the batteries altogether.

The top box is glued, then screwed on the to bottom box. Hinges on the bottom box let me easily get at the batteries for removal for charging.

So, the only wires in the battery portion of the box are the balance leads, which will go out to monitors/alarms, and the main battery lead, which
heads out through a hole in the top of the bottom box leading to the controller thru a hole in the bottom of the top box..

I lied. The throttle and hub feeds go into the back of the bottom box. But then go immediately up thru a hole and into the controller box.

I don't know if anyone is interested in this stuff or not. But, I figured I'd write it anyway. In case anything gets screwed up, at least someone
else can benefit from my folly.

More wires tomorrow.
 

Attachments

magwa

New Member
Jul 14, 2015
61
0
0
Coarsegold, CA
Test ride today.

Got the electrics "buttoned up". I still have to work out the latches on the boxes and some buckles for the "book straps".

All-in-all, it was a successful 1/2 mile run. It was mostly up hill. Slow going with my weight. So, in top gear, I gave her a
little help. On the flats, plenty of poop...and some to spare.

Came back .5v shorter than when I left.

Going down hill? "Fagedaboudit!" Brakes are set up nicely.

Two mods now: One already done...The alarm/monitors have been moved to the top of the bottom box, outboard of the top
box. Same plane, or line-of-sight as the primary volt meter.

Also, some handlebar controls need to be moved a little. I squeezed out the room necessary to allow the shifter to work properly.

Same spot for some more pics:

https://magwa.smugmug.com/Electric-BikeController/
 

Attachments

Last edited:

cannonball2

Well-Known Member
Oct 28, 2010
3,682
221
63
Colonial Coast USA.
A really nice build! Every thing tucked away neatly.

I bought a similar cell monitor/alarm. My packs run identically voltage wise so one will work fine.
Remember you don't get full charge until 4.2v. 4.15v is something like 90%. Charge it fully at least for the first few cycles. Should come off the charger around 50v for the packs in series.
 

magwa

New Member
Jul 14, 2015
61
0
0
Coarsegold, CA
A really nice build! Every thing tucked away neatly.

I bought a similar cell monitor/alarm. My packs run identically voltage wise so one will work fine.
Remember you don't get full charge until 4.2v. 4.15v is something like 90%. Charge it fully at least for the first few cycles. Should come off the charger around 50v for the packs in series.
Okay. Thanks.
Will do 4.2v for the first couple of cycles.

dnutdnutdnut
 

kevyleven007

Active Member
Sep 25, 2008
1,217
8
38
texas
looks good. . . I like how you did the voltage and alarm displays. Looks pretty cool. You must have those boxes bolted down on bottom or something.
 
Last edited:

magwa

New Member
Jul 14, 2015
61
0
0
Coarsegold, CA
looks good. . . I like how you did the voltage and alarm displays. Looks pretty cool. You must have those
boxes bolted down on bottom or something.
Thanks.

Yeah. I have to be very careful not to have anything but "smooth and padded" in the battery box. At least on the sides where the batteries
lie down, get closed upon, or nestle up against the sides. I've got padding all around.

So, on the laterals of the racks outside underside of the box, I used some rubber screen door insulation (black/sticky) on the metal side.

Then, I used two aluminum u-brackets (1/2" usually used to hold PVC) on the outside and under the center rack lateral. Filled them with
the same material for "squish"..Then, I used some fender washers inside in the center of the box; and two 1/2" M8 SS bolts and nylocks
for each clamp pinch the bottom box to the rack.

The top box has two "skids" wood glued to the bottom to create an air space.

After drilling the top box for controller heat disbursement, and then fitting it so I could open the bottom box with it attached, I glued the
top box to the bottom box. I still may put a couple of wood screws between them. But the priority is to not encroach on that battery box
at all. With anything.

The leather straps on the outside are a final structural element, as well as the fact I think they look tasty.

I have some hardware coming for the boxes.

I'll take some pics of the final set-up now that I know that it won't be a cumbersome load up front.

One mistake: I soldered and shrunk wrapped and then taped the line out from the top box to the hub without considering the obvious need
to remove the front wheel from time-to-unfortunate time.

Now it's hard-wired. When I need to take off the front wheel, I'll see how much slack I actually have to work with. Likely, I'll have to cut the
wire and the little phase and hall sensor wires and fab a cool connector. The old one (I'm a dummy) is in the trash.
 
Last edited:

kevyleven007

Active Member
Sep 25, 2008
1,217
8
38
texas
At least its on the front. My motobecane I have to completely remove the derailer to get the wheel off. And then the axle likes to stick in the dropouts on one side. I think I'd rather build a whole new bike than change that tire AGAIN.
 

magwa

New Member
Jul 14, 2015
61
0
0
Coarsegold, CA
Just about finished putting the hardware on the "carrier boxes".

Controller in the top box and the batteries in the bottom one.
Bottom box is held to the rack by brackets. Top box, which has seven holes drilled in the back,
and several (under the controller) in the bottom, is glued to the bottom box.

Holes in the back of the bottom box for bat>out, extra throttle wiring, and two balancing
extensions (not shown) that run to the two monitor/low voltage alarms (held on by commercial Velcro).

Bottom box has the interior completely padded for the two 6s'.

I'm just waiting for the final leather strap hardware to show up.
I also bought a more robust charger that will be here Sat.....

:-||
 

Attachments

Last edited:

Lungcookie

New Member
Aug 15, 2013
310
0
0
Oregon
Looks good.
You riding it?

You could cover the batteries with some kind of plastic or what not to protect the 'soft' cells, if you are concerned with mashing or puncturing the pack.

I used a bit of a plastic milk container to protect the bottom of my pack/taped on.
 

magwa

New Member
Jul 14, 2015
61
0
0
Coarsegold, CA
Looks good.
You riding it?
You could cover the batteries with some kind of plastic or what not to protect the 'soft' cells, if you are concerned with mashing or puncturing the pack.
Only ridden 1/2 mile or so, so far.
New battery charger coming tomorrow, so I'll charge up and go for a ride.

Got the strap connections made today.

The whole inside of the lower box is padded with soft rubber and closed-cell foam. Makes for a nice package.

And a nice "home" for those bad boys.
 

Attachments