My first build and so many issues..

GoldenMotor.com

jeffyh

New Member
Nov 28, 2015
53
0
0
Madison, NJ
I wanted a simple way to get me back and forth to the train station in getting to work. I started looking into those electric razor scooters and thought I could do better. I remembered I saw this really sweet motorized bicycle in NYC one day and figured that'd be cool! Wish I read more before I decided to get after putting one of these together. So anyways, here's my build so far. Was hoping that you guys could help with a couple problems I'm having.

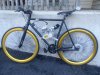
Bike: 6KU nebula-2 single speed with flip-flip hub
Engine Kit: Gasbike.net GT6

Issues:
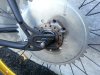
  • The rear hub is velocity 32H flip-flop hub with a concave axle which I found out no ragjoint or sprocket adapter will work on.
    • Solution: I had a bike shop cut out the opening on the sprocket and weld it to the fixed gear screw-on cog. I'm really hoping that the reverse threaded lock ring is enough to keep it together.
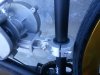
  • Couldn't figure out how to mount the engine in a way that would give enough clearance for the intake.
    • Solution: Got a CNC front motor mount and used it in the rear with the standard spacer.
  • The CNC motor mount rubs the back tire.
    • Proposed solution #1: finding a larger rear mount spacer to have the mount higher up. Was thinking of stacking washers between the motor and the stock spacer mount.
    • Proposed solution #2: Grinding the rear side of the motor mount to create a groove for the tire.
  • The front motor mount doesn't sit flush.
    • Proposed solution: hoping that when i adjust the rear mount higher, I'll find a front point which will sit flush.
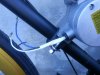
  • Angle of the engine with stock exhaust doesn't follow downtube angle and blocks the front tire.
    • Proposed solution #1: Bend the connecting pipe between flange and muffler to a sharper angle. Can anyone tell me how this will affect performance/operation.
    • Proposed solution #2: cutting the pipe and using some sort of flexible tubing between flange and muffler. Can anyone suggest a tube which won't melt, etc...

Would love to hear if anyone has any comments or suggestions.

Anyone live in north/central NJ and have a chain tool and/or experience getting these running? I'd gladly pay to have some experienced help.
 

Attachments

bluegoatwoods

Active Member
Jul 29, 2012
1,581
6
38
Central Illinois
Oh, boy...........I'm genuinely sorry for you. It does look like a nice bike. And yet in so many ways it looks as though this bike just doesn't fit this particular job.

It's likely that you can still make it work. But that might be at an unacceptable cost. In terms of actual money, perhaps. But also in terms of your needing to do some engineering that won't be useful on any other bike and might not work completely anyway.

I actually do think that the simplest solution for you would be to spend $100 on something like a Huffy Cranbrook and motorize that. They have their weaknesses and there are a few upgrades that really should be done.

But that bike can be made into a safe and reliable machine much more easily, I think, than the bike you're working with now.
 

jeffyh

New Member
Nov 28, 2015
53
0
0
Madison, NJ
I just wish i had access to a CNC mill. That'd probably solve all my issues. I think I'm financially committed to this build already...

Would a derlin block work as a motor mount spacer? I think I'm going to screw the mounting plate for the U clamp direct to the motor, then use a derlin block as a spacer with two long studs through it to connect to the rear CNC engine mount. That should give me the clearance and angle I need in the rear.

Once I figure out the engine angle, i think i'll use the sandpaper pipe method to make the front mount flush to the downtube,

The only piece I need after that would be exhaust. There has to be some sort of either "rubber" or metal flex hose I could weld to make the angle I need. Suggestions?
 

MEASURE TWICE

Well-Known Member
Jul 13, 2010
2,744
1,221
113
CA
http://fubarlabs.org/

http://fubarlabs.org/join-fubar/

New Brunswick, NJ location

I could not tell from their site what cnc if they have. (sorry see second link they have cnc) It showed 1/4ly dues and I was at a place like that for a while. A Dremel, Die Grinder, & Angle Grinder have always been quite useful. Of course then MIG welder and other assorted for use on ferrous metal I finally just got and it is an investment, plus needing a place to use.

Google showed 45 min drive, X2 round trip.... don't know if your up to that
 
Last edited:

Chaz

Well-Known Member
Jun 3, 2012
1,004
72
48
Vancouver, British Columbia
Jeffy, Have you tried mounting the engine using just the stock air filter? It would let you get the engine down so you might be able to use the stock rear engine mount. That filter you have now is taking up a lot of space for no good reason. The stock engine mount will probably give you the clearance you need. It might also give you the clearance for your exhaust once you get the engine down, or at least make it a smaller bend in your header pipe. If these pictures were taken at the same time I can see that you have at least a 1/4 inch of room to move the rear axle back.
 

2door

Moderator
Staff member
Sep 15, 2008
16,302
175
63
Littleton, Colorado
I concur. I addressed this to the OP in another thread. Mount the engine as it was meant to be mounted, to the seat post and then worry about the front mount. That air filter and the pipe it connects to is totally unessessary and just making the engine mounting harder.

Also at the angle and height the engine is now you're probably going to have problems with the chain hitting where it exits the engine case.

Lower the engine, use the kit rear engine mount as it was designed, and get rid of the rubber betwen the engine and frame. It will not eliminate any vibration and will in fact make it worse. The engine needs to be mounted solid to the frame. People who make and market rubber mounts are not providing a service to the motorized bicycle community. Get rid of it.

Tom
 
Last edited:

jeffyh

New Member
Nov 28, 2015
53
0
0
Madison, NJ
@2door @chaz, Shows how much I know, hah. I thought a high density rubber mount would've been good like in cars.

I'll go with the stock filter and the stock rear mount as per your advice. The engine came with a small, flat, black, disc shaped filter with 3 tubes. Will there really be no gain with that larger aftermarket one? If the stock rear mount is wider than my seat tube do I have to get a shim?

Lastly, why is what I did such a bad idea? I ask mainly to understand my failures cause that's how I normally learn. Increased torque on mount due to larger radius which may snap studs? The chainline was actually unobstructed.
 

2door

Moderator
Staff member
Sep 15, 2008
16,302
175
63
Littleton, Colorado
Jeffyh,

Many before you have attempted to use rubber or a resilient material in the engine mounts and have found what we said to be accurate. When the engine is allowed to move, as it compresses the rubber, it actually increases the vibration which is basically inherent with a single cylinder, 2 stroke engine. Mounting the engine solid allows the frame to absorb some of that vibration so it is not concentrated on the mount or mount fasteners. Premature fastener failure is one of the most common issues with soft mounted engines as well as stripped threads in the engine case, bike parts shaking loose and overall rider discomfort.

Center of gravity is another consideration. Your engine is mounted very high in the frame which impacts bike stability to some degree. The lower the center of mass, the more stable the ride. Although not a critical point it is one to consider.

There has never been any substantiated proof that the stock black plastic air cleaner is any less effecient than the aftermarket would have you believe. Many of us have used the kit air cleaner with no noticable decrease in performance. Personally I have compared them with several aftermarket, so called, "High Performance" air cleaners and found no difference in power output.

Shimming the rear mount to fit the seat tube is okay as long as the shim material is metal or a non-resilient material. Some suggest PVC pipe. I like metal, although I've yet to mount an engine on a bike that the rear mount didn't fit the seat tube correctly. More common is a seat tube that is larger than the saddle of the mount cast into the engine case which will require grinding out some material, not adding it.

Hope this answers some of your questions as to why we suggest other options to mount your engine.

While I'm making suggestions I'll also add that you should replace that kit spark plug boot with a good automotive quality item. The kit boots are notorious for causing problems.

Tom
 

jeffyh

New Member
Nov 28, 2015
53
0
0
Madison, NJ
Thanks, Tom. Hope I didn't sound like I knew better. I just like knowing the mechanics behind the methods leading to failure. I feel like you learn a lot more from failure, but in this case a failure while riding would kindof suck. I've low sided on a crotch rocket at speed and feel like this has a much higher pain potential...

So.... say if I can't get a metal/pvc shim. Would it be the worst thing to mount as is so only the front and back of the mount saddle touches? If not, looks like me and PVC are gonna have a 3-way with some sandpaper or a heatgun. This is one of those cheap china single speed bikes.

Shimming the rear mount to fit the seat tube is okay as long as the shim material is metal or a non-resilient material. Some suggest PVC pipe. I like metal, although I've yet to mount an engine on a bike that the rear mount didn't fit the seat tube correctly. More common is a seat tube that is larger than the saddle of the mount cast into the engine case which will require grinding out some material, not adding it.
 

2door

Moderator
Staff member
Sep 15, 2008
16,302
175
63
Littleton, Colorado
The closer you can get to full surface contact the better the mount will be. Open spaces should be avoided if at all possible.

You might hear the suggestion to fill any voids with an epoxy compound like JB-Weld. Although I'll admit I've never tried that method, I'm just not a fan of it. That product and others like it have uses I just don't feel this is one of them. Any adhesive failure or cracking of the filler will render your 'shim' useless.

Tom
 

jeffyh

New Member
Nov 28, 2015
53
0
0
Madison, NJ
So figured out that the stock air filter fits with the rear mount flush on the frame, but now with the front flush, the pedal crank hits the engine. I'm gonna loose my ish if this motor doesn't run when I'm finished...

Turns out that the CNC motor mount on the front gives it just enough clearance to clear the crank arm + 1" with the rear mount flush. I have to remove the front mount studs to attach the CNC mount. The bolts that came with the ragjoint seems to be the same size and thread spacing so I'm gonna chop them and use them to mount directly to the block. Bad idea?

The exhaust now clears the front wheel, but is obstructed by the downtube. Until I find a proper size pipe to cut/extend/weld the exhaust pipe, I think i'm going to run the exhaust upside down just to be able to ride it a little. Face full of exhaust, it'll be fun :)

Thanks guys for helping with info. This project finally seems finishable now. Have any rec's for a good chain breaker? Last piece of the puzzle.
 

Chaz

Well-Known Member
Jun 3, 2012
1,004
72
48
Vancouver, British Columbia
Glad to hear things are coming together on your bike. I think you could get away with using the rag joint bolts for a while. Ideally, you can get upgraded bolts from a hardware store.

You can bend the header pipe to give you clearance but make sure you do it with the exhaust/header removed from the engine. Best to do a couple of tiny bends along the arc of the pipe rather than one big one that makes a big dent. And also be sure to leave the header pipe flange out of the proceeding as you need a nice flush contact for the gasket and exhaust port.

It sounds to me like you have a good understanding of mechanics so you should have no problem getting this bike humming for you.

I think any old chain breaker would do. If it looks real cheap like it won't hold up then it probably won't. I used a small hex screwdriver bit and a stout c- clamp with the chain taped to a socket so it wouldn't jump around when I didn't have a chain breaker.

good luck
 

MEASURE TWICE

Well-Known Member
Jul 13, 2010
2,744
1,221
113
CA
I used some flex pipe but eventually since it was not meant for muffler, it cracked from vibration and heat. The various flex water pipe of copper and also tried the stainless steel, with the rubber gaskets replaced by my own home made copper gaskets worked only for like a few months. I now have the sold, but heavy cast iron pipes and mounted it very rigidly. It could otherwise damage the threads or crack the exhaust port. I've bounced around trails a lot an it stays.

Maybe you can figure something lighter to use or just what you have by experimenting how it can go together.

The rubber motor mounts are essentially suited for automobiles. I'm not even sure they are used on motorcycle always. The weight of engine to total weight of vehicle ratio I think may have something to do if they are useful or not.

You could make a motorcycle especially for Kitty Foreman who on That 70's Show had so dearly not wanted to have Red Foreman return the motorcycle he got but was to return. The whole motorcycle could attain resonance and really please:)
 

jeffyh

New Member
Nov 28, 2015
53
0
0
Madison, NJ
Finally got everything mounted and set, and I think I'm about ready to run :) Having a little alignment/bending issue with the chainguide that I'll fix over the holiday break.

Pedaled around the driveway a little with the clutch in and hearing a slight scraping/feeling a little friction every couple turns of the engine drive sprocket. Something to be concerned about?

Did some searching but didn't find all the info I needed. What kind of pre-flight check should I do before trying to start her up for the first time? I'm more afraid of this thing than my crotch rocket...
 

2door

Moderator
Staff member
Sep 15, 2008
16,302
175
63
Littleton, Colorado
Pre-flight?
I'd say the most important is to make sure your brakes work well. After that assure the bike rolls easily without the engine drive chain jumping off the sprockets. You can check by removing the spark plug and pedaling the bike a little, clutch engaged, to see how the chain behaves.

Make sure you've mixed oil with your fuel. Check for fuel flow from the tank to the carburetor and the fuel petcock is in the 'on' position.

Make sure the throttle and kill switch function properly and as they say, 'never aim a bicycle at anything you don't intend to kill'. Oh, wait, that advice is for guns...sorry.

Good luck and let us know how it goes.

Tom
 

jeffyh

New Member
Nov 28, 2015
53
0
0
Madison, NJ
Tried starting her up today, and I'm having some issues again. I think it's the CDI. I've tried both CDIs that came with my kit and neither produced a spark. In all fairness. I think I broke the connection in the plug boot of the second one I was testing though.

Can you recommend a good CDI to buy?

fyi, I tested my magneto to make sure it wasn't the issue. It looks like it aligns with testing info I found on here for a properly functioning unit.
  • Blue - Black = 320.4 ohm
  • Blue - White = 0.1 ohms
  • Black - White = 320.5 ohms
  • Walking Volatge = ~15V AC
 

Attachments

Chaz

Well-Known Member
Jun 3, 2012
1,004
72
48
Vancouver, British Columbia
I don't get into the electronics testing but these don't produce a big spark and may be tough to see in broad daylight. It's my understanding that the stock cdi's are pretty good and very seldom fail. I would check the plug wire and boot. They have a bad rep and should be replaced with something better. You can switch between the two cdi's that you have. Some are tough to remove at the box.

Anyway, to help get it started you can try closing the plug gap to 020 and wide open throttle with the choke on and peddle like mad.

good luck
 

2door

Moderator
Staff member
Sep 15, 2008
16,302
175
63
Littleton, Colorado
As Chaz suggested, get rid of the kit spark plug boot. Replace it with a good automotive quality boot and make sure you have a good electrical connection between the wire's conductor and the metal part inside the boot. If you do this you'll also need a spark plug with the top cap installed. Most kit spark plugs come without the cap and only have exposed threads. A new boot won't work on that kind of plug.

There is nothing wrong with the kit plug wire. They at least have a metallic core, or conductor where most of the wires you'll get at an auto parts store today will be resistance wire.

Most new CDIs come now with the plug wire glued into them. If you insist on replacing the wire you'll need to carefully dig around the wire where it enters the CDI to break the glue joint. Be very careful doing this because there is a small threaded protrusion in the CDI that is there to 'screw into' the core of the wire. It looks like a small sheet metal or wood screw poking up out of the CDI. If you break it off your CDI is toast.

Tom
 
Last edited:

jeffyh

New Member
Nov 28, 2015
53
0
0
Madison, NJ
I completely forgot about switching out the wire/boot. I just bought one and am waiting for it. Meanwhile, one cdi came w/o an epoxied wire and I took the better spring coil plug boot from the other cdi. I cut the ends and soldered the plug boot side for a better connection. The bike now starts but I'm having carb tuning issues that I'm working on.

Thanks for all the help guys! Can I buy you guys a 6 pack or something? Really don't think I would've gotten here without your help.