Back And Aparently Crazier Than Ever!

GoldenMotor.com

MEASURE TWICE

Well-Known Member
Jul 13, 2010
2,744
1,221
113
CA
In a black smith shop part of an Antique Gas and Steam Engine Museum I saw where they used a flat belt with a twist to change direction of rotation. With the A section v-belt it can work too I suppose. I have also seen a v-belt used with a half twist, rather than gears to make a 90 degree axis change on the bottom of a self-propelled lawn mower using a vertical shaft engine.

That twin cylinder opposed engine is quite nice to have on the bike I'd say!

MT
 

cannonball2

Well-Known Member
Oct 28, 2010
3,682
221
63
Colonial Coast USA.
In a black smith shop part of an Antique Gas and Steam Engine Museum I saw where they used a flat belt with a twist to change direction of rotation. With the A section v-belt it can work too I suppose. I have also seen a v-belt used with a half twist, rather than gears to make a 90 degree axis change on the bottom of a self-propelled lawn mower using a vertical shaft engine.

That twin cylinder opposed engine is quite nice to have on the bike I'd say!

MT
Yeah, coming from the lawn equipment trade, I have seen this method used numerous times. There was an old Craftsman variator mower that had the ground drive belt twisted. An owner would replace the belt in an non twisted install. They would bring the thing in complaining it now had 5 reverse speeds and 1 forward-lol. The weirdest I remember was a mower that reversed rotation by running the flat side of the v belt around a flat driven pulley to an idler. It came in with the belt missing. Took some head scratchin to figure it out.

The little twin is very smooth. Has a fully counter weighted crank, the big flywheel, plus its inherent balance. Should be a pleasant and leisurely ride!
 

curtisfox

Well-Known Member
Dec 29, 2008
6,048
3,959
113
minesota
Funny
I have a White lawn tractor with a half twist front belt. to a clutch jack shaft ( or belt tension idealer that pivets). The first time i changed it was glad i backed it out of the shed to do it. Put it in reverse and almost hit may shed................Curt
 

cannonball2

Well-Known Member
Oct 28, 2010
3,682
221
63
Colonial Coast USA.
Been working on a belt guard, and have it to the finish stage. The belt is fully enclosed so no worries getting wrapped up in it. Scored a very rare factory Maytag flywheel guard off ebay. Will cut it down to use only the back and lower half in the right knee area. This will expose the rope pulley for starting. In washing machine form the engine started on the other side with a kick start.
 

Attachments

Intrepid Wheelwoman

New Member
Oct 29, 2011
2,830
61
0
Hauraki District, New Zealand
Been working on a belt guard, and have it to the finish stage. The belt is fully enclosed so no worries getting wrapped up in it. Scored a very rare factory Maytag flywheel guard off ebay. Will cut it down to use only the back and lower half in the right knee area. This will expose the rope pulley for starting. In washing machine form the engine started on the other side with a kick start.
Nice find :) Nothing looks so much like genuine old parts as, - well, - genuine old parts ;)
 

curtisfox

Well-Known Member
Dec 29, 2008
6,048
3,959
113
minesota
How about a holly guard over the belt,just a thought. Can't wait to see how this preforums after its done,might have to get a Maytag engine myself.............Curt
 

cannonball2

Well-Known Member
Oct 28, 2010
3,682
221
63
Colonial Coast USA.
Thanks Yall! You are right IWW, being a genuine Maytag piece this compliments the theme of the build. From what I can ascertain these were used post war when the engine was hung with an overhead mount. It may have been an option though I could be completely wrong about this. I have only seen one other and it was sold with the engine. Hate to cut it up but I feel it would be to imposing in its entirety.

Curt: That's a good thought on adding holes to the belt guard, I can use a piece of the flywheel guard as a drill guide to match it. As far as performance its not going to be a barn burner stock as I am gonna run it. They are easy to mod to a side draft carb and I have heard they will spin pretty well with out the governor. This one will cruise at the rpm most engines idle! Got an extra if you get serious.
 

curtisfox

Well-Known Member
Dec 29, 2008
6,048
3,959
113
minesota
I can pick one up at the local farm swapmeat if i deside to get one. There is some there every year,also some older rear ones that go for big bucks,thanks. They also have some set up and running so i know what they do and that fast enough for me, if i deside to get one.Put-Put-Put.
Every time i see one i think of my Monark twin that i had when a kid.
Drilling all the hole,Put-Put...............Curt
 

cannonball2

Well-Known Member
Oct 28, 2010
3,682
221
63
Colonial Coast USA.
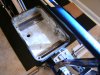
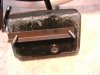
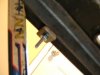
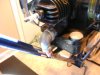
A little more progress. Fabed the engine mounting system I guess you would call it. The fuel tank is actually the mount. This engine had the cast aluminum tank. It was originally hung by a mount on the cylinders in the washer, so there are no mounting bosses on the tank, and the tank is painfully thin as it job was just to hold fuel. The mounts actually go through the tank floor. Angle iron plates spread the load over a large area, bolts are threaded into a center piece of angle on the bottom of the tank that fits perfectly into the two angle engine mounts(its on backwards in the pic). There is an adjustment bolt at the back of the tank to adjust belt tension by sliding the engine. All of this is locked into position by plates tightened against the angle engine mounts(shorter bolts of course!). The tank pieces will be sealed/bonded to the tank with JB weld. Its very substantial if the tank takes it, don't think it an issue with the low HP produced. Also got the exhaust started will, be 3/4 copper paralleling the front down tube to get the exhaust down on the road near the bottom bracket. Don't want it any where near me at a 16:1 mix ratio! Was a real trick to get it to clear the frame.
 

Attachments

silverbear

The Boy Who Never Grew Up
Jul 9, 2009
8,325
670
113
northeastern Minnesota
I was wondering because I tried making a copper exhaust a couple of years ago. I got it all together and stood back for a look..."that is so cool!" I do like copper and think of it as the poor man's gold. Anyway, I fired up the engine and within a few minutes of riding it started coming apart. What???

The exhaust was hot enough that it melted the solder. So much for that. I scrapped the idea. I'm hoping you have better luck that I can learn from as I still think that a copper exhaust pipe would look classy. Please share your copper moment. And good luck!
SB
 

cannonball2

Well-Known Member
Oct 28, 2010
3,682
221
63
Colonial Coast USA.
Yeah I have never made a copper exhaust so it may end up in EMT. This engine is so low an output and has such a paltry compression ratio that it doesn't seem to make a bunch of exhaust heat. There is a solder called Safety-Silv 56 I am looking for. Melts@ 1200F. Cant imagine it getting that hot after all its oil cooled@ 16:1-lol.
 

cannonball2

Well-Known Member
Oct 28, 2010
3,682
221
63
Colonial Coast USA.
Just searched this stuff, be prepared to open the wallet! There are great instructionals to read at the Harris website. Just search the product name. Harris Safety Silv 56.
 

silverbear

The Boy Who Never Grew Up
Jul 9, 2009
8,325
670
113
northeastern Minnesota
Well, it looks possible anyway. And you're right, it is definitely the high priced spread. On the other hand you wouldn't need much for a few copper joints. I hope you do it. I wonder how the rigid copper would bend using a conduit bender. Is a regular propane torch adequate or does it want more heat?

I think it would make a great looking exhaust!
SB
 

cannonball2

Well-Known Member
Oct 28, 2010
3,682
221
63
Colonial Coast USA.
Im curious about bending the copper also. I know it can be softened by heating it to remove work hardening. I gave my benders away before the move(stupid thing to do). Will stay with straight runs and fittings on this build. I believe propane will work fine on the smaller tubing and 1/16 solder. Found enough for several small jobs on ebay for $17. Would really like to make copper work, its relatively cheap, easy to work and looks great/vintage.
 

silverbear

The Boy Who Never Grew Up
Jul 9, 2009
8,325
670
113
northeastern Minnesota
Just looked up your ebay vendor. Looks like the way to go since you would only use this for exhaust/ high heat situations. Nothing about copper is cheap... even regular pipe fittings, especially in larger diameters. Being the tight wad I am I'm going to let you jump first... ha!

Take photos!
SB
 

cannonball2

Well-Known Member
Oct 28, 2010
3,682
221
63
Colonial Coast USA.
Got the exhaust roughed out, fits as I hoped it would. Everything from the muffler south is soldered with common silver solder. From north of the muffler its all slip joints as its probable the solder wouldn't survive, Tried it this way to see what works before shelling out the $$$ for the Safety Silv 56. Its all tied nicely to the frame with a OEM Whizzer exhaust frame mount. Hopefully the exhaust/oil is headed away from the back tire as I wont be riding long if its not. Should make a great auto chain oiler-lol.
 

Attachments