


Hey, I had an idea for a project to build a behind the seatpost box for my homemade cdi out of wood. I had 1 piece left over so i made headlight brackets for my chopper-style forks. Here's some info:
First I went and bought this:
Loew-Cornell 2-3/4''x7-1/4'' Wood Slats - 6PK*: unfinished wood*: wood crafts*: crafts*: Shop | Joann.com
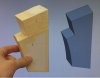
I use a 3D design program daily for my job and in my "spare" time created a 3D rendering of the oil tank/ toolkit and made patterns, cut them out and developed a mock up of the item. I had to create a notch of sorts to clear my rear brake calipers, and it does so perfectly. At home, I then glued the patterns to and cut them out of the 3/16" plywood craft boards with a utility knife. (just keep scoring until you get through) I glued and nailed it together, then puttied, sanded and painted it to match my bike. I'm having white vinyl decals cut in a co-worker's "spare" time to complete the look. To attach it to the seat tube, I used the bracket and the long bolts from my old crappy cdi to secure the box to my seatpost. Now I just need to re-route the wires from the engine and the spark plug wire and drill, mount, and rewire my kill switch toggle switch...
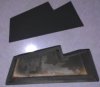
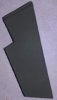
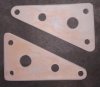
Next, I noticed that I had 1 piece of this craft wood left and no ideas what to do with it. My brother was going to cut headlight brackets for me from aluminum that I had designed and sent to him via PDF file. He apparently doesn't have as much "spare" time at work as I did. In waiting for him to deliver, I decided that my brackets should be shorter so I redesigned them, made patterns, and took them home and found that they both fit perfectly on the last piece of wood. I cut them out, sanded them and mounted them using 4 - 1" conduit hangers (painted black). Perfect fit and looks awesome. -Until I hit that first big bump and they break, but until then, they'll look awesome)...
I can provide plans if anyone is interested. Then you can decide what material to use. I don't have a welder, so sheet metal was out of the question. Plus this entire project with all the mounting hardware was around $5. Not bad, plus a definite upgrade in appearance. I have pics of everything finally mounted after tonight, but in the meantime, here are the items themselves...
First I went and bought this:
Loew-Cornell 2-3/4''x7-1/4'' Wood Slats - 6PK*: unfinished wood*: wood crafts*: crafts*: Shop | Joann.com
I use a 3D design program daily for my job and in my "spare" time created a 3D rendering of the oil tank/ toolkit and made patterns, cut them out and developed a mock up of the item. I had to create a notch of sorts to clear my rear brake calipers, and it does so perfectly. At home, I then glued the patterns to and cut them out of the 3/16" plywood craft boards with a utility knife. (just keep scoring until you get through) I glued and nailed it together, then puttied, sanded and painted it to match my bike. I'm having white vinyl decals cut in a co-worker's "spare" time to complete the look. To attach it to the seat tube, I used the bracket and the long bolts from my old crappy cdi to secure the box to my seatpost. Now I just need to re-route the wires from the engine and the spark plug wire and drill, mount, and rewire my kill switch toggle switch...
Next, I noticed that I had 1 piece of this craft wood left and no ideas what to do with it. My brother was going to cut headlight brackets for me from aluminum that I had designed and sent to him via PDF file. He apparently doesn't have as much "spare" time at work as I did. In waiting for him to deliver, I decided that my brackets should be shorter so I redesigned them, made patterns, and took them home and found that they both fit perfectly on the last piece of wood. I cut them out, sanded them and mounted them using 4 - 1" conduit hangers (painted black). Perfect fit and looks awesome. -Until I hit that first big bump and they break, but until then, they'll look awesome)...
I can provide plans if anyone is interested. Then you can decide what material to use. I don't have a welder, so sheet metal was out of the question. Plus this entire project with all the mounting hardware was around $5. Not bad, plus a definite upgrade in appearance. I have pics of everything finally mounted after tonight, but in the meantime, here are the items themselves...
Attachments
-
 47.1 KB Views: 154
 -
 74.6 KB Views: 131
 -
 41.4 KB Views: 157
 -
 33.5 KB Views: 151
 -
 65.2 KB Views: 133