

Firebird, Silverbear's Worksman Cruiser
- Thread starter silverbear
- Start date

I had to look at the pictures to see what holes you were talking about. Good grief, no! That's the brass filigree wings I bought. The brass is thin and is stamped out by a machine. Back when Tiffany lamps were the rage what they called the art deco style was real big... this would be in the 1920's and 1930's. For some reason dragonflies were a popular thing to incorporate into the design of a lamp. Stained glass is cut out to the same shape as the wing, the edges are wrapped in copper foil and then it is soldered to the brass filigree wing... then it got soldered in to the rest of the lamp and the light shining through lit up the dragonfly. Pretty cool. Also pretty fussy work. When I had a stained glass shop many years ago I made windows, usually big windows using lead cames (an H shaped strip of lead which held the edge of the glass in each channel & then soldered together where cames joined up. Tedious work. If this were the middle ages I would have been called a "glass monger", today stained glass workers are known as "stained glass artisans". It's a specialized trade, but one I got pretty good at. I stopped working with lead after I had nerve damage from lightning... lead is bad for the nervous system and you handle it a lot making big windows, then breathe in the fumes of flux and lead/tin solder in joining it all up. I figured I'd better keep my distance from it if I didn't want this nerve damage to get worse. With this copper jewel light I'm using silver solder, so no worry. By the way, an interesting side note most people don't know is that technically glass is a liquid and not a solid. I guess it is in between really. When you go to your church next time look at the leaded windows and you'll see that the glass is thinner at the top of a piece than it is at the bottom... that's because it is ever so slowly being pulled down by gravity. It just flows very very slowly. Kinda cool thing to think about.WOW! did you cut all them hole in the copper with the Dremel?
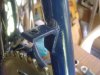
The only truble I see with the shims is that it might turn in them. If so maybe solder them to the post.
Like all the rest its going to be a nice build...Curt
Regarding the shims. You may be right, but we'll see. If I can get it tight enough I think it will work. If it doesn't then it doesn't and I'll do something else. But I'm going to be optimistic and say it's going to work perfectly!
SB
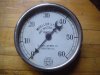
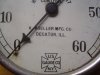
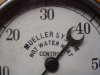
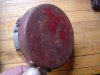
SIDECAR SPEEDOMETER
I found a little treasure at the dump the other day. I saw the gauge, the zero to sixty and the cool needle and pictured it on the canoe sidecar. No, it isn't a speed ometer, but a heat ometer. Close enough for government work, as they say (the government workers say that, I guess). I'm picturing this in a little dashboard at the front of the canoe/sidecar which I also picture having a little windscreen made of Plexiglas. I'll paint the back of the gauge and while the cover is off will try making a little half circle out of something, maybe the chromey looking foil duct tape... what on the reservation is called Indian chrome, good for covering rust holes and shiny, too. Once the tell tale heat part is covered up I can affix a water decal of the Indian motorcycle logo. I had some(got burned up, but I think I can get more) I got from a cast iron toy restoration guy, made for old cast iron Indian motorcycle toys. Like the big ones, just little. So, a little decal... fit right in there... a genuine made in America Indian speedometer (quite rare) that does not work of course, but who cares? Can't go sixty anyway. How cool is this, eh?
Silverbear
Attachments
-
 254.6 KB Views: 131
 -
 218.2 KB Views: 112
 -
 214.5 KB Views: 118
 -
 210.4 KB Views: 127
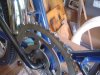
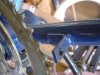
REMOVAL OF CHAIN GUARD MOUNTS
The Worksman Newsboy has tabs welded to the frame for mounting the pedal chain guard. My understanding is that these tabs interfere with placing the engine as low as possible in the frame. So they have to go. How best to do this? I have available to me a hacksaw, dremel moto tool with cutoff wheels, grnders which fit into the drill chuck, files. I'm thinking hacksaw followed by grinder attached to drill. Yes?
A secondary question is how small do I need to go with the pedal crank (not the arms, but the sprocket. I can see that the stock one is too big, so how small do I need to go? Anyone know? Getting closer...
SB
Attachments
-
 223.7 KB Views: 153
 -
 205.8 KB Views: 161
 -
 200.2 KB Views: 152
Silverbear, I've been following you and several others on their builds. It is a great help. I have a Worksman frame and thinking about getting started on it. I would like to modify the frame with a drop-loop so I can get an EZM system in it, but I'm having trouble finding someone with a tubing bender. I have a prototype bent up with conduit, but we don't have a bender where I work to do it right. I may stick with the frame and go 2-stroke again similar to the Pirate bike. Keep at it, maybe we can get together in Thurmont when you are down this way again. Dan
Tinsmith,
Yes, I'd like getting together for a ride this fall. Maybe we can get something going with a group ride. The Thurmont area is beautiful with lots of back roads.
I don't have the skills or tools to do a frame modification on a Worksman. A four stroke would be tough to fit in there any way you look at it. The Schwinn Panther frame is another story and any of the old Schwinns with the cantilever frame have plenty of room. if you really want to get the frame modified with a drop loop, I'd get in touch with Crazy Horse who knows a lot about this modification, Worksman frames and such. He's in Maryland and might be able and willing to do the work for you. Or he will point you in the right direction. I think he's over in the Rockville area.
SB
SB,,,
I have used copper pipe split in 2 for shims on OCC bikes before and see no prob with your using them
(occ seatposts are 31.8 and very hard to get a 'normal' seatpost for, so I shimmed smaller posts to fit, and have never had a post move since doing this") )
)
I also changed from a 44 tooth pedal sprocket to a 36 and can pedal with the 2 little ones in their trailer a lot easier
I hope that helped you a little
I have used copper pipe split in 2 for shims on OCC bikes before and see no prob with your using them
(occ seatposts are 31.8 and very hard to get a 'normal' seatpost for, so I shimmed smaller posts to fit, and have never had a post move since doing this
)I also changed from a 44 tooth pedal sprocket to a 36 and can pedal with the 2 little ones in their trailer a lot easier
I hope that helped you a little
Last edited:
What I see in the pictures is they are welded on top and bottom just cut the welds with a saw and it should fall. A lot of times you can cut one weld and break the other but it could tear the tube if it is to thin. Then grind the rest.REMOVAL OF CHAIN GUARD MOUNTS
The Worksman Newsboy has tabs welded to the frame for mounting the pedal chain guard. My understanding is that these tabs interfere with placing the engine as low as possible in the frame. So they have to go. How best to do this? I have available to me a hacksaw, dremel moto tool with cutoff wheels, grnders which fit into the drill chuck, files. I'm thinking hacksaw followed by grinder attached to drill. Yes?
A secondary question is how small do I need to go with the pedal crank (not the arms, but the sprocket. I can see that the stock one is too big, so how small do I need to go? Anyone know? Getting closer...
SB
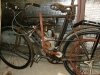
Blackhog01,
I was just in the board tracker & vintage bike section and saw your Shaw thread with the great pictures. I'm taking the liberty of posting the third of your photos below and want to thank you for sharing it with us. I saw something very interesting in that bike which was different than the others pictured. Notice the drop stand setup. Usually on these old timers the dropout has been made so that the mount and stop for the drop stand is made integral to the drop out. Not on this one. This is a separate piece which looks to me like it could be copied so that it would work on any older cruiser... say a 50 Panther or something newer you want to look old like a Worksman newsboy. A rear drop stand is also useful if you want to add an expansion chamber exhaust under the pedal crank where it usually interferes with the kickstand.
I was just in the board tracker & vintage bike section and saw your Shaw thread with the great pictures. I'm taking the liberty of posting the third of your photos below and want to thank you for sharing it with us. I saw something very interesting in that bike which was different than the others pictured. Notice the drop stand setup. Usually on these old timers the dropout has been made so that the mount and stop for the drop stand is made integral to the drop out. Not on this one. This is a separate piece which looks to me like it could be copied so that it would work on any older cruiser... say a 50 Panther or something newer you want to look old like a Worksman newsboy. A rear drop stand is also useful if you want to add an expansion chamber exhaust under the pedal crank where it usually interferes with the kickstand.
Attachments
-
 306.3 KB Views: 288
Thanks, Bill. That's good to hear.SB,,,
I have used copper pipe split in 2 for shims on OCC bikes before and see no prob with your using them
(occ seatposts are 31.8 and very hard to get a 'normal' seatpost for, so I shimmed smaller posts to fit, and have never had a post move since doing this
SB
Thanks, Curtis. I think so, too.What I see in the pictures is they are welded on top and bottom just cut the welds with a saw and it should fall. A lot of times you can cut one weld and break the other but it could tear the tube if it is to thin. Then grind the rest.
SB
Thats the one I will be cloneing. Belt drive and all.Blackhog01,
I was just in the board tracker & vintage bike section and saw your Shaw thread with the great pictures. I'm taking the liberty of posting the third of your photos below and want to thank you for sharing it with us. I saw something very interesting in that bike which was different than the others pictured. Notice the drop stand setup. Usually on these old timers the dropout has been made so that the mount and stop for the drop stand is made integral to the drop out. Not on this one. This is a separate piece which looks to me like it could be copied so that it would work on any older cruiser... say a 50 Panther or something newer you want to look old like a Worksman newsboy. A rear drop stand is also useful if you want to add an expansion chamber exhaust under the pedal crank where it usually interferes with the kickstand.
Great find it will look realy Cool on it. They wont let us snoop at the dump anymore. Stupid buracrats. I do anyway when I bring a load out,but that is only a couple times a year. I should go once a week and hall my own garbage. I tried that once and it gets to stinky oh wellSIDECAR SPEEDOMETER
I found a little treasure at the dump the other day. I saw the gauge, the zero to sixty and the cool needle and pictured it on the canoe sidecar. No, it isn't a speed ometer, but a heat ometer. Close enough for government work, as they say (the government workers say that, I guess). I'm picturing this in a little dashboard at the front of the canoe/sidecar which I also picture having a little windscreen made of Plexiglas. I'll paint the back of the gauge and while the cover is off will try making a little half circle out of something, maybe the chromey looking foil duct tape... what on the reservation is called Indian chrome, good for covering rust holes and shiny, too. Once the tell tale heat part is covered up I can affix a water decal of the Indian motorcycle logo. I had some(got burned up, but I think I can get more) I got from a cast iron toy restoration guy, made for old cast iron Indian motorcycle toys. Like the big ones, just little. So, a little decal... fit right in there... a genuine made in America Indian speedometer (quite rare) that does not work of course, but who cares? Can't go sixty anyway. How cool is this, eh?
Silverbear
Last edited:
just got around to reading all this, SB, dunno how i missed it before.
praises first; bike's looking great! i'm all into the subtle details, and the dragonfly light and grips are a nice touch. i know i've said Worksman's were "ugly," but i guess it's all in how it's done. can't wait to see more, especially the sidecar. i'd love to build one myself, but it's just so impractical with southern california traffic.
now for some tips.
your seat post shims should work fine. i've done that myself plenty of times. the smaller diameter posts usually came with a shim on those old bikes. it was split down the middle and bent over at the top so it wouldn't fall in. i've seen them on ebay.
i made one awhile ago using a piece of aluminum pipe the same diameter of a seatpost. i had a steel pipe about 6" long and the same OD as the seat tube on a bike, and i cut the aluminum pipe about 1/4" larger, then slid it inside the steel pipe.
the 1/4" that stuck out, i used a round punch as a dowel and flared out the pipe by beating on it with a hammer so it mushroomed outward and made a lip. then removed it from the steel pipe, grinded and polished the hammered end, cut it down to 2" and slit the side.
worked perfect, wouldn't fall into the bike, and was barely noticeable. kinda a lot of work just to make a shim, but you know how it is when you start obsessing over tiny bits.
as for the chainguard tabs, i had to remove one from a buddy's bike, and lemme tell you, those welders at worksman don't mess around. i started by carefully grinding the welds at both sides, figuring, like you, it'd just fall off, but it was on there pretty good. did a lot more grinding and eventually got it off, but it took me awhile to get it all smooth. as far as his bike, though, it didn't affect the actual seat tube, just was a pain to do.
and on the sprocket, we used a 36 tooth. plenty of room, and makes the bike easier to pedal, when you have to. i actually use a 36 on all my bikes, even the skiptooth (which would be an 18tooth.) if you wanted to keep the bike "factory correct," you could get a 36t from Worksman for 10 bucks. just make sure you get the right one, 'cause worksman uses thicker chains, but they do have them in both thicknesses, i checked.
that's it from me. looks like you're off to another great bike...
Thanks, Kyle. It should look a good bit different once the engine is in place with the SBP exhaust, a different paint job, different fenders, cream tires and my lights & leather stuff. It won't be anything fabulous, but it will be mine, made to suit me with the stuff I like and can afford. I have some trouble picturing it all in my mind, so I'm looking forward to each step coming closer to done so i can see it kind of come alive.
Curtis,
Thanks for the tips. Your idea of doing a clone of the Shaw is awesome. I see why you like it so much. What engine will you use? What frame?
Bairdco,
Thanks for the kind words and tips. I got a nice sprocket and crank arm assembly off a girl's 24" Hawthorne or JC Higgins (don't remember which) and tomorrow will count the teeth. It is smaller in diameter than the Worksman or whatever it is I put on there... might be anything as it was a year ago. I also have a donor 20" bike from the dump I could take the sprocket and crank from which is smaller yet. Yeah, I thought of you and your copper bike when I was making the initial jewel tail light. I figured you and Barely would like it. I'm looking forward to making the front fender light with the dragonfly wings. I can get the stained glass beveled jewels from my old glass supplier in different colors including clear, blue, green, amethyst, ruby and amber which is what I'm using for the front fender light. They aren't cheap, but they sure are beautiful. It is so gratifying when you get an idea and then discover that it is even better than you thought it would be. I'm hoping to sell these eventually, capitalizing on the skills I have in glass work. Someday I'm going to make one of your copper gas tanks or at least try to. Naw, I can do it. I will make one of your tanks. For your solder work what kind of torch do you use? I've been using just a regular shop one that fits on a propane tank, but find it is too hard to control the flame for fine work. I got a couple cheap pencil torches that run on butane which were fine for awhile and then became junk to throw away. I have a better one ordered and hope it is the answer for the fine jewel light work. For most stained glass work you use a soldering iron which I used to control with a rheostat to get the right temperature. Your tank soldering looks so good.
SB
SB I started last fall. I have a older Raleigh it has the longer stearing tube. I changed the front fork and had lengthen the top tube to fit. I spliced it in the midel.The fork that was wasto narrow for the 26" wheels I put on they came off a three speed,nice crome rims.Now I have to cut and shorten the rear the brakes are to high for the wheel. I don't know what engine to use I was thinking a Honda but I might get a two stroke just because of the open fin more like the shaw.
What size wheel do most run will 1:95 be wide enough to hold up I am 220lbs?
What size wheel do most run will 1:95 be wide enough to hold up I am 220lbs?
Curtis,SB I started last fall. I have a older Raleigh it has the longer stearing tube. I changed the front fork and had lengthen the top tube to fit. I spliced it in the midel.The fork that was wasto narrow for the 26" wheels I put on they came off a three speed,nice crome rims.Now I have to cut and shorten the rear the brakes are to high for the wheel. I don't know what engine to use I was thinking a Honda but I might get a two stroke just because of the open fin more like the shaw.
What size wheel do most run will 1:95 be wide enough to hold up I am 220lbs?
I hope someone more knowledgeable will step in here and give answers better than mine. What size wheels did the Shaw have? Any idea? What will fit in the frame and front fork you have. I tend to think wider is better, but what do I know? I like balloon tires, the way the look and ride. I'm about 200 pounds.
I'm not sure I understand about the brake calipers, but I'm guessing you need ones with a longer reach, like from a BMX bike. If you email me a photo of your bike I can post it here for you. Sounds like a cool project.
SB
i just use the yellow bernzomatic mapp gas torch from ACE. after some experimenting, i just keep the flame low and go to town.
honestly, i probably have the most primitive method of soldering a tank, but it's all about making do with what you got.
i have a really nice, high dollar pencil torch with a bunch of different attachments, and it didn't work at all. the butane just wouldn't heat it up.
copper is so easy to work with. i had absolutely no experience besides soldering wires when i built my first tank, and it just gets easier everytime. with all the practice you've had soldering juice cans, you could probably put me to shame...
I was looking at jeweler's torches and some of those are very expensive. Last year I had what was called a "pencil torch" head from Bernzomatic using regular propane tanks and it was pretty good at controlling the flame. Looked just like a regular torch head but was supposed to produce a more controlled pencil flame. It came through the truck fire looking OK, but no longer works. I understand you can use Mapp gas with a regular Bernzomatic sold for propane torches, which I bought one of thinking it would help when I'm trying to go for high heat to bend something. As you say, use what you've got. I have a couple regular old torch heads for general shop use. Good enough for now.i just use the yellow bernzomatic mapp gas torch from ACE. after some experimenting, i just keep the flame low and go to town.
honestly, i probably have the most primitive method of soldering a tank, but it's all about making do with what you got.
i have a really nice, high dollar pencil torch with a bunch of different attachments, and it didn't work at all. the butane just wouldn't heat it up.
copper is so easy to work with. i had absolutely no experience besides soldering wires when i built my first tank, and it just gets easier everytime. with all the practice you've had soldering juice cans, you could probably put me to shame...
Did you clamp the sections of tank together and then kind of tack it with solder points or just start soldering in a continual bead, removing clamps as you go? I saw in a thread awhile back where someone riveted a tank together and then followed with soldering it up. That would work, but I think yours has a cleaner look. As for my soldering skills... some of those tanks look less than good under the spiffy leather. Soldering a curved surface is kind of tricky. Thanks to your copper tank I stopped wishing I knew how to weld. Copper is good enough and fine for me. Thanks, Bud.
SB