

A Question to Ponder
- Thread starter FlyGuy
- Start date

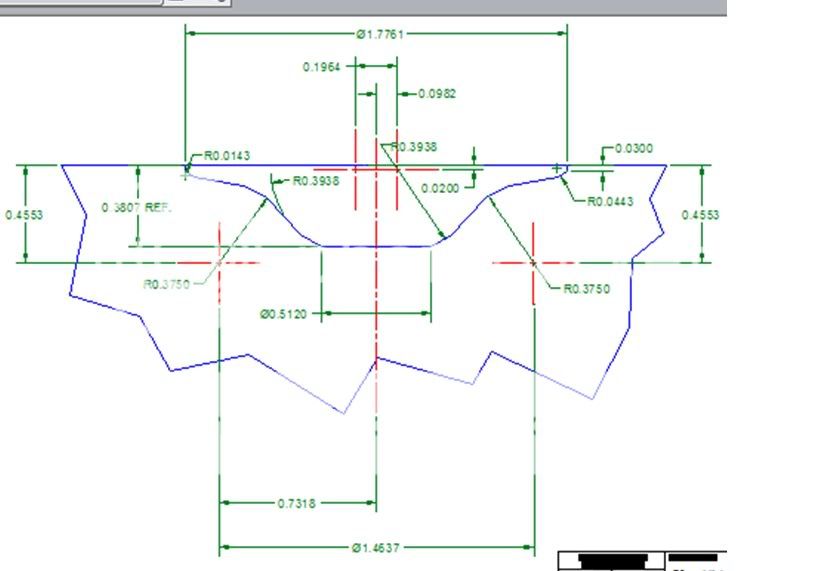
This is what the combustion chamber will be with the piston at top dead.
The top of the piston will be turned to match the cylinder head.
The squish band thickness will be somewhere between .015 and .030.
Depending on how the compression ratio works out.
The top of the piston will be turned to match the cylinder head.
The squish band thickness will be somewhere between .015 and .030.
Depending on how the compression ratio works out.
so far im liking the ideas and concepts at hand. i would do some research on the squish bands and how to cutt them correctly for best results. also look into the port timing as well for the best all around results.
as for the motor. do you have a link for the crank your going to use? and will the crank have to be cutt or shaved to fit correctly?
lastly. take pictures of what ya got, cause im diein to see this thread be put together!
cheers
mobike91 - wil
as for the motor. do you have a link for the crank your going to use? and will the crank have to be cutt or shaved to fit correctly?
lastly. take pictures of what ya got, cause im diein to see this thread be put together!
cheers
mobike91 - wil


Mobike91
Here is a nice crankshaft.
puch moped race crankshaft stuffed
or
Puch E50 Teflon Stuffed Race Crank Everything Kit for $120.00 in Crankshaft from 1977 Mopeds
Made to be rocked.
The deal is these cranks use 6203 bearings.
The chineese engines use 6202 bearings.
That leaves 2 options.
A) Grubee Starfire Super Rat takes 6203
B) Other Starfire Engines may use 6203 bearings look at grubee site for that info.
C) If cant get any starfire cases then ummmm Machine Custom Cases YA.
We will get to the other good stuff soon.
Mobike91
Here is a nice crankshaft.
puch moped race crankshaft stuffed
or
Puch E50 Teflon Stuffed Race Crank Everything Kit for $120.00 in Crankshaft from 1977 Mopeds
Made to be rocked.
The deal is these cranks use 6203 bearings.
The chineese engines use 6202 bearings.
That leaves 2 options.
A) Grubee Starfire Super Rat takes 6203
B) Other Starfire Engines may use 6203 bearings look at grubee site for that info.
C) If cant get any starfire cases then ummmm Machine Custom Cases YA.
We will get to the other good stuff soon.
so are those cranks a little wide? or will they fit right in? im thinking you have to cutt them down or something. and add a keyway or something to make the crank sprocket fit on it. then on the other side you gotta mill it down and tap it to the right size for the magneto to fit. least thats what im thinking. the crank looks wide. but then again it was a big picture lol.
so the 6203 bearings. will they not fit right in? is it a different size at the crank or in the case? i might be looking into making one of these builds for fun. sounds like a good way to make a bad mobile. lol.
so you said you was gunna run a 70cc piston right? do you think the bottom of the jug will fit into the bottom end of the bike? and will the crank clear the bottom end as well as it swings around?
dont need to answer all the questions. just put some imput. just throwing out questions that might help you in your build
Yes the right questions bring the right answers.
I have went over these questions again and again.
At this point it should be easy enough to realize the scope of my plans.
Due to my line of work i have access to resources that many hobbist normally would not. The resources are all inclusive of what it would take to pull off this build.
My faviorite saying is.............
Let your peoples success be your success......
For if you enable your people to be successful..........
At the end of the day you are successful.............
When you enable your people to be successful they help you succede.
That's a little piece of wisdom bestowed upon me by my mentor.
Mobike91
I will answer all of your questions.
I started this thread a little wile back.
http://motorbicycling.com/f13/performance-crank-hybred-28591.html
It will contain all of the crank data we need.
So check there for that piece of this build, and in my other threads for other pieces of this build. Thata way we can keep the extent of each thread on the subject at hand.
This whole project is gonna be so much fun.
Right now my only limitation is cash flow. Theres plenty i can get done without it for now.
Check back later today for an update on the cylinder head.
Update
Ok got some numbers......
This is what the setup above would yeild.
I think the compression is wayyy to high.
compression ratio cylinder volume combustion volume
17.14286 74.6252 4.6228
This is the perfered setup if there is enough meat to get the chamber right.
compression ratio cylinder volume combustion volume
11.33333 70.8660 6.8580
Yes 11.3:1 is very high as well. I hope to make Aluminum Ehaust headers with large fins to suck the heat out of the engine. With the correct timing advance you can pump more heat out the exhaust.
Be back later to post the new machining plans.
I will be raising the ehaust port approximatly .060 inches.
That will hel with the compression proble a little.
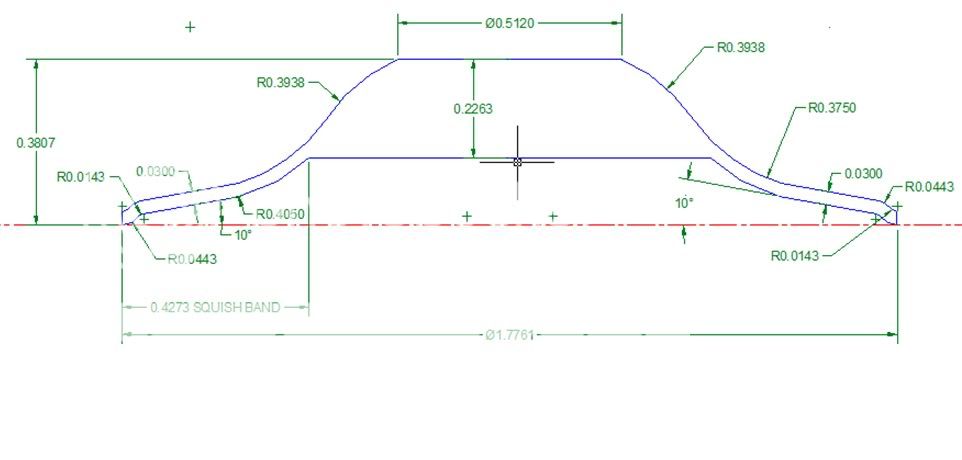
The balance here is in having a 50% or better squish band and correct compression using the material we can cut from the head. The bigger around we make the combustion chamber center the smaller the squish band gets smaller. The head is currently set for a 1/2 reach plug. If i went deeper id have to use a 3/8 reach and i dont want that.
I will have to build up the top of the cylinder a little so i can cut deeper.
That will hel with the compression proble a little.
The balance here is in having a 50% or better squish band and correct compression using the material we can cut from the head. The bigger around we make the combustion chamber center the smaller the squish band gets smaller. The head is currently set for a 1/2 reach plug. If i went deeper id have to use a 3/8 reach and i dont want that.
I will have to build up the top of the cylinder a little so i can cut deeper.
Well heres the final results.
If i go 1/8" deeper the ratio will be 11.5:1.
Still really high but if i have to i will sacrifice squish for a little volume.
Im gonna cut it and run it 11.5:1 if it dont' overheat and ping i'll leave it if it pings i'll cut it.
Post ya the drawings later.
If i go 1/8" deeper the ratio will be 11.5:1.
Still really high but if i have to i will sacrifice squish for a little volume.
Im gonna cut it and run it 11.5:1 if it dont' overheat and ping i'll leave it if it pings i'll cut it.
Post ya the drawings later.
Thanks for the suggestion.
I have only run NGKB7 and B8 in the past.
Currently i have one of those heads on a chineese engine and it runs good if i take it easy. After some long WOT runs it overheats to the point that the metal of the sparkplug turns blue.
I think part of my problem is with the head gasket.
The super high compression blows out the aluminum head gasket rather quickly.
Seems to leak around the studs down into the cylinder as there is lots of black tar oil in there.
I have thought about trying to alumiweld the head to the cylinder.
Soon as the head starts to leak the engine runs way lean and overheats super quick.
Do you think the alumiweld will work?
Aluminum repair kits, repair any aluminum metal by welding with a Propane Torch - Alumiweld
Harbor Freight Carries it
Yeah, I've use it. It's tough stuff and has to be 750 F degrees to melt, way under the melting point of aluminum.
Is there evidence of torching?(AKA tunneling). This is when the hot gases cut grooves in the aluminum then the Alumiweld would work. Totally degrease the jug then pre-heat in an oven. When I used it a small propane torch wasn't enough heat. The aluminum carries off heat so fast a small torch couldn't keep up. I used a torch hooked up to a 20 lb propane bottle like on a BBQ. Maybe with pre-heating in an oven at the highest temp you could use a smaller torch.
To level out the top of the jug there's a thing called draw filing. A file can cut very finely if you hold it sideways with both hands and pull the file towards you using the file teeth on a sharp oblique instead of the more direct way of pushing it across which would cause gouges. Holding the tang or handle in your left hand and the tip with your right pull the file across the top evenly. If you have to file more on the Alumiweld buildup. Try to keep any buildup to the least amount possible so you don't have so much to take off. When you have it milled to the right level the file will almost float across the diameter of the bore. When you reach the point of where it seems to not be working anymore then switch to the sand paper and glass routine. Be careful not to take very much off the top of the cylinder if you can help it. If you do you can still use two base gaskets, that would just change the port timing slightly.
Spray the head gasket with Permatex Copper Spray Form-A-Gasket and let it set up like it says, torque to your favorite torque setting and you should be good to go.
p.s.: I don't think welding the head to the cylinder would work. I don't think you could depend on the Alumiweld which is more of a solder really. You would have to depend on a capillary action of the solder to make it to the cylinder/cylinder head junction inside the cylinder. Fail at that then you'd still be getting oil down the stud holes")
Is there evidence of torching?(AKA tunneling). This is when the hot gases cut grooves in the aluminum then the Alumiweld would work. Totally degrease the jug then pre-heat in an oven. When I used it a small propane torch wasn't enough heat. The aluminum carries off heat so fast a small torch couldn't keep up. I used a torch hooked up to a 20 lb propane bottle like on a BBQ. Maybe with pre-heating in an oven at the highest temp you could use a smaller torch.
To level out the top of the jug there's a thing called draw filing. A file can cut very finely if you hold it sideways with both hands and pull the file towards you using the file teeth on a sharp oblique instead of the more direct way of pushing it across which would cause gouges. Holding the tang or handle in your left hand and the tip with your right pull the file across the top evenly. If you have to file more on the Alumiweld buildup. Try to keep any buildup to the least amount possible so you don't have so much to take off. When you have it milled to the right level the file will almost float across the diameter of the bore. When you reach the point of where it seems to not be working anymore then switch to the sand paper and glass routine. Be careful not to take very much off the top of the cylinder if you can help it. If you do you can still use two base gaskets, that would just change the port timing slightly.
Spray the head gasket with Permatex Copper Spray Form-A-Gasket and let it set up like it says, torque to your favorite torque setting and you should be good to go.
p.s.: I don't think welding the head to the cylinder would work. I don't think you could depend on the Alumiweld which is more of a solder really. You would have to depend on a capillary action of the solder to make it to the cylinder/cylinder head junction inside the cylinder. Fail at that then you'd still be getting oil down the stud holes
Last edited:
Great post i never heard of that fileing method before.
The head and cylinder are flat but the problem seems to be the inability to tighten the studs securly without pulling them out of the engine case.
Im wondering if i cut an angle on the outer edge of the cylinder and head to create a channel ( weld Prep ) i could lay a nice bead of alumiweld in there.
No chance the alumiweld will reach the stud holes but i wonder if i could use a copper head gasket and the just weld around the outside for a little extra sealing.
That way the copper gasket wont melt during welding and will seal the stud holes.
the outer weld will keep air from getting in the cylinder and prevent it from running too lean.
You can try but I'm not sure how you'd be able to compress a gasket with the head welded to the jug. I just think a new gasket, up-graded head studs, making sure both gasket surfaces are flat and using Permatex spray with a good torque pattern will seal the motor. Mine's running about a 13:1 compression ratio, I think from the info gathered in the forums. I have a hi-compression Puch head and after putting is on with SPB studs and new gasket there's not a hint of leakage.
Something to think about; cutting a groove around the inside of the bolts for a wire "O" ring. Needs to be a little more than 1/2 the diameter of wire deep. Use copper wire with the ends beveled to overlap for a seal. Mask off the combustion chamber on the head and Permatex spray the head. Torque to a normal torque.
from the info gathered in the forums. I have a hi-compression Puch head and after putting is on with SPB studs and new gasket there's not a hint of leakage.Something to think about; cutting a groove around the inside of the bolts for a wire "O" ring. Needs to be a little more than 1/2 the diameter of wire deep. Use copper wire with the ends beveled to overlap for a seal. Mask off the combustion chamber on the head and Permatex spray the head. Torque to a normal torque.
The plan was to.....
1) place cylinder on empty bottom end with the studs in it.
2) place copper gasket on cylinder and studs
3) place head on cylinder
4) bolt it all together with the proper torque.
This will accomplish the compression of the gasket and the proper assembly of the top end.
Then after all that lay a nice bead of alumiweld around the joint between the head and cylinder. ( There will be a groove cut there for the alumiweld to lay in )
After she cools down un-bolt the studs and walla we have a one piece top end.
Now I haven't decided if this is a good idea or not.
But i'm thinking i will do this to my old engine first to test it.
I like the O-Ring idea with exception to the split in the wire.
But maybe taking some copper tubing, throw it in a lathe and cut some little o-rings out of the pipe could work. I have ball endmills with 1/16" diameter that i could mill the grooves in the head and cylinder. I'd rather use a larger copper o-ring and 1 groove for an all encompassing o-ring seal.
Heck that could be better than weldin it together.
Do you really think that a beveled wire would work?
It won't leak on the ends?
If so thats even easier. hummmmm i wonder if somewhere sells copper O-Rings.
Thanks for the ideas.
There Great.
I think that when torque is applied the gap would pretty much seal itself but it would have to be a good fit, as close as possible. The copper should also expand when running further closing any gap. If nothing else then silver solder the ends together.
p.s: Heh, I forgot your the guy that has access to a real machine shop. I think it would be very easy to chuck a jug in a lathe and cut an O ring groove. Anneal the copper ring before being soldered to soften it, spray the head with Permatex and I think you'd have done about all you can for a seal.
p.s: Heh, I forgot your the guy that has access to a real machine shop. I think it would be very easy to chuck a jug in a lathe and cut an O ring groove. Anneal the copper ring before being soldered to soften it, spray the head with Permatex and I think you'd have done about all you can for a seal.
Last edited:
I'm afraid the gap will leak some.
The copper may expand slightly but with a wire size of 1/16" diameter and the cooefficent of thermal expansion im sure we would find it'll be less than .0005 of an inch.
Silver solder will melt for sure.
Anyhow from what i can gather a stainless steel o-ring would be best.
Now i got to find one big enough.
I never tried the permatex spray but have heard good things about it. I worked with a guy who raced high performance race carts and he swore by it. Even with a good gasket. Do you use the red spray?