Hey all. This is my 3rd build. Gonna try to do it right. So I pieced a bike together part by part online (my girlfriend thinks we are being overrun by cardboard) I will try to post everything I can but I am sure I will miss something.
FOUNDATION:
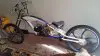
Z2 Stretch Tank Frame (has a faux tank that I intend to seal and make the functioning fuel source.
125cc Full Auto 4-stroke motor from PCC Motor. Electric start full auto gearbox to a jack shaft
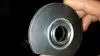
Front and rear disc brake on 6 spoke alloy wheels
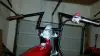
Micargi triple tree
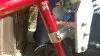
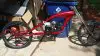
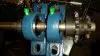
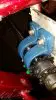
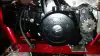
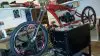
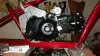
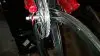
I decided I'd start by tackling the motor mounting situation. I kept some aluminum scraps I knew a project would crave later and ,eureka, today was that day.. I drilled 7/8 holes to later be the clamps to secure to the frame. Then with a sharpie, some cardboard, lots of cutting and grinding and a 12 pack to get the imagination stimulated it started to take shape. For others it's necessary to use the top mounts as I did. There is 4 threaded holes on the bottom of the motor that a skid plate was mounted to. If you try to use this as a motor mount it will Crack the case.
I have half of the mount done in the pics. It's a crude first rendition. I will clean it up later. It's all bolted together and hand tooled. Fasteners are size matched to the hole and driven into the hole to prevent wear from the motor vibration. The next mount will incorporate the seat post and bottom. I like the big beefy aluminum monstrosity it has become.
The space inside the mount will be filled with all the wiring.
I am still making it up as I go. I will update my progress at the end of today
FOUNDATION:
Z2 Stretch Tank Frame (has a faux tank that I intend to seal and make the functioning fuel source.
125cc Full Auto 4-stroke motor from PCC Motor. Electric start full auto gearbox to a jack shaft
Front and rear disc brake on 6 spoke alloy wheels
Micargi triple tree
I decided I'd start by tackling the motor mounting situation. I kept some aluminum scraps I knew a project would crave later and ,eureka, today was that day.. I drilled 7/8 holes to later be the clamps to secure to the frame. Then with a sharpie, some cardboard, lots of cutting and grinding and a 12 pack to get the imagination stimulated it started to take shape. For others it's necessary to use the top mounts as I did. There is 4 threaded holes on the bottom of the motor that a skid plate was mounted to. If you try to use this as a motor mount it will Crack the case.
I have half of the mount done in the pics. It's a crude first rendition. I will clean it up later. It's all bolted together and hand tooled. Fasteners are size matched to the hole and driven into the hole to prevent wear from the motor vibration. The next mount will incorporate the seat post and bottom. I like the big beefy aluminum monstrosity it has become.
The space inside the mount will be filled with all the wiring.
I am still making it up as I go. I will update my progress at the end of today
Attachments
-
 368.3 KB Views: 514
 -
 395 KB Views: 815
 -
 390.7 KB Views: 592
 -
 272.2 KB Views: 569
 -
 312.6 KB Views: 494