'49 J.C. Higgins build

GoldenMotor.com

ruppster

Member
Mar 3, 2010
191
0
16
maine
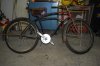
Ok this is the restart of the my thread carried over from the rustoration build off. Over the weekend I recieved my SBP H.D 2 shift kit with bottom bracket adaptors. I went through the contents of the box and either the chain adjuster packet didn't get packed or I lost it. I contacted them Sunday afternoon and it was shipped at no cost to me monday morning priority mail. If that isn't great service then I don't know what is! Top notch company and I'm now one of their many loyal customers.

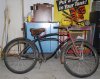
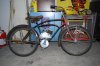
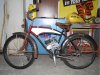
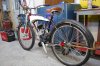
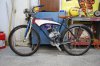
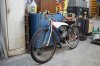
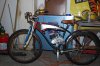
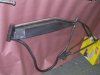
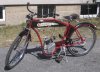
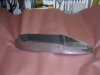
The shift kit is really nice as well. To be honest it looked kind of cheap and homemade in the pictures but in real life it's a very nicely made high qaulity kit. I mocked it up quickly and it blends in with the motor like it belongs there. I don't know why it's so non photogenic on their web site but I'm happy as a clam to own it. Now it's time for the build..shft.
 

ruppster

Member
Mar 3, 2010
191
0
16
maine
I just got some pics loaded up so I can show where I'm at. I first removed the crank so I can install the bottom bracket adaptors and 3 piece crank for the shift kit. When I tried to put the adaptors in I couldn't get the screws to thread in or even find the holes (Typical). After a close inspection it was obvious that the frame tubes extended into the bottom bracket and were blocking the path of the screws. I took out my die grinder with a bull nose mill and removed the stubs but the bracket was reinforced internally so I had to grind the hole into a clover shape to make a path for the screws. I'm concerned about the strength of the bracket now but I didn't have any choice but do what I did. I then honed the cups that the adaptors sit in so I don't have to hammer them in. I did this by switching to a krokus type attachement.
 

Attachments

ruppster

Member
Mar 3, 2010
191
0
16
maine
Looks like the computer work is going to be the hardest part of this project. I'm going to mock the complete bike up before I make anything permenent then disasemble it, paint it and then resemble. Now that the adaptors fit I put the crank and arms on snug but not tight. I assembled the individual parts of the shift kit over th weekend so I won't go through the pains of showing you how to do this. SBP has the process on their website already. I also mounted the motor in loosely to see how everything is going to sit. The output chain from the shift kit to the pedal crank will contact the clutch casing in this position. The motor will have to sit higher to make clearance which means a new front motor mount and maybe a 180 deg. turn for the cylinder head. It looks like bad news for the rear fender because it's really tight. I will have to snug up the rear mounts just to see how it' really going to set.
 

Attachments

ruppster

Member
Mar 3, 2010
191
0
16
maine
That's about it for tonight, I couldn't resist throwing a tank template on it just to see how it would look.
Just in case some of you didn't catch the begining of this thread in Rustoration build off. You will see me shamelessly beg, borrow and steal ideas from other members far more clever and talented than myself in this build. I'm just trying to do a detailed noob friendly thread including my costs and all my mistakes which there will be many of. I do have my pride so I didn't take pictures of the crank installed backwards. I won...cough,cough some columbia springer forks on evil bay for $90 so I'll have to throw that in the total. I hope they aren't junk and work on this bike. I already bought a pair of strut forks that I probably won't use.
 

Attachments

ruppster

Member
Mar 3, 2010
191
0
16
maine
I got my fork set Thursday and after some fiddling trying to figure out how they go together I think I got it right. I couldn't wait to test fit them so I was out there at 9:30pm putting them in. Wouldn't you know it? the stems threads were totally boogered up. I think I called every bike shop in a 30 mile area to see if they could chase the threads. I got "they have used 1" forks in 20 years" and a nobody around here messes with old bikes anymore. I tried a bike shop in town that in the past has never been open but I got lucky and someone was actually there and he had a die.
 

ruppster

Member
Mar 3, 2010
191
0
16
maine
I've been working on the bike,I got the forks mounted and I realized that it was starting to look dangerously close to barely awakes bike. I didn't realize it when I bought the forks that they were the same as his. Imitation is the highest form of flattery but I want my bike to have it's own look. I was planing on black paint that looked 3' deep and J.C Higgins in gold leaf emblazed on the tank. I gotta do something different now; my last bike was AC-Delco blue with gold stripe so blue is out.

Anyways I want my tank to have some shape and not be so slab sided so I worked some curves into it. The template in the pictures is version #3; just the profile of the tank makes it hard because there's so many angles and as soon as you make an arch or angle on one demension it messes up the other. I know this stage is crucial to the tank coming out right so there's no rushing this part. I think I till want more of a sweeping curve to the top, less width at the front and back a little wider in the middle. When I was at the bike shop getting the fork stem threads chased the guy had piles of old parts in boxes and bins everywhere. He gave me the nod to dive in and came up with some stuff I wanted. I picked up a mounting bracket for the carbide headlight, a tail light and a kickstand.

I'm a little down on the build right now. There's just something about the bike that doesn't look right. The proportions are off or something and I'm not sure about the parts I picked out. The head light doesn't look as cool as I imagined and I don't think the tail light is going to work out. I want a antique look so a fender mounted tail light would probably look more the part. I just threw the seat on there to see how it would look but it aint staying.
 

Attachments

SlowBalt

Member
Mar 8, 2010
759
6
16
Rhode Island
I'm a little down on the build right now. There's just something about the bike that doesn't look right. The proportions are off or something and I'm not sure about the parts I picked out. The head light doesn't look as cool as I imagined and I don't think the tail light is going to work out. I want a antique look so a fender mounted tail light would probably look more the part. I just threw the seat on there to see how it would look but it aint staying.
I think it looks sweet. The only thing I would do is put a lay back seat post on it.
I think once it's all one color you will like it better.
 

ruppster

Member
Mar 3, 2010
191
0
16
maine
Well I got my gas tank cut out an tacked together but I did it in 23ga. The trouble is my mig won't weld that thin a gauge so I'll have to have it tig welded,find a smaller mig welder to borrow or remake it in 20 ga. I'm not sure if it's a good idea making it this thin but it was so much easier to work with than the thicker gauge material I used before. Have any of you made a tank this thin before?
I called about my wheels as they've been at the bike shop for almost 3 weeks now with no word from him. He still hasn't ordered the darn spokes yet! According to him the length and gauge I need in stainless steel are hard to find and he may need to special order them. When I dropped them off he knew what the price of the spokes where and I paid him out front. Yeah, I know but what can you do? He's got my hubs, my rims and my money. This is why I try to be 100% independent because you can't count on anyone in my experience.
 

Attachments

Last edited:

ruppster

Member
Mar 3, 2010
191
0
16
maine
Well this kind of stinks and I've been blocking it out since pretty early in the build but I think I'm going to have to abort the build as I intended. I mounted my bars and actually sat on the bike and as much as I hate to say it the bike is just to small for me to ride comfortably. I'm all cramped up on it! Plan "B" I think I'm going to take off my current parts and tranfer everything to my '50 Schwinn Panther frame. I'm going to continue with the build but it will be for my wife and she has no desire for a shift kit. I decided to rebuild the tank in 20 ga. as well. It will be cheaper than paying someone to tig weld it for me ad it will be that much stronger. I got ahold of the guy I had to build my wheels and he still hasn't done anything so I fired him. Of course he doesn't have my money right now so I have a 50/50 chance of ever seeing that again. I'll be happy just to get my hubs and rims back at this point so it won't be a total loss. Never pay anyone up front to do work for you,Never pay anyone up front to do work for you,Never pay anyone up front to do work for you. I think it might sink in this time!
 

ruppster

Member
Mar 3, 2010
191
0
16
maine
Your bike is so sweet! Maybe different bars and a layback post is the way to go. I'' try a different set of bars first.
 

ruppster

Member
Mar 3, 2010
191
0
16
maine
Not much progress lately. I managed to weld up the gas tank which came out horrible. The metal warped so badly and the welds are down right embarassing. I got a sheet of 20 ga. the other day and I'm just going to remake it. By some miracle I was able to retrieve my wheels,hubs and my money from the bike shop today I thought they were as good as gone. I brought them to a local bike shop for service and I'm much more confident in this shop.

I took your advice slowbait and mocked up some commuter bars and it was night and day so on with the build as planned. I guess I just needed to take a step back and re boot
 
Last edited:

Bikesnfire

New Member
Jul 17, 2010
50
0
0
PA
Don't give up on the gas tank. They are a challenge but very rewarding to see your finished product. Everytime I make a tank, I swear it will be my last, but I'm already planning another build with my own fabricated tank. Don't sweat the looks of the welds. As long as you test it and it doesn't leak, fiberglass and body filler work wonders. The nice thing with body filler, you can add more complex shapes and curves if desired. Get your rough size and shape with the metal and finish with the bondo. Good luck.
 

ruppster

Member
Mar 3, 2010
191
0
16
maine
Don't give up on the gas tank. They are a challenge but very rewarding to see your finished product. Everytime I make a tank, I swear it will be my last, but I'm already planning another build with my own fabricated tank. Don't sweat the looks of the welds. As long as you test it and it doesn't leak, fiberglass and body filler work wonders. The nice thing with body filler, you can add more complex shapes and curves if desired. Get your rough size and shape with the metal and finish with the bondo. Good luck.
Thanks for the encouragement Bikesnfire. I'm not giving up on the tank I'm just going to make it stronger. The welds not only look horrible they are horrible. The 23 ga. is just to darn thin and I want to make sure it will hold up. I don't want to have to make a new tank in mid summer. I was thinking about trying some shapes on the next tank but that's a ways off.
 

ruppster

Member
Mar 3, 2010
191
0
16
maine
Thank you Russell, I hope your right. I haven't been very good about documenting the build but there hasn't been much to document. Tank version #2 went bad because I tried to make the top and bottom in two pieces but I botched the rear radius and ended up scrapping the attempt. I'm on tank version #3 and it's another failure in my eyes. The darn thing twisted in me from front to back really bad. The welding went much better with the 20ga. steel but as as hard as I try something always goes horribly wrong. I have enough steel for one more try. I think I'll form the tank first then solder the strap fastener in afterwards. I think the heat from welding those in first might be distorting the metal. I'm up for any sugestions if anyone has input.

I also started building my '50 Panther for my wife so when I get discouraged with Higgins I tinker with her bike. The Ironic thing is I like the panther better than my bike. I got some Husky wheels and spooned on the Quick bricks I bought for my bike. It's low slung and beefy looking. The tires made my bike look tall, and awkward so I put some smaller tires on it it's much better.
 

Russell

Well-Known Member
Apr 19, 2009
1,276
155
63
MA
I'm with SLOWBALT tacking first is the best method. I have seen his tank first hand and it is excellent.
I also tacked mine about every two inches. It was my first tank build, turned out good(due to luck not talent). I used tank sealer on it, still my biggest fear was the tank leaking as I am an amature welder(got lucky again). I cut the sheet metal with a saber saw, If I ever do it again I'll use a shear.
Everything I did on my build, I re-did a few times, so don't get discouraged. You will just appreciate the result that much better.
 

Attachments

ruppster

Member
Mar 3, 2010
191
0
16
maine
Thanks for the advise guys but I did tack it up as I went. I took my botched tank to a friend of mine and after much study we came to the conclusion that the tank racked when I made the tight radius at the back of the tank. The problem with my tank is it has so many curves and bends that I have to tack and form it as I go. I have to figure out what order to weld it up with out messing up other sections of the tank or make some sort of jig to hold the shape.My other options are make the tank in more pieces or I may just make the back of the tank square to eliminate the problem area all together.

As far as progress I decided last minute to paint the rims before having them laced. I decided on my color scheme (I think so anyways) gold with black accents and red rims. I used engine paint and Dupli-color wheel clear coat. Over th course of 2 days I carefully preped the wheels and painted and cleared them. The paint job looked ok but I decided it was to soft and also changed my mind on the color and decided to go with black rims. I spent 2 days tracking down a powder coater. Last night spent some quality time with my friends sand blasting cabinet and figured I have the moving leg of my fork done while I was at it. I should have them back by the end of next week.

I took the Raw motor for my wifes bike apart tonight to clean up the ports. The top of the piston had a thick coat of gummy oil with what looked like sand blast media sprinkled in it. The bottom end was similar except there was a glob of grease on the crank. The tranfer ports were partially blocked by the cylinder liner but the rest of the ports weren't too bad. I removed as much material as I could from the tranfer port but I couldn't get it all. I noticed that the combustion chamber still had the sand cast texture. I might be wrong but these small pits could heat up enough to cause detonation. I sanded them down and polished the dome and hopefully I'll have a chance to lap the cyclinder head tomorrow to up the compression.

Sorry for the long winded post but I haven't had a chance to update in awhile. I hope to grab some pictures soon.
 
Last edited: