

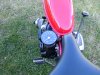
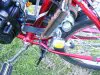
This is a new fabbed mount, none of the old rack made it into this build. Its on the shelf for later or parts maybe. The engine rails are bolted to the frame while the rest of the unit(the square U shaped part) is welded and pivots on two bolts at the frame rear.. Could as easily have been all bolt together. The whole affair is only mounted at 2 points on the frame I have "crush tubes" placed through the frame mounting holes. These are a carefully sized thick wall tube that allows the frame to bend in slightly when the mounting bolts are tightened, but dont allow the frame to distort as they stop the mount before that happens. Not really necessary on a steel frame but this one is aluminum.
Schwinn Point Beach FD Remake
- Thread starter cannonball2
- Start date

Thanks for that info, the inside tube thing for softer metals is a good idea.
I thought of you mentioning about sanding down the crankshaft to get a clutch on. If there is rust or something on it that that helps to remove the rust by sanding off with a 400 grit. I though did that and sometimes I could put the clutch like you have on and other times not.
What I found is that there are sort of two keys for the keyway.
Attached my 2 pics and view the webpage with a video of this guy turning down on a lathe a crankshaft that is larger than ¾ inch that came from a lawn mower engine. There are two woodruff slots that are seen right away in the beginning of the video. This I saw as from searching on converting vertical shaft to horizontal shaft engine, but I saw the two spots for the keyway and it reminded me of if I didn’t have a full length keyway the crankshaft I’m using for the clutch I have would have the same two ground out half moon shapes.
see post #29
http://motorbicycling.com/f14/would-you-like-help-bunch-teenagers-35791-3.html
The view of the crankshaft with two slots cut in it: 3.5HP Briggs - Vertical to Horizontal Pt. 3 - YouTube
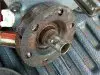
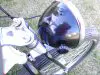
I found that I was able to turn the inside separately from the outside of the clutch. There is little nub on the cylindrical looking part that is exposed as I disassemble to free up the rusted shoes and everything else I was cleaning. Sort of a dimple in the metal of the cylinder is what it is. It must line up with the full length key way on the crankshaft. Note on the other side which my pictures don’t show, but has a slot that is part of where the shoes are has a key that must be put in and align with the full length key way to make them turn as one.
I really don’t know why they did that than other than the torque may rip the little weld between the shoe side of the clutch that also has turn together and is attached to the cylindrical part. **(Correction)** I just realized the sleve bearing surface allows the bell with the gear teeth to either spin with the engine speed when above idle or stay motionless at idle. This means that most of the time when the engine is running and you are moving it would be better to have the cylindrical thing at engine speed so there is no friction on the parts at they rotate at the same speed. While at idle and not rolling at all, but a complete stop. Then the idle speed of the crankshaft makes friction with the cylindrical thing.
In reality the cylindrical thing could have been made to be independant of turning with the bell or the shoes as it is just a mounting point to have for the bell. The idea of less wear and tear I suppose then was there idea in building it this way.
This is almost analogous to how in Popular Science Magazine I saw in the past that to prevent wear on aircraft tires that they would have a motor to spin them to the right spped just before touching down. This never became reality though it seemed a good idea.
Just to fully explain, the part with the tooth gear attached to the bell fits over the cylindrical part and is held in with a circlip which I removed to get the whole thing apart to clean.
Once I realized I had sort of a built in second key that had to line up on the crankshaft I was no longer scratching my head what the @$%^#!
Measure Twice
I thought of you mentioning about sanding down the crankshaft to get a clutch on. If there is rust or something on it that that helps to remove the rust by sanding off with a 400 grit. I though did that and sometimes I could put the clutch like you have on and other times not.
What I found is that there are sort of two keys for the keyway.
Attached my 2 pics and view the webpage with a video of this guy turning down on a lathe a crankshaft that is larger than ¾ inch that came from a lawn mower engine. There are two woodruff slots that are seen right away in the beginning of the video. This I saw as from searching on converting vertical shaft to horizontal shaft engine, but I saw the two spots for the keyway and it reminded me of if I didn’t have a full length keyway the crankshaft I’m using for the clutch I have would have the same two ground out half moon shapes.
see post #29
http://motorbicycling.com/f14/would-you-like-help-bunch-teenagers-35791-3.html
The view of the crankshaft with two slots cut in it: 3.5HP Briggs - Vertical to Horizontal Pt. 3 - YouTube
I found that I was able to turn the inside separately from the outside of the clutch. There is little nub on the cylindrical looking part that is exposed as I disassemble to free up the rusted shoes and everything else I was cleaning. Sort of a dimple in the metal of the cylinder is what it is. It must line up with the full length key way on the crankshaft. Note on the other side which my pictures don’t show, but has a slot that is part of where the shoes are has a key that must be put in and align with the full length key way to make them turn as one.
I really don’t know why they did that than other than the torque may rip the little weld between the shoe side of the clutch that also has turn together and is attached to the cylindrical part. **(Correction)** I just realized the sleve bearing surface allows the bell with the gear teeth to either spin with the engine speed when above idle or stay motionless at idle. This means that most of the time when the engine is running and you are moving it would be better to have the cylindrical thing at engine speed so there is no friction on the parts at they rotate at the same speed. While at idle and not rolling at all, but a complete stop. Then the idle speed of the crankshaft makes friction with the cylindrical thing.
In reality the cylindrical thing could have been made to be independant of turning with the bell or the shoes as it is just a mounting point to have for the bell. The idea of less wear and tear I suppose then was there idea in building it this way.
This is almost analogous to how in Popular Science Magazine I saw in the past that to prevent wear on aircraft tires that they would have a motor to spin them to the right spped just before touching down. This never became reality though it seemed a good idea.
Just to fully explain, the part with the tooth gear attached to the bell fits over the cylindrical part and is held in with a circlip which I removed to get the whole thing apart to clean.
Once I realized I had sort of a built in second key that had to line up on the crankshaft I was no longer scratching my head what the @$%^#!
Measure Twice
Attachments
-
 581.8 KB Views: 231
 -
 555.1 KB Views: 187
Last edited:
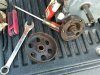
The polishing of the crank was to reduce the diameter from 16mm to 5/8" The cranks even though advertised as 5/8 are not. The maxtorque clutches dont have the dimple now, atleast the two pulley clutches I have now dont. Unless you want a real cuss fest DONT remove the circlip holding the shoes and remove them. Ask me how I know. I lube the clutch bushing with moly lube and have never had to replace a bushing. Riding out in the sticks where I live I dont spend a lot of time idling though. I have converted one vertical engine to horizontal and I just ran the 7/8 shaft with a pulley reducing bushing and a one inch clutch. Had to make a special key, not a big deal. Some vert. engines have a 1" shaft already. 1" clutches are pricey though.
Thanks for that info, I try to just use what I have. I have a ¾ and whatever the 5/8 really is in a toothed version and an ancient belt clutch off of what had said Moto-Mower Company Founded 1919 and had a 50’s era Briggs Cast Iron 5S. It is the one engine I prize the most and so I had the valves and seats cut on it so it was not as smokey as a two strokes the way I got it.The polishing of the crank was to reduce the diameter from 16mm to 5/8" The cranks even though advertised as 5/8 are not. The maxtorque clutches dont have the dimple now, atleast the two pulley clutches I have now dont. Unless you want a real cuss fest DONT remove the circlip holding the shoes and remove them. Ask me how I know. I lube the clutch bushing with moly lube and have never had to replace a bushing. Riding out in the sticks where I live I dont spend a lot of time idling though. I have converted one vertical engine to horizontal and I just ran the 7/8 shaft with a pulley reducing bushing and a one inch clutch. Had to make a special key, not a big deal. Some vert. engines have a 1" shaft already. 1" clutches are pricey though.
No offense to two stokes
")
One valve was stuck on the 5S when I found it out at curb trash. I recycled liquid wrench on it over and over 3 times a day for over a week, finally I removed and replaced it.
As for the shoes on this more modern but definately not new clutch, I didn't take the shoes off. I only used oil on everything and just needed to get the bell off to get oil in all crevasses. The shoes had been frozen with rust from both it and the bell.
I think it will be real smoky if I don't get some thinner and now clean all the oil off first before putting it into use. Or anyway at least clean off the area on the bell and the shoes, all else it should help preserve it. It was either a free-be or dirt cheap at a flea market so I thought I would get it working if I can.
Removing the springs, eh, you better have a full metal jacket and head face next protection. If we all haven't had close calls for sure, yea. Just for instance I had heard from a boss that at another job where he works he mentioned a guy had removed the trucks from a subway car the wrong way. The car was supposed to be lifted off the trucks. The guy was beneath in a pit below instead. On one of the last bolts he was removing it just snapped and the whole four wheeled truck and its frame came down scraping an arm and leg. He was then stuck surrounded by this in the pit. They got him out alive, but that was some damn mistake that would have cost the guy his life. Whew!
Measure Twice
Last edited:
The spring is a gaiter type, doent come flying out but you need 5 hands and some determination to reassemble it. I wrestled with it a long time. I had a Maxtorque TT clutch which was tunable. Worked well for a cheaper clutch, easy to remove the shoes. Thats what I assumed about this type, not so.
I put a flat blade screwdriver inbetween two opposing shoes and pryed to get them to expand out like when you go above idle. I was braking free rust from all surfaces side and inbetween ect.
I expect if I ran it without cleaning the specific areas that gets hot (the inside of the bell and the shoes) that I may have the oil burn and glaze over the metal. That would be a bear to remove. I have acetone I will use and let it dry out.
I was wondering though if anyone has made a crankshaft reducer or enlarger as I am looking use what parts clutches, gears, pulleys and such to have an alternate very geared down machine that woun't burn up the clutch.
You see I want to be going at 2 to 3 mph (no faster than 5) for what I hope to mod my build to an art 2 wheeled vehicle for events that require slow speed.
I know a lathe would be nice but I don't have one.
Alternately but probably way expensive is a clutch that is made to engage at slower speed. This also would possibly be not so good aside from cost as the torque at slow engine rpm may negate the usage of trying to move slowly, it would just stall out.
Measure Twice
Last edited:
Run the clutch on the jackshaft with a belt primary. You can easily find a 7/8 pulley for the crank.
Here is my easy answer to the gen light conumdrum. The head and tail light are wired together on the battery position of the switch, with the gen mounted to one of the head light positions and the battery to the other. Just be fore coming to a stop the position is switched from the gen to the battery, then back after take off. The switch has a kill in it to boot. Also very period correct for this build. Maybe not as esoteric as an auto switch system, but practical and easy.NEW 7/8" DIMMER HORN KILL SWITCH ASSEMBLY CHOPPER BOBBE | eBay
Jus as a BTW in case ya didn't know - that appears to be a Puch moped switch assembly, the Puch ones are quite rugged & long lasting;
https://www.treatland.tv/puch-chrome-switch-harness-p/puch-chrome-switch-harness.htm
https://www.treatland.tv/puch-chrome-switch-harness-p/puch-chrome-switch-harness.htm
Thanks for the link, does apper to be the same and a better deal too! Really want one of the Lucas(I know, prince of darkness) switches like on the old Triumphs and BSAs. Really a pretty switch, but $25 is a bit steep.
hey MT, have you considered a manual idler belt clutch? Very simple,cheap and reliable. I've got almost 700 miles on mine, no wear showing on the belt yet.
Then you could put a large like 8" or bigger pully on the jackshaft and gear it way down.
I like the full control of the manual clutch. It allows you to putt along at just above idle speed. You won't find any auto clutch to do that.
Then you could put a large like 8" or bigger pully on the jackshaft and gear it way down.
I like the full control of the manual clutch. It allows you to putt along at just above idle speed. You won't find any auto clutch to do that.
Thanks for the infohey MT, have you considered a manual idler belt clutch? Very simple,cheap and reliable. I've got almost 700 miles on mine, no wear showing on the belt yet.
Then you could put a large like 8" or bigger pully on the jackshaft and gear it way down.
I like the full control of the manual clutch. It allows you to putt along at just above idle speed. You won't find any auto clutch to do that.
Somewhere else I heard of checking McMaster-Carr and I found what looked like the same as what I wanted when looking at Grainger for a bit less. There was a 7.7 inch for my #35 chain an 5/8 Azuza jackshaft that was? $43 or so.
Then I also looked at having another wheel already with other than my 10 inch washing machine pulley on the rear wheel spokes, and that is a Whizzer type sheave that looks to be about 20 inch. Then both together with my smallest about 2 inch sprocket on the clutch and a 2 inch pulley on the jackshaft I could be around 3 mph at about 1800 rpm and max 5.X at 3600 and that will do.
What I did not realize till now was that I never used a centrifugal clutch on a motor bike only a mini bike with like 15 inch tires. It was a while back. There is no slow going other that feathering the throttle with the clutch except way down gearing like I plan.
I sort of thought that what I had before with a clutch always in direct drive was able to go slow and it did. Just one thing though, it chugged the engine and you could hear the individual power strokes one by one when starting out at 2mph. I don't know how bad this was for the engine but it worked.
The gear calc is nice and matches what I have been calcing manually.
The range of mix and match parts for OHV woods an open area riding with a clutch grab at 1800 rpm would be 15mph to 20mph and top speed 3600 rpm top end 20mph to 45mph. Note the 45 mph is expecting the engine to turn out 3600 and I know it most likely won't with the higher lesser gearing down and I would not trust going that fast anyway.
I rode a Kawasaki 350 2 stroke and used a manual clutch before and did the DMV test for slow moving in tight turns and somehow forgot that the mini bike with centrifugal clutch had to have the throttle feathered to do the same slow maneuvering.
Measure Twice
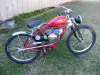
Finished the build except for final paint. Went through several changes. Settled on a 1:1 ratio to the roller. I also ran it with a .08 overdrive and it did pretty well. Should have a theoretical top seed of 40@5500rpm. Should cruise easily @ 30-35. Foul weather has prevented getting much time on it, but is finally clearing, so time to ride. The gen system works great. Have not installed the battery system that powers the lights when stopped. Has a side mounted speedo in typical bobber fashion, which is what it is modeled after. It will run off the rear wheel. I really like the lever engagement system, and auto clutch. If I release the cam lock the belt idler tension will pull the roller to neutral. Its cool at a light if you want to rev the engine(how juvenile right?), then before the light changes shift the lever down to engage, looks like you are really doing something. Found some cloth wiring on ebay, looks real period. Alos found the knob drawer at ACE, so there are "knobs to know where" as my wife says, like on the head light. Keep em guessing. Any way its a fun ride.
Attachments
-
 164.3 KB Views: 1,486
 -
 147.3 KB Views: 294
 -
 152.6 KB Views: 272
 -
 129.6 KB Views: 279
 -
 163 KB Views: 290
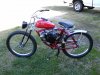
I was wondering if the idler pulley (seen pushing down on the belt) is making the friction wheel rub part for the tire always turning? Then the friction wheel rub thing is such that the stick shift (although I know only 1 speed) acts like a clutch. It moves the friction wheel rub thing up to and presses on the rear tire.
Maybe I have it right correct me if I'm not.
This is quite an ingenuitive approach to a friction drive, and I like it!
I have seen other lever stick shift like things used to make a rear drive sheave (pulley) tension up a v-belt when activated and could be used to grab just a little and still slip for a very slow crawl speed.
If the type you have made with friction to the rear wheel direct can use that idea to an advantage as well, I'd like to know?
Is the lever such that it has an amount of dampening and that it stays where you put it for varying amount of grab or all or none?
The way I've seen the rear sheave type done with a couple of notches to have varying settings for an amount of friction, it was dispensed with on Harry's Villers Beach Cruiser and done differently in the end, but I am sure it maybe be done or is in use somewhere.
To be able to go real slow even though you do not have an underdrive, if I may call it that, this seems to be a way out and allow very slow crawl speed.
http://motorbicycling.com/members/harry76-albums-villiers-beach-cruiser-picture1898-picture-382.html
Thoughts on this?
Thanks
Measure Twice
Actually the idler is spring loaded and mounted to the engine. The lever moves the roller. At the top of its travel it is completely disengaged from the tire. It engages when pushed down. I can vary the drive downloading quite a bit from light to a large amount of tire deflection. I normally run it about mid way. The idler keeps the belt tensioned no matter where the lever is. It has a centrifugal clutch driving the belt. If you want to travel slowly an FD would be easy to use. If you have a belt driven roller you can easily slow the roller speed with a low ratio. If you had an engine with a top rpm of 4000 fitted with a 2" pulley driving a 6" the roller speed would be 1333rpm. If using a 1.5" roller the top speed would be 5.9mph, 2.9 at 2000 rpm. The range can be quickly changed with a pulley/and or belt change. I have 3 different pulleys for this bike. Over and under drive and a 1:1. You were wanting to go slow right? This is a real easy way to do it.
Wow! Thanks Wayne! That quite a compliment. I guess this is one of those builds that all the elements work well together. The tires are a major contributor to giving it a small motorcycle look. Had to spend a little money on it though. About the only thing left of the Point Beach is the frame and handlebars! Part of the look I believe is the clean look of the back wheel. The FD is all most invisible. Put a little time on it yesterday and it is a joy to ride. I really like the Preadator has a real thumper sound. Should improve a little more when its finally paintedMan! I swear that is the best looking mototized bike I've seen yetI
That first pic needs to be on a magazine cover. Who woulda thought friction drive could turn out so cool and work so well.
Great job.
I'm awfully late coming to this party, but better late than never. What a very cool, good looking build! I'm curious. Four years have gone by since you finished the build. Do you still ride it? How would you assess the bike now?
SB
SB
Last edited:
I sold the bike with several of my more interesting builds to a fellow in Atlanta before I moved nearly 3years ago. It was a very nice bike every thing fit and worked well. Never got around to painting it. Strangely I must have removed the speedo as it is on the Maytag bike.
A 3speed hub would be right at home replacing the roller and would have made the bike even better. The method of mounting the engine on two rails with the roller mounted on the extended ends would work very easily with a hub.
A 3speed hub would be right at home replacing the roller and would have made the bike even better. The method of mounting the engine on two rails with the roller mounted on the extended ends would work very easily with a hub.