

Back And Aparently Crazier Than Ever!
- Thread starter cannonball2
- Start date

There is a silver solder that comes in a stick just like brazing rod. no flux used just like brazing rod. I got it from a refrigeration guy they use it to install new compresers. Yoy can buy it at a welding supply buy the one foot stick.Tell them what you are going solder copper . I used it to solder copper gas line from the meeter to my cabin. And i have a piece of it left but it at the cabin,other wise i could give you the number. You will need a welding torch to melt it...................Curt
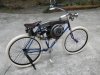
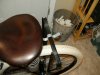
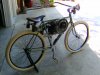
Well the build is basically completed with the exception of a clip for the drop stand which is in transit. Finishing is another matter! Have to pull the engine to seal the fuel tank before venturing a ride. Am amazed how well balanced it turned out, The 36lb engine weight is not nearly noticeable as I had feared, especially carried so high. Rides under pedal very nicely. I would say about 75% of this bike is vintage/antique parts some over a hundred years old.
Curt, followed your thoughts with holes for the belt guard. Copied the spacing from the flywheel guard. Just a run down the middle to tie it all together.
Curt, followed your thoughts with holes for the belt guard. Copied the spacing from the flywheel guard. Just a run down the middle to tie it all together.
Attachments
-
 114.6 KB Views: 202
 -
 117.3 KB Views: 218
 -
 107.2 KB Views: 203
 -
 101.5 KB Views: 196
What a lovely bike you've built Cannonball. It looks amazingly light and graceful and that carbide lamp is the perfect finishing touch.
Thanks for the kind comments yall! Have chosen a rather sedate medium green for the color with a bit of black trim. Should fit the antique theme pretty well. I believe it will finish up nicely. Will be a leisurely ride, but that's appealing to me just easing along on this one.
In my grandfather's day that would be called a "Jim Dandy", meaning that it is just right. So that's my name for your bike. Call it what you want, but for me it's a Jim Dandy. Well done!
SB
SB
Thanks SB! Jim Dandy it is. Still a lot of work to do but at least its over the hump. Cant wait to rip around on 5/8hp!
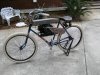
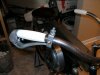
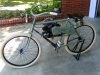
Last two pieces of the puzzle(yeah right). A lock for the clutch so it can be rope started on the stand, made from pieces of an old light fixture I removed from my house. And a vintage drop stand clip mounted to a tab welded to the seats cross brace, holds the stand very securely. Now the work really begins on finishing. Since I have to pull the engine pretty far down to seal the tank thought I might as well install new rings, ran fine as is but at $20 a set why not. Also will crack the mag open to check points, etc. but I can attest to its power as it nearly knocked me on my a$$ when I accidently grabbed the unshielded spark plug!
Attachments
-
 70.9 KB Views: 175
 -
 86.1 KB Views: 130
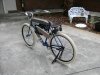
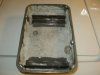
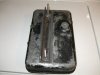
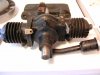
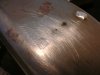
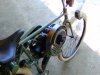
Have begun the tear down of the engine and bike. First thing is to bond and seal the fuel tank. Being as this was a hang mount engine instead of tank mount the tank is rather thin aluminum instead of cast iron. I added cross braces to the tank floor to spread the clamp loading of the mounting. There is a longitudinal brace on the bottom to keep the engine aligned and handle the driving loading. All this is seal/bonded with JB Weld and the inside of the tank will be sealed with several applications of tank sealer. The tank gasket appeared to be original as it was contact cemented to the tank. The tank is pristine under the cement drips and corroded elsewhere. appears factory, interesting. You can see how the tank fits into the frame mounts on the bike and the tensioning screw in the last pic. Also added a drain valve as I plan to drain after each ride.
Attachments
-
 62.3 KB Views: 121
 -
 61.5 KB Views: 111
 -
 59 KB Views: 124
 -
 87.9 KB Views: 142
Totally rad...cant wait for video of u puttin along with lil kids blowin by on rollerskates...lol
Totally jealous too
Nice forkin ride/job/work
Totally jealous too
Nice forkin ride/job/work
Thanks Wicked, yeah kids might be faster on skates but they will get smoked with the 16:1 fuel mix-lol.
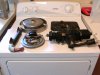
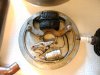
Got back on the Maytag bike a bit today. Pulled the engine down as far as it need to go. It appears to be in very good shape ring/cylinder wise, so just left as is, was totally amazed at the condition of the magneto. Is in pristine original shape. The coil especially, most are trashed insulation wise although the still work. This one is so nice the original paint OK markings are still visible! Am going to leave the engine in its original paint, has just the right patina. Only thing I am changing are the plug wires for some vintage style repros. Will finish the bike in a similar way. Not like a barn find but in a nice, showing wear patina.
Attachments
-
 84.2 KB Views: 144
 -
 74.7 KB Views: 151
 -
 93.3 KB Views: 128
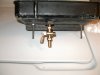
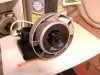
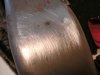
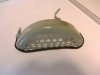
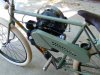
A bit more progress. Got the Maytag assembled and finished. Couldnt help it, painted it in the method recommend in the repair manual, with a brush, in Rustoleum semi-gloss black. Turned out nice. Replaced the plug wires and set up the magneto. Has hot blue spark. Shes ready to run. Began work on the toolbox/"tank". Was originally to be hung between the upper and lower bars of A Shelby I believe. Has four screw holes on what will be the top now that needed filling. Decided to try solder as a filler. Remember seeing older body men using lead when I was a kid, was always intrigued. Anyway worked out well. Was fairly quick too. Also is a pic of the flywheel guard in the finish color, gonna look pretty period I think.
Attachments
-
 89.8 KB Views: 111
 -
 77.4 KB Views: 114
 -
 85.5 KB Views: 108
 -
 48.3 KB Views: 109
Thanks SB!
Curt, the paint is Rustoleum gloss Sage Green from Home Depot. It looks better than the pic. Cant wait to get the rest painted.
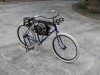
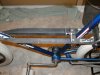
Had to get a bit serious with the frames rear triangle to clear the 2.125 tires. It was originally a light weight bike. Cut a wooden wedge of the right size and drove it into the lower tubes at the bottom bracket to spread them a bit. I bolted an old rear hub in the drop outs to keep the frame square. Believe it or not it worked perfectly. Pretty much its just paint and assemble now.
Curt, the paint is Rustoleum gloss Sage Green from Home Depot. It looks better than the pic. Cant wait to get the rest painted.
Had to get a bit serious with the frames rear triangle to clear the 2.125 tires. It was originally a light weight bike. Cut a wooden wedge of the right size and drove it into the lower tubes at the bottom bracket to spread them a bit. I bolted an old rear hub in the drop outs to keep the frame square. Believe it or not it worked perfectly. Pretty much its just paint and assemble now.
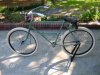
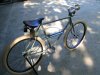
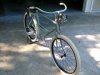
Got the bike all together with the exception of the tool box/tank. Thats a good days work in prep as the seams and spot welds have to be filled. The wood faced belt guard primed and painted out to look like all metal, pretty pleased. Nothing ever goes back together exactly as it comes apart. Took awhile to get every thing in sync.
Attachments
-
 101.9 KB Views: 129
 -
 113.9 KB Views: 130
 -
 109.5 KB Views: 109
 -
 93.2 KB Views: 108