The 2010 4-Stroke in-frame Build-Off!

GoldenMotor.com

jbcruisin

Active Member
Oct 10, 2008
1,118
7
38
Lebanon, Pa.
Re: EZM's 2010 4-Stroke in-frame Build-Off!/Deadline Extended!

Hi people, due to a rash of requests, the deadline for the EZM contest is officially extended!!! It seems that a bunch of bikes are not yet completed, and so we are listening to that need!
Mike
I quit working on mine because I figured I'd rather ride in the summer & build when it's cold outside. I've had this preference ever since I had Harleys here in "cold winters" Pa.
Jay
 

MotorbikeMike

Dealer
Dec 29, 2007
477
3
18
Sacramento
EZM's 2010 4-Stroke in-frame Build-Off!

Hey! Don't let it be said that we do not listen to our customers! The revised deadline for the 2010 EZM build-off is Dec. 25th Midnight, where ever you are, east west, Australia, it's OK! So, here is what's puzzling me, I see no build threads, no build pics, no build links (well, actually a couple!) and I am sure, that I am not the only one who wants to see? Give us all a peek of what you are doing? I promise we wont steal your Ideas......errr maybe a little?

This is a fun concept, and I cannot recall anyone having a build-off like this for Motor bicycle, which is open to the entire viewing world! We used to have some guys in Estonia, and Latvia (2-strokes, BUT there must be some valved engines over there).

I am very much behind in my build BUT, don't be like me, I am a spectator, incapable of winning!

Show them if you got them, take new pics if you don't!

Here is another Trophy Plaque, I wonder who owns the bike pictured??? Poof!
 

Attachments

Last edited:

The_Aleman

Active Member
Jul 31, 2008
2,653
4
38
el People's Republik de Kalifornistan
So, here is what's puzzling me, I see no build threads, no build pics, no build links (well, actually a couple!) and I am sure, that I am not the only one who wants to see? Give us all a peek of what you are doing? I promise we wont steal your Ideas......errr maybe a little?
Yup, see, when the Super Bowl is coming out, contestants don't show their playbook to the opposition. :p

Here is another Trophy Plaque, I wonder who owns the bike pictured???
What is more important, IMHO, is what bike is going to PWN that bike pictured! And maybe take it's place :D
 

Techbiker

New Member
Oct 27, 2009
164
2
0
DFW, Texas
The Spectra Mountain Fury 4 Stroke

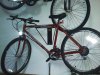
When this thread started I didn't own a 4 stroke bike so I didn't plan on participating. Recently I put together a nice 4 stroke kit so I thought that it would be worth contributing. I originally pulled this bike out of a bike recycle bin and it was in pretty sorry shape when I got it. The poor Mississippi-built Murray Spectra had seen much better days. All of the bearings were dry and filled with sand and both wheels were pretty severely rusted. The rear deraileur was bent and all of the pull cables were rusted. The chain was so rusted that it wouldn't bend at all.

Anyway, this bike was a journey! I repacked all of the bearings and derusted the wheels. I then replaced the rear derailer with a Shimano unit and bought a new pedal chain. I picked up a relatively stiff but comfortable seat at my local bike shop and replaced all of the pull cables and cable housings. I then installed new tubes and Kenda 1.5" tires. After the tires, I ordered a quality speedometer with a backlight and 5" raised handlebars for a more laid-back ride. Finally, the bike was back in adequate working condition.


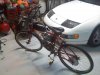
After getting the bike so that it would finally roll as a pedal bike, I decided to move onto the next step. I ordered the Huasheng 4G kit from bicycle-engines.com and with my dad mounted the engine. A 3 piece wide crankshaft had to be used so that the pedals would clear the engine. One issue was that the bike had originally used a 1 piece crank and some tubes that were protruding into the bottom bracket had to be ground down before the 3 piece adapter would press in. The hardest part however was the rag drive sprocket which would align horizontally but not vertically. A combination of JB Weld and paper clips kept the rag drive in place. Surprisingly though, in just 2 days the bike was up and running.

There were several issues that plagued this bike from the start however. The rust on the stock steel wheels was almost all of the way though the rims. Also, the steel rims kept getting bent out of true whenever I would hit a bump at cruising speed. After truing both wheels once I did not want to spend anymore time on them. Another issue with the bike was that the stock exhaust kept dumping exhaust fumes out right below me so unless I was moving I was constantly inhaling exhaust. A third issue was that the included motor drive chain was not standard 415 chain so it would not accept a half link in order to achieve a good chain length.

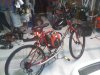
Frustrated with these issues, I bought two new rhinolite wheels with Shimano hubs, new presta tubes, and a disc brake mount rear drive sprocket from Firebelly cycles. I mounted the drive sprocket to the rear wheel and mounted the tires to the new wheels. I was going to drop the new wheels into the hangers on the bicycle when I noticed that the new wheels were wider than the original steel wheels. Using a car jack, I then spread the front fork enough for the wheel to slide in. The rear hangers just needed a small amount of spread to accept their new wheel. In total, the new wheels and lighter drive sprocket removed 7+ pounds of weight from the bicycle.

I then attached a new section of heavy duty #41 chain to the drive system. Made in the USA, this $20 piece of chain showed almost zero side to side flex compared to the old Chinese 415 chain. My dad and I worked out the spacing fairly well with a half link so that there was a reasonable amount of slack in the chain.

I then called up EZM and ordered their flex pipe in order to move the exhaust fumes back a couple feet. Installation was fairly easy. The most annoying part was that I had to order a regular 2 stroke exhaust in order to use its header to mount the flex pipe to the engine. I hack-sawed off the header and attached it to the flex pipe with a seat tube clamp. Then I screwed on the header piece and clamped the end of the flex pipe onto the rear part of the frame. Not only does this exhaust look sweet, it moves the exhaust fumes away from my face, makes the bike sound like a Harley Davidson, and added a ton of mid-range acceleration and about 5 mph to my top end. Props to EZM for such a simple yet amazing exhaust.

Aside from some smaller details that I have not mentioned in this lengthy article, this is where my bike is at the moment. A suspension 1" threaded front fork along with a new front V-brake was ordered in and will be installed when I return to my house from college for fall break. I am also considering installing a new v brake in the rear along with a caliper to V brake adapter.

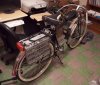
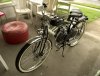
The paint on the bike frame could use a little work, but overall this bike seems to be very solid. I've put around 100 miles on the bike so far and I can get it to about 35 mph. Cruising at roughly 31 mph is possible. I get roughly 120-130 miles per gallon of gas.

Here are a couple of pictures of the bike as it sits now. They are blurry because they were taken with a camera phone but I will try to get better pictures in the future. If you have any questions, please let me know. Ride safely. usflg


Attachments

silverbear

The Boy Who Never Grew Up
Jul 9, 2009
8,325
670
113
northeastern Minnesota
I agree with Barely, pictures are a good thing. Too many is better than too few. It is a great learning tool for new people, but is also fun for those of us who have 'been there and done that' to vicariously experience a build again through someone else. For me it is like watching swimming competitions. I sure don't race anymore, but part of me is in the pool giving it everything I've got as I watch. It triggers memories. I'm sure ball players experience the same thing.
I think even documenting our missteps and wrong turns is valuable, too, as that is also part of the process of building a bike and gives encouragement to those who are new to this just feeling their way along. Its OK to screw up. And sharing that gives opportunity for the rest of us to help out. In my opinion a build off needs commentary and photos showing the process of a build.
SB
 

GlueKill

New Member
Jun 16, 2010
26
0
1
Columbia, MO
Well I started working on mine back in June. But overtime at work combined with a summer semester of college and having to move at the end of my last lease made things take longer than I would have hoped. These two pictures are at stages of the build. As of right now it's all put together but will only run for about 2 seconds at most. And just now the pull start handle came off in my hand. I'll fiddle with it some more in the morning.
 

Attachments

GlueKill

New Member
Jun 16, 2010
26
0
1
Columbia, MO
It's been raining today so I worked on it on the front porch. I cut off the old knot on the pull cord, re-inserted it through the pull handle, and slipped a slightly smaller diameter nut over that before knotting it again to hopefully prevent a repeat of last night.

It still won't run for more than 2 seconds. There's fuel in the lines and it's getting to the carburetor. I pulled the spark plug wire and it wouldn't kick over at all, so it's getting spark. I held down the kill switch and the same thing happened, so the kill switch isn't stuck on or wired wrong. Tried it with the choke on and off. It would only run for those 2 seconds with the choke on.

There are a few shops within a few blocks from home that do small engine repair. I may just have one of them take a look at it tomorrow.
 

Attachments

silverbear

The Boy Who Never Grew Up
Jul 9, 2009
8,325
670
113
northeastern Minnesota
That isn't how you check for spark by pulling the spark plug wire. Remove the spark plug from the engine. reconnect the spark plug wire to the spark plug. With the electrode end (the part that normally would be inside the engine) hold that up against the engine up near the spark plug hole (or anywhere on the engine really) and pull the pull cord, watching the end of the spark plug. You should see a spark jump to the engine. If you don't then no juice is leaving the spark plug. The you go backwards trying to find the problem... change the plug... still no spark then call up your dealer and see what he says. How do you know you are getting gas to the carb? Can you see it in the fuel line? After you try starting the motor without success, if you pull the spark plug is it wet? The motor needs spark, fuel and air to run. You can be pretty sure it is either spark or fuel so it's good to know which is the problem area so you can go from there.
SB
 

Tad Bit Tipsy

New Member
Jan 2, 2010
478
0
0
Pensacola,FL
Also make sure you ground it good. I grounded mine directly to the engine using one of the screw-ins on the right hand side. That's made a big difference in the way mine started. Also check your carb adjustments, air screw/idle screw. Either one can be off straight from the factory.
 
Hi GlueKill,
A common issue is small particles from the new fuel tank. The particles can be small enough to plug up the pilot jet, main jet, float valve, and or passages inside the carburetor body. There is a small screw on the bottom of the float bowl that can be opened to empty the bowl and posssibly any unwanted dirt particles.

I normally remove the plug [as SB suggested] to test it, but plugs that have been wet fouled sometimes don't fire under pressure, so best to replace plug if unsure. An Autolite 4194 is a great replacement plug fot the HS motor and can be purchased at most auto parts store. Having a spare plug for a single cylinder motor is a good idea anyway.

Have fun,
 

GlueKill

New Member
Jun 16, 2010
26
0
1
Columbia, MO
Thanks for the suggestions. I'll let you know what I find. I know fuel is getting to the carburetor because I can see it in the lines. I also can see tiny bubbles (like champagne) floating up the fuel line from the carburetor after trying to start it. Just pulled the plug and it is indeed wet. I dried it and laid it against the engine to check for spark. It definitely has spark. I drained the bowl and the fuel ran out clear. I figured any contaminants would have been picked up by the screw-on petcock filter and inline filters I have installed. This pretty much means that the problem is within the carburetor itself.
 
Last edited:

scotto-

Custom 4-Stroke Bike Builder
Jun 3, 2010
6,505
24
38
Ridin' inSane Diego, CA.
Well if it's not too late, I've almost got my EZM 4-stroke up and running.....I'll take some almost finished pics of it tomorrow. It's nothing spectacular, but it's looking pretty sweet to me.....until then.....cheers, scotto-