Thought I'd start my posts with something easy for you guys...

GoldenMotor.com

MoreBloodWine

New Member
Oct 9, 2012
116
0
0
Meadville, Pa
Solved: Thought I'd start my posts with something easy for you guys...

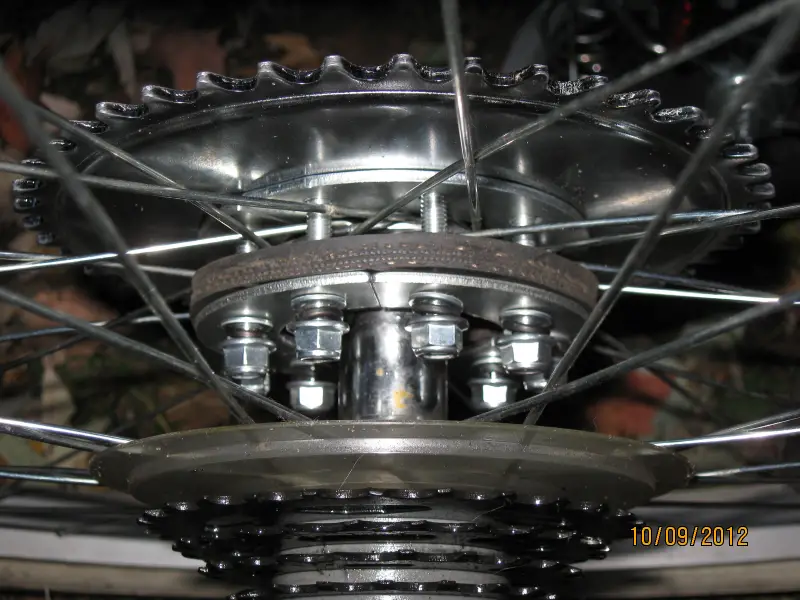
Ok, do I finally got my Grubee GT5 2011 in the mail today and tsarted working on it. Well, I wanted to start with what I thought would be the easiest thing, the rear sprocket. Well, as you can see I only used one of the rubber rings. So here's my question... as it stands now can I keep this the way it is ?

The reason I didn't use the other ring was because with the two attached all that I was able to manage was getting the washer and lock washer on. Trying to get the nut on was pretty much impossible for me. If I do need to use both of em I don't know what to to becaue like I jut said, it was a mad house trying to work with both.

Right now nothings tightened so as seen in the pic it's all just sitting "loose".

Ty.

 
Last edited:

2door

Moderator
Staff member
Sep 15, 2008
16,302
175
63
Littleton, Colorado
No. You can't use just one rubber isolator. Keep trying.
Without the second rubber you'll damnage your spokes, the sprocket won't stay tight and it will probably wobble.
I know it's not easy but hundreds/thousands have done it before you. It's a sandwich. Sprocket, rubber, spokes, rubber half moon steel plates. Tighten the bolts evenly and keep checking for concentricity with the rear hub. The sprocket can not have any lateral or horizontal wobble or you'll have constant chain derailing problems.
Good luck.

Tom
 

MotorBicycleRacing

Well-Known Member
Jul 28, 2010
5,844
109
63
SoCal Baby!!!
www.facebook.com
. Well, as you can see I only used one of the rubber rings. So here's my question... as it stands now can I keep this the way it is ?

The reason I didn't use the other ring was because with the two attached all that I was able to manage was getting the washer and lock washer on. Trying to get the nut on was pretty much impossible for me. If I do need to use both of em I don't know what to to becaue like I jut said, it was a mad house trying to work with both.

Right now nothings tightened so as seen in the pic it's all just sitting "loose".

Ty.

Remove the metal rings/thingies from the outside as they are not needed
between the sprocket and the spokes.
That will give you a litte extra space.
You don't have to use them.
ONLY HAVE ONE RUBBER WASHER BETWEEN THE SPROCKET AND THE SPOKES.

Grubees are the only kits that come with 2 sets of metal rings.
Sorry. I can't think of the correct name for the rings.

Do you have a pic of the outside of the sprocket?
Maybe the sprocket hole is too small and not right against the hub?
 
Last edited:

MoreBloodWine

New Member
Oct 9, 2012
116
0
0
Meadville, Pa
No. You can't use just one rubber isolator. Keep trying.
Without the second rubber you'll damnage your spokes, the sprocket won't stay tight and it will probably wobble.
I know it's not easy but hundreds/thousands have done it before you. It's a sandwich. Sprocket, rubber, spokes, rubber half moon steel plates. Tighten the bolts evenly and keep checking for concentricity with the rear hub. The sprocket can not have any lateral or horizontal wobble or you'll have constant chain derailing problems.
Good luck.

Tom
I was watching / reading some thigns and a lot of people had the same issues with the nut. What I read suggested to just forgot the lock washer ? to gain the extra thread ground for getting the nut on.

What are your thoughts on this ?

For what it's worth though, can't the spokes still be damaged even with the other ring on there that would go between the spokes n bolt plate ?

-- OR ---

As MotorBicycleRacing suggested, what about getting rid of that outer bolt plate ? This way the rubber ring just sits between the pokes and sprocket. This would then allow the use of the lock washers.
 

PAracer

New Member
Sep 14, 2012
284
0
0
Steelton, PA
The order should be:
Sprocket, rubber, spokes, rubber, 1/3 plates, 1/2 plates, washer, lockwasher, nut.

Tips:
Use a power drill or driver. It will really help.
Asseble a couple without the washer, and lockwasher. This will compress the sandwich enough to get the others on with all the pieces. then you can go back and do them all with the washers.

Yes, it is a pain in the butt. :)
A wise upgrade would be to a sprocket adapter. It takes care of a lot of issues.
 

PAracer

New Member
Sep 14, 2012
284
0
0
Steelton, PA
It will all go together.

Once it's tightened down completely, the rubber will mold itself to the spokes.

You can tighten those sqrews quite a bit. Go around in a star pattern a couple times while trying to keep the sprocket as centered as possible .
 

MoreBloodWine

New Member
Oct 9, 2012
116
0
0
Meadville, Pa
Also, how wide are your tires? because the wider tires
require the sprocket dished out to clear the chain.

If you get it all assembled with the sprocket the wrong way
you will have to do it all over again! :D
Not sure but if I need to use both plates (the whole shabang) that means I'm in the same spot I'm in now when I originally tried this. Which means I would most likely have to forget the lock washer to get it all sandwhcihed right, unless, and this just hit me... if I can find my rubber feet squeeze clamps and press the **** out of everything then just screw it all down.

Edit: For what it's worth the four letter star word began with an h lol
 

MoreBloodWine

New Member
Oct 9, 2012
116
0
0
Meadville, Pa
Ok, so it looks like I got the right configuartion now and didn't have to forgo the lock washer since the absence of the second bolt plate gave me the clearence I needed. I pumped the tire to the required capacity of 45psi to take the pic. Now in the pic you can see the tires white wall. Well, after I tighten everything down I should have just the right amount of clearance for the chain to clear the tire.

Yes I know there's still the chance I will need to flip the sprocket to set the chain closer to the tire if needed but here's hoping I don't need to do that since yes the bolts were easier this time they were still however a pain in the butt.


Any of you at a quick glance of the pic think I might need to flip the sprocket ? I only ask because I don't know how much of that space between the sprocket & tire is gonna close with the compression of the rubber pads during bolt tightening.
 

PAracer

New Member
Sep 14, 2012
284
0
0
Steelton, PA
What is the width of your tire? Mine measure just over 2-1/8" I assembled mine with the dish outward.

When you tighten, the gap between the pads will disappear completely. The pads themselves will also compress a good bit as well. Using that drill in the pic would be a good idea. Go slow so that you can keep that sprocket centered. If it's off be more than a couple milimeters, you can have issues.
 

MoreBloodWine

New Member
Oct 9, 2012
116
0
0
Meadville, Pa
What is the width of your tire? Mine measure just over 2-1/8" I assembled mine with the dish outward.

When you tighten, the gap between the pads will disappear completely. The pads themselves will also compress a good bit as well. Using that drill in the pic would be a good idea. Go slow so that you can keep that sprocket centered. If it's off be more than a couple milimeters, you can have issues.
So other than the tire size and sprocket flip in question I'm G2G. On that note, how does one accurately measure the width of their tire ?

Also, I don't have any accessory bits for the drill that would let me use my socket bits ;-/
 

PAracer

New Member
Sep 14, 2012
284
0
0
Steelton, PA
So other than the tire size and sprocket flip in question I'm G2G. On that note, how does one accurately measure the width of their tire ?

Also, I don't have any accessory bits for the drill that would let me use my socket bits ;-/
Once you get the tire measured, you will know how to orient the sprocket. If you're under 2" put the dish inward. over 2", outward.

No problem on the drill, you can do without it. It will just me a workout to get all the screws tightened.

If you can create a list of tools that you might need, take a trip to harbor freight. There's one in Edinburg, one in Erie. Cheap tools there. Sure their no hi quality, but they're great for getting started.
 

MoreBloodWine

New Member
Oct 9, 2012
116
0
0
Meadville, Pa
Ok, here's what the tire reads...

26x2.00

So that means I keep the sprocket the way it is now right which sets the teeth a lil farther out from the tire given the shiny / bump side is facing inward ?

Edit: About centering the sprocket, obviously one should try and get it as near centered as possible but even if it's not. As long as the horizontal is good with proper bolt tightening the vertical shouldn't matter as much since it would just be vertical chain movement right ?
 
Last edited:

PAracer

New Member
Sep 14, 2012
284
0
0
Steelton, PA
Before you go too far, check the edges of the sprocket for sharp edges. You should grind or file them down. It will help the chain run smoothly.

I would assemble the sprocket so that the teeth flare outward. If the chain is not centered well enough, it will go tight/loose/tight/loose as the wheel turns. Too tight and it will snap. Too loose and it will jump and jam up somewhere you don't want it to. I recommend a sprocket adaper like sportsman flyer, manic mechanic, or pirate cycles sells. You don't need to do it now, but think about it for the future.
 

MoreBloodWine

New Member
Oct 9, 2012
116
0
0
Meadville, Pa
Before you go too far, check the edges of the sprocket for sharp edges. You should grind or file them down. It will help the chain run smoothly.
All teeth look pretty great right now but will double check n file as needed.

I would assemble the sprocket so that the teeth flare outward. If the chain is not centered well enough, it will go tight/loose/tight/loose as the wheel turns. Too tight and it will snap. Too loose and it will jump and jam up somewhere you don't want it to.
It looks darn near centered right now (unless you mean centered with the sprocket on the motor which I am suree will be a PIA)... just gotta double check teeth edges and tighten the bolts. Also, the teeth flare out now since the shiny side / bump of the sprocket currently faces inward.

I recommend a sprocket adaper like sportsman flyer, manic mechanic, or pirate cycles sells. You don't need to do it now, but think about it for the future.
Only one I saw that looked nice was manic mechanin and it only works on the backwards pedal brake system, my bike has real brakes lol.

When I backwards pedal I free spin.

The smaller than standard tire size will make things a little easier for you. Less clearance issues.
So aide from grinding teeth if needed everything stays the way it is now ;-)
 
Last edited: