If your bicycle is a cheap Chinese bike like mine this may be of interest to you.
The cranks on cheap bicycles usually have caged ball bearings in what's called the bottom bracket. The bottom bracket is the part of the frame where the crank, and crank bearings fit into. There's really nothing wrong with a caged ball bearing crank except it requires regular maintenance. Considering all the maintenance a motor bicycle already needs, any way we can cut down on it sounds like a good thing.
If your bicycle has a 3 piece crank you're good to go, but if it's a 1 piece you'll need to buy crank arms too. You'll also need some special tools, but they don't count because you need them just to maintenance the stock crank.
What we're going to do is change the stock caged ball bearing crank spindle, for a sealed bottom bracket cartridge. Total cost not including special tools was about $10 for mine.
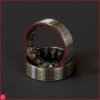
When I took my crank apart this is what I found. Here's a look at the crank spindle, caged bearings, the LH bearing cup, and lock ring. One thing we don't see much of is bearing grease.

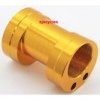
This is the bottom bracket cartridge we're going to install in place of the caged bearing assembly. These cartridges come in different sizes. You'll need to measure two things to know what size you need.
1. Measure the width of your bottom bracket. Mine was 68 mm
2. Measure the width of your crank spindle. Mine was 122 mm
You can see the one I bought for my bike is a, Chin Haur 52-68 122
That means it's made by Chin Haur and it's model 52. The size is
68 x 122 mm. I'm assuming the BC1.37 x 24 thread size must be pretty standard because the mechanic at the bike shop didn't even ask about it.

The first thing we have to do is remove the crank arms. You'll need a crank arm removal tool.

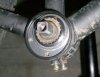
Now what we're looking at are the bearing cups and lock ring. This may be a problem because cheap bicycle bearing cups aren't uniform so the special tools to take them apart might not be readily available. The lock ring side wasn't to difficult, but the chain side on my bike was a challenge. Bottom brackets are usually screwed in pretty tight.


The cranks on cheap bicycles usually have caged ball bearings in what's called the bottom bracket. The bottom bracket is the part of the frame where the crank, and crank bearings fit into. There's really nothing wrong with a caged ball bearing crank except it requires regular maintenance. Considering all the maintenance a motor bicycle already needs, any way we can cut down on it sounds like a good thing.
If your bicycle has a 3 piece crank you're good to go, but if it's a 1 piece you'll need to buy crank arms too. You'll also need some special tools, but they don't count because you need them just to maintenance the stock crank.
What we're going to do is change the stock caged ball bearing crank spindle, for a sealed bottom bracket cartridge. Total cost not including special tools was about $10 for mine.
When I took my crank apart this is what I found. Here's a look at the crank spindle, caged bearings, the LH bearing cup, and lock ring. One thing we don't see much of is bearing grease.
This is the bottom bracket cartridge we're going to install in place of the caged bearing assembly. These cartridges come in different sizes. You'll need to measure two things to know what size you need.
1. Measure the width of your bottom bracket. Mine was 68 mm
2. Measure the width of your crank spindle. Mine was 122 mm
You can see the one I bought for my bike is a, Chin Haur 52-68 122
That means it's made by Chin Haur and it's model 52. The size is
68 x 122 mm. I'm assuming the BC1.37 x 24 thread size must be pretty standard because the mechanic at the bike shop didn't even ask about it.
The first thing we have to do is remove the crank arms. You'll need a crank arm removal tool.
Now what we're looking at are the bearing cups and lock ring. This may be a problem because cheap bicycle bearing cups aren't uniform so the special tools to take them apart might not be readily available. The lock ring side wasn't to difficult, but the chain side on my bike was a challenge. Bottom brackets are usually screwed in pretty tight.


") Thank You for sharing with us this will be very helpful for the forum.
Thank You for sharing with us this will be very helpful for the forum.