


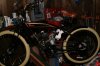
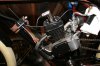
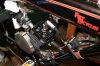
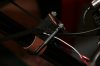
so here it is...it took three months, and I couldn't have done it without HB Local and Clotho...thanks for the tips and tricks. Thanks to Creative engineering for the sweet clutch kit, and CW racing motors for balancing the crankshaft. The head and jug were lapped, and dowel pinned on two diagonal studs to the case for a tight fit (there is way too much play in those stud holes, enough to rattle and effect the timing), and I made a copper headgasket. I ported the intake and exhaust, myself, as well as fabbed all mounts. I mounted the CDI sideways so I could use the holes for the mount screws as cable routes for the clutch and throttle, which turned out pretty clean. The electrics will be in steel braded like the fuel line....no zip ties on this build! Unfortunately, it's pouring rain for the next five days or so, so I'll have to wait a bit for hte maiden voyage....can't wait to experience that balanced motor.
Attachments
-
 380 KB Views: 2,412
 -
 388.4 KB Views: 1,240
 -
 397.5 KB Views: 1,319
 -
 215.3 KB Views: 901
