

3 guesses, 1st 2 don't count.
- Thread starter Ratt_Bones
- Start date


Yessir, 12v even. Nice and bright!
Brake lever operated, so no need to worry about turning it on and off.
I'll update every step of this project with pics, as it is an experiment. No white wire needed, 12v, minimal brains, and fabrication needed. It should work on ANY brake lever that has an adjustable reach set screw.
Brake lever operated, so no need to worry about turning it on and off.
I'll update every step of this project with pics, as it is an experiment. No white wire needed, 12v, minimal brains, and fabrication needed. It should work on ANY brake lever that has an adjustable reach set screw.
Step 1.)
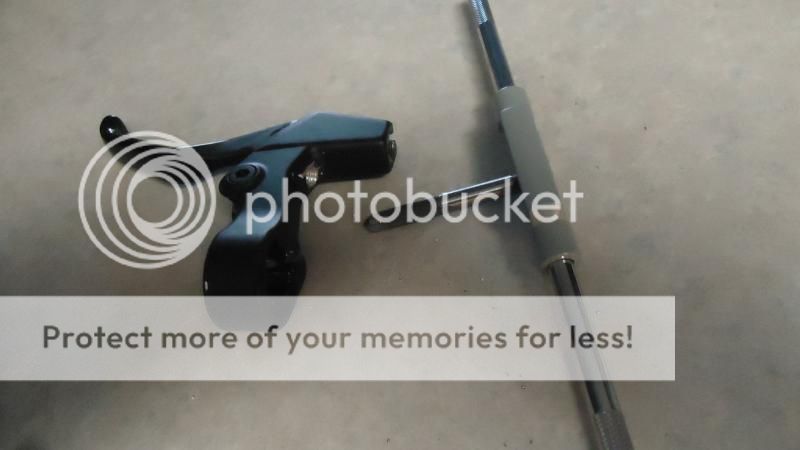
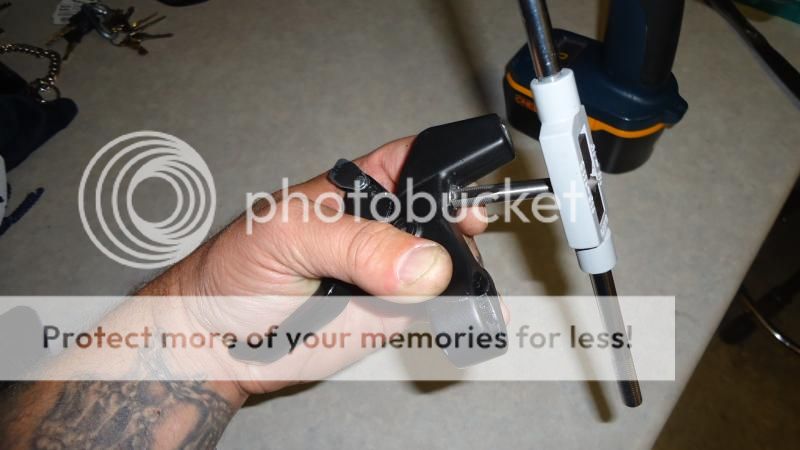
Find a brake lever with a set screw for lever reach adjustment.
Remove this screw. Start with the appropriate size drill bit (slightly larger than the threaded set screw hole), drill it out, and then step up to the next size larger drill bit until you reach 1/4". Stop there, that is the size you want this hole to be.
After that, you will need to tap/thread the hole. The thread you want is M7.07
This is the size of the threads on the switch you will be using. Which is a:
"SPST mini
Momentary Pushbutton Switch
N.C. contacts rated
3.0A at 125VAC
1.5A at 250 VAC
You can get these at any Radio Shack.
Both of the leads on this are hot wire.
IMPORTANT! neither of these leads are ground!!!
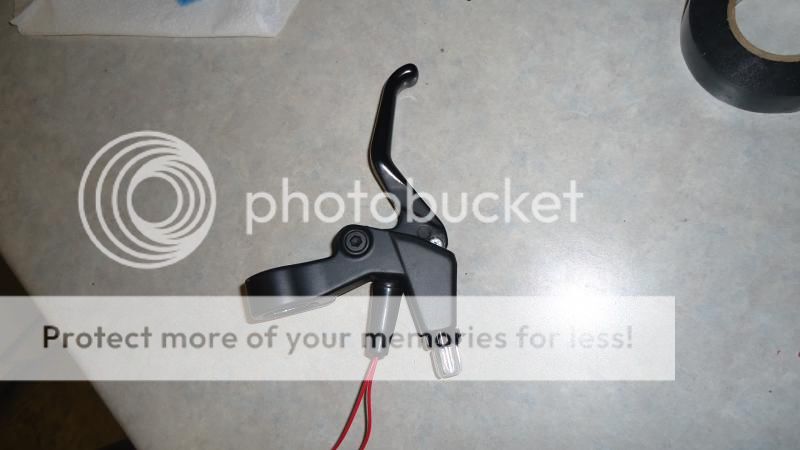
With this switch, the circuit is closed when the lever is open. When you squeeze the lever, it opens the switch, making the connection, and therefore supplying the light with power. So far (in my testing phases) this is working flawlessly.
After connecting your wires, be sure to solder them up, and don't forget a bit of heat shring around the leads for some weather protection. Just to add to the eye candy..... I used the choke cable boot (fit perfectly) from my old Can Never Start carb. Now it looks like this actually belongs to the lever. Like it was manufactured this way.
This is probably the toughest part of this mod. I see a lot of people looking for actual working brake lights. I did come up with another one using a motorcycle switch, but it looks ugly. Works wonderful, but again.... looks like ass. I wanted something that wasn't so nasty to the eye, and after some discussions with a fellow computer nerd, this is what we came up with.
I will post more pics up as I get more done like the battery box, and so on.


Find a brake lever with a set screw for lever reach adjustment.
Remove this screw. Start with the appropriate size drill bit (slightly larger than the threaded set screw hole), drill it out, and then step up to the next size larger drill bit until you reach 1/4". Stop there, that is the size you want this hole to be.
After that, you will need to tap/thread the hole. The thread you want is M7.07
This is the size of the threads on the switch you will be using. Which is a:
"SPST mini
Momentary Pushbutton Switch
N.C. contacts rated
3.0A at 125VAC
1.5A at 250 VAC
You can get these at any Radio Shack.
Both of the leads on this are hot wire.
IMPORTANT! neither of these leads are ground!!!
With this switch, the circuit is closed when the lever is open. When you squeeze the lever, it opens the switch, making the connection, and therefore supplying the light with power. So far (in my testing phases) this is working flawlessly.
After connecting your wires, be sure to solder them up, and don't forget a bit of heat shring around the leads for some weather protection. Just to add to the eye candy..... I used the choke cable boot (fit perfectly) from my old Can Never Start carb. Now it looks like this actually belongs to the lever. Like it was manufactured this way.
This is probably the toughest part of this mod. I see a lot of people looking for actual working brake lights. I did come up with another one using a motorcycle switch, but it looks ugly. Works wonderful, but again.... looks like ass. I wanted something that wasn't so nasty to the eye, and after some discussions with a fellow computer nerd, this is what we came up with.
I will post more pics up as I get more done like the battery box, and so on.
"With this switch, the circuit is closed when the lever is open. When you squeeze the lever, it opens the switch, making the connection, and therefore supplying the light with power."
Just for clarification, you have this backwards. If the brake lever is unsqueezed the switch contacts would be open, (normally open switch/contacts). When you pull the brake lever the switch will close completing the circuit and providing power to the light.
I understand that your tests have shown your switch selection is right, but your explanation is wrong. Don't want to confuse people. Switch contact arrangement can be confusing if you don't understand electrical circuits. Open/closed, normally open/normally closed.
Yeah, I'm nit-picking. I'm a perfectionist. So sue me.") or buy me a beer.
or buy me a beer.
Tom
Just for clarification, you have this backwards. If the brake lever is unsqueezed the switch contacts would be open, (normally open switch/contacts). When you pull the brake lever the switch will close completing the circuit and providing power to the light.
I understand that your tests have shown your switch selection is right, but your explanation is wrong. Don't want to confuse people. Switch contact arrangement can be confusing if you don't understand electrical circuits. Open/closed, normally open/normally closed.
Yeah, I'm nit-picking. I'm a perfectionist. So sue me.
or buy me a beer.Tom
I need a first and last name, current mailing address, and directions to your favorite bar or pub. I think it's best if I just deliver the subpoena in person over a cold one.
VERY WELL DONE. I'm currently using the switch that comes with one of those little cheap white kits situated on your cable but when it dies this is what I will repair it with . It's in the my fourm inventions file .
Thank you!VERY WELL DONE. I'm currently using the switch that comes with one of those little cheap white kits situated on your cable but when it dies this is what I will repair it with . It's in the my fourm inventions file .
I've seen a few "do it yourself" brake lights out there, but most of them just look awful. I wanted one that looks good ya know? There are a few that you can buy, but they come with little clips that site between the caliper and frame. I don't have caliper brakes. I have a coaster, and a disc. Plus, they come with integrated turn signals, and hardly have a vintage look to them.
Step #2.)
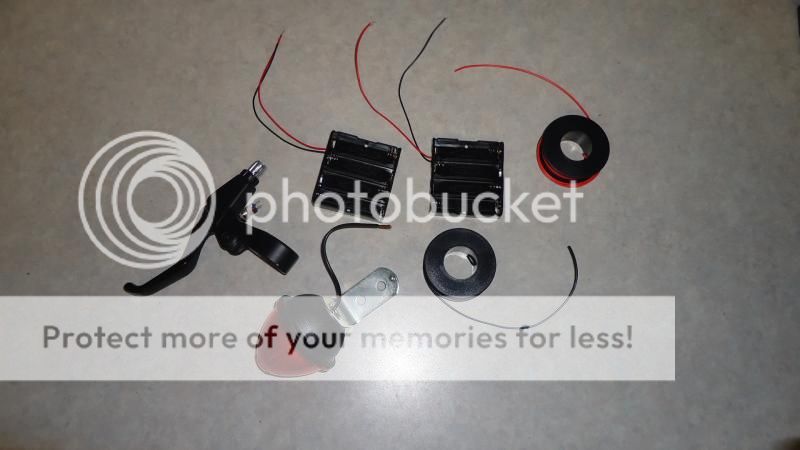
You need to power your light and switch.
I wanted bright, and old school. So I went with a 12v auto bulb. I may end up converting to a 12v LED cluster later on, but we'll see.
Unfortunately Radio Shack did not carry any 12v AA size batteries like I was hoping to use. They are small, and last quite a while. Instead I went with eight AA batteries, and piggy backed them to achieve the 12 volts desired.
Also available at Radio Shack are the battery holders with the wire leads for about $2.00 a piece. Now that I have power, and leads, I need a box to contain them. You could simply mount the battery holders to wherever on the seat pan as they do have screw mounts. However, one good bump and you have eight AA batteries spilling out all over the road. Also, no working brake light.
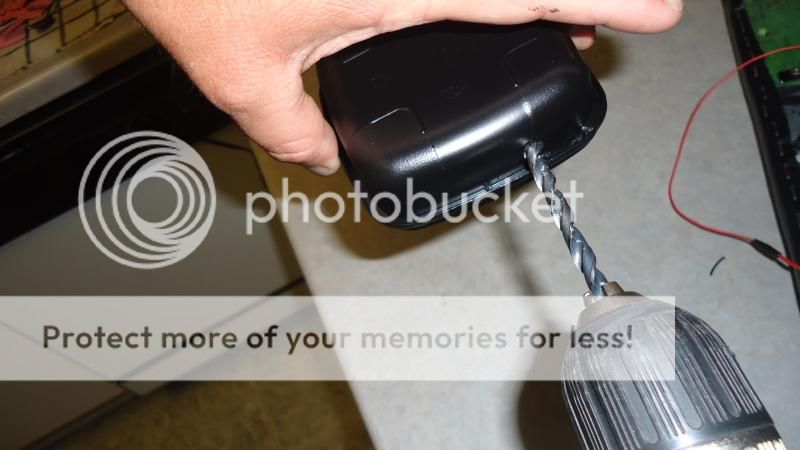
As I was building this mod in the kitchen (to much dismay of the SO), I noticed a Tupperware bowl seemed like the perfect candidate for a battery box. Just needed some paint, and a port for wiring. A few screws later to attach to the seat pan, and BAM!!!
The light mount was simple. Two wood screws. If you followed my previous seat pan build, you will know that my nana seat is made from an old skateboard, some carpet padding memory foam, and some poorly stretched leather. So anything attached to it is a matter of some short wood or sheet metal screws.
After mounting, the wiring is pretty simple. Hot wire from battery to first lead on switch. Second wire from second lead on switch to hot wire on light. Ground wire from batteries to the metal casing on the light fixture.
Now you have a working brake lamp.
On my bike it's a little different. I ride. I never idle. If I am on my bike, it is in motion. Therefore I chose a clutch lever with no locking mechanism. My front brake is a hydraulic disc brake. This mod will not work on that particular lever. So..... Under my current riding philosophy, if I am squeezing the clutch, I am slowing down (braking). So this mod went on my clutch lever.
Yes, I have an interesting bike indeed!


You need to power your light and switch.
I wanted bright, and old school. So I went with a 12v auto bulb. I may end up converting to a 12v LED cluster later on, but we'll see.
Unfortunately Radio Shack did not carry any 12v AA size batteries like I was hoping to use. They are small, and last quite a while. Instead I went with eight AA batteries, and piggy backed them to achieve the 12 volts desired.
Also available at Radio Shack are the battery holders with the wire leads for about $2.00 a piece. Now that I have power, and leads, I need a box to contain them. You could simply mount the battery holders to wherever on the seat pan as they do have screw mounts. However, one good bump and you have eight AA batteries spilling out all over the road. Also, no working brake light.
As I was building this mod in the kitchen (to much dismay of the SO), I noticed a Tupperware bowl seemed like the perfect candidate for a battery box. Just needed some paint, and a port for wiring. A few screws later to attach to the seat pan, and BAM!!!
The light mount was simple. Two wood screws. If you followed my previous seat pan build, you will know that my nana seat is made from an old skateboard, some carpet padding memory foam, and some poorly stretched leather. So anything attached to it is a matter of some short wood or sheet metal screws.
After mounting, the wiring is pretty simple. Hot wire from battery to first lead on switch. Second wire from second lead on switch to hot wire on light. Ground wire from batteries to the metal casing on the light fixture.
Now you have a working brake lamp.
On my bike it's a little different. I ride. I never idle. If I am on my bike, it is in motion. Therefore I chose a clutch lever with no locking mechanism. My front brake is a hydraulic disc brake. This mod will not work on that particular lever. So..... Under my current riding philosophy, if I am squeezing the clutch, I am slowing down (braking). So this mod went on my clutch lever.
Yes, I have an interesting bike indeed!
I have a crappy digicam, and this is from the side. It's kind of tough to stand behind my bike with a camera, and up front to pull the lever at the same time.
