

I've got only 20 miles on a brand new 66 cc engine, Took a fast look at it after needs presented turning the cylinder head to face the plug forward for clearance.The assembly absent the piston will move up and down vertically I'm doubting damaged over all only a few vertical scratches are present on the piston. How loose is worn out or incorrect ? The vibration is likely above what most would find acceptable should I run it or replace it ? 10:09 PM 4/18/2015
New engine trouble 66 cc.
- Thread starter BOYGOFAST
- Start date

Re: New engine trouble 66 cc.
Yeah have at least one reply testing my faith. Well This 66 cc was not the most expensive on the internet but I'd not doubt it's not much worse than most of them.Simply fact is a decent top end is to be cut not purchased it so appears and I don't have a fancy grinding tool quite yet to play with but the assembly is new likely the tolerance's are correct This engine will turn effortless and endless RPM'S or else..
Yeah have at least one reply testing my faith. Well This 66 cc was not the most expensive on the internet but I'd not doubt it's not much worse than most of them.Simply fact is a decent top end is to be cut not purchased it so appears and I don't have a fancy grinding tool quite yet to play with but the assembly is new likely the tolerance's are correct This engine will turn effortless and endless RPM'S or else..
Fuel, compression, spark at the right time, air, correct timing and it will run.
Make sure you're getting fuel to carb, make sure you have spark, make sure intake gasket and head gasket are tightened corectly and sealed off.
plenty of info on here to be found using search feature on how to test for all these things.
bes5 wishes and hope you get it going.
PS: forget about mods to anything and concentrate on just getting an 3ngine running and tuned properly, otherwise you'll likely just be working against yourself since you dont have the basics down yet.
Fully Agreed... Gotta crawl before you can walk, and gotta walk before you can run...
Concentrate on getting a bone stock engine running before even thinking about modding one of these... as simple as they are, they can still get messed up beyond help if modded with no experience.
Keep things Simple too... The engine only needs 3 things to run... Spark, Fuel, and compression. If it don't spark it can't run, easy enough... If there's too much or too little fuel it won't run... Keep it stock and it should still be easy enough. Main problem with fuel is contamination or something getting into the carb to block the main jet or to keep the float valve from shutting... Use a fuel filter to avoid this, and NEVER trust a brand new tank from China is clean on the inside, clean that thing out Good before assembling and installing.
compression... Same thing here... keep it stock until you know for sure what you're doing, make sure you got a good head gasket in there and torque it down to 80 to 120 in/lb,and Always torque in a criss cross pattern, not circular. the base gasket and the intake gasket also come into play here... as well as the crank seals, any of these leak and it won't run or it'll run very poorly. As long as you haven't removed the head or cylinder, these gaskets should still be sealing and intact, of anything has been removed, new gaskets are in order, Never try to reuse a base or intake gasket, the head gasket can be reused if it's perfectly flat and straight tho, but none of the others can, you remove a part that needs a gasket, replace the gasket before reassembling, that simple.
I prefer to spray my new gaskets as well as the head gasket with a light coat of copper gasket spray, this isn't mandatory, but it does help seal things up just a bit better, Indian Head gasket shellac also works very well but it's kinda messy and hard to get a nice thin coat on, not to mention it's a nightmare to remove and clean up if you have to remove a part with a paper gasket that was sealed with this stuff...
So.. Let's start with a new engine that has never been messed with or disassembled... get it installed in the bike as well as the carb and the fuel tank, line, and filter (you remembered to clean out the tank, right?) Now it's time to install the CDI unit... throw the CDI bolts in the nearest trash can, we're gonna mount the CDI with zip ties. Why do we throw the CDI bolts out and use zip ties? .. because 9 out of 10 newbs will tighten it too tight and crack the CDI unit rendering it useless, and 5 out of 10 experienced bike builders will do the same... we're gonna use zip ties here.
Now to wire the CDI to the engine we plug in the black wire to the black wire, the blue to the blue, and cut off the end of the white wire and tape over the end so it can't short on anything, then zip tie it out of the way. Tape over the black and blue wire connections too. If you're gonna use a kill switch to kill the engine, just make sure one wire goes to the black and the other to the blue, nuff said there, no way to wire this backward anyway, but after you got the wires connected, tape over the connections to prevent shorting out and to keep the install clean looking.
Now that the engine is bolted in and the fuel lines are set up and the wiring is done comes the fun part... trying to start one of these for the first time... it's not easy or fun but you gotta pedal and dump the clutch, edal and dump the clutch, and pedal some more and dump the clutch some more... It'll be tough to start that first time, and the next few times but it'll loosen up and become easy to start soon.
This brings us to what fuel mix to use, forget the instructions here, just mix up a batch of 24:1 or even 32:1 and go for it. 16:1 is really tough to start and just simply too much oil for the amount of fuel, which also reminds me... use 87 octane gas in your mix, the higher the octane, the harder it is to light off, and you're gonna have trouble starting it the first few times right? ... use the 87 octane gasoline.
Get it started and run it for about 10 to 15 minutes and sht it down until it fully cools down then repeat as many times as you wish, don't go too easy on it but don't stay at full throttle, or stay at any throttle position, keep changing your speed, accelerate up and slow down over and over again, load that engine up to seat the rings, but don't let it get too hot, shut it down after about 15 minutes for the first several rides to let it cool down.
after the first tank of fuel is gone you can run it longer but keep varying the speed, you will feel it start to get stronger and smoother somewhere during the second tank, this is also where it'll begin to start on the first try just about every time.
Hopefully I didn't forget to add anything in here and that covers it from assembly to break in, just follow these easy steps and it should be running great and easy to start in no time.
BGF said it ran for 20 miles and he only took the head off to rotate it for plug to frame clearance.............Fully Agreed... Gotta crawl before you can walk, and gotta walk before you can run...
Concentrate on getting a bone stock engine running before even thinking about modding one of these... as simple as they are, they can still get messed up beyond help if modded with no experience.
Keep things Simple too... The engine only needs 3 things to run... Spark, Fuel, and compression. If it don't spark it can't run, easy enough... If there's too much or too little fuel it won't run... Keep it stock and it should still be easy enough. Main problem with fuel is contamination or something getting into the carb to block the main jet or to keep the float valve from shutting... Use a fuel filter to avoid this, and NEVER trust a brand new tank from China is clean on the inside, clean that thing out Good before assembling and installing.
compression... Same thing here... keep it stock until you know for sure what you're doing, make sure you got a good head gasket in there and torque it down to 80 to 120 in/lb,and Always torque in a criss cross pattern, not circular. the base gasket and the intake gasket also come into play here... as well as the crank seals, any of these leak and it won't run or it'll run very poorly. As long as you haven't removed the head or cylinder, these gaskets should still be sealing and intact, of anything has been removed, new gaskets are in order, Never try to reuse a base or intake gasket, the head gasket can be reused if it's perfectly flat and straight tho, but none of the others can, you remove a part that needs a gasket, replace the gasket before reassembling, that simple.
I prefer to spray my new gaskets as well as the head gasket with a light coat of copper gasket spray, this isn't mandatory, but it does help seal things up just a bit better, Indian Head gasket shellac also works very well but it's kinda messy and hard to get a nice thin coat on, not to mention it's a nightmare to remove and clean up if you have to remove a part with a paper gasket that was sealed with this stuff...
So.. Let's start with a new engine that has never been messed with or disassembled... get it installed in the bike as well as the carb and the fuel tank, line, and filter (you remembered to clean out the tank, right?) Now it's time to install the CDI unit... throw the CDI bolts in the nearest trash can, we're gonna mount the CDI with zip ties. Why do we throw the CDI bolts out and use zip ties? .. because 9 out of 10 newbs will tighten it too tight and crack the CDI unit rendering it useless, and 5 out of 10 experienced bike builders will do the same... we're gonna use zip ties here.
Now to wire the CDI to the engine we plug in the black wire to the black wire, the blue to the blue, and cut off the end of the white wire and tape over the end so it can't short on anything, then zip tie it out of the way. Tape over the black and blue wire connections too. If you're gonna use a kill switch to kill the engine, just make sure one wire goes to the black and the other to the blue, nuff said there, no way to wire this backward anyway, but after you got the wires connected, tape over the connections to prevent shorting out and to keep the install clean looking.
Now that the engine is bolted in and the fuel lines are set up and the wiring is done comes the fun part... trying to start one of these for the first time... it's not easy or fun but you gotta pedal and dump the clutch, edal and dump the clutch, and pedal some more and dump the clutch some more... It'll be tough to start that first time, and the next few times but it'll loosen up and become easy to start soon.
This brings us to what fuel mix to use, forget the instructions here, just mix up a batch of 24:1 or even 32:1 and go for it. 16:1 is really tough to start and just simply too much oil for the amount of fuel, which also reminds me... use 87 octane gas in your mix, the higher the octane, the harder it is to light off, and you're gonna have trouble starting it the first few times right? ... use the 87 octane gasoline.
Get it started and run it for about 10 to 15 minutes and sht it down until it fully cools down then repeat as many times as you wish, don't go too easy on it but don't stay at full throttle, or stay at any throttle position, keep changing your speed, accelerate up and slow down over and over again, load that engine up to seat the rings, but don't let it get too hot, shut it down after about 15 minutes for the first several rides to let it cool down.
after the first tank of fuel is gone you can run it longer but keep varying the speed, you will feel it start to get stronger and smoother somewhere during the second tank, this is also where it'll begin to start on the first try just about every time.
Hopefully I didn't forget to add anything in here and that covers it from assembly to break in, just follow these easy steps and it should be running great and easy to start in no time.
so I would say since we all know that rotating the head to change spark plug location wont prevent one from running, spark, fuel supply issues or compression loss from a head that isnt sealing to the jug should be checked.BGF said it ran for 20 miles and he only took the head off to rotate it for plug to frame clearance.............
It is always hard to know for sure whats going on since we cant put our hand on it, but something has gone wrong other than what rotating the head can cause unless of course he doesn't have enough compression for it to run because of a head gasket leaking badly.
All right BGF!I've got only 20 miles on a brand new 66 cc engine
You finally built something and rode it!
I am so tempted to give you the same kind of nonsensical 'help' you regularly put in other peoples help posts it makes my nuts hurt but I'll bite...
Did you pull the jug off, or just spin the head?
Do you have a real torque wrench?
Did you torque the head nuts down to 20# in an X pattern?
Did you try ANY of YOUR 'advice' things to it?
I for one want to see a pic of this bike you built that runs.
No offense but come on, I take everything you say with a cup of salt and wouldn't put making something up so people would respond to past you.
Wow.... we would have never guessed that... I'm sure he'll be up and running in no time after hearing this...Those vibrating 66 cc engines make great boat anchors.
a display of vertical movement of ten thousandths or better at the crankshaft rod bearing is the issue it will run should I reassemble it the way it is..already has but the rod bearing should not have that kind of play due wear at 20 miles or so running time ..Yes / No what is acceptable I would expect zero to be the only answer
Last edited:
Controlled is an understatement Davezilla, anyway I just purchased a new J 68 closed cup needle bearing for a nearly new 66 cc. It's cold steel another word for drop forged should I recall correctly in the description strongest on the market @ less than ten dollars with ship. Now not to complain about those rambling on and on but I asked a simple question and had to look over the setup once again due none of the brains I'd requested reply from could forward one single reply worth consideration. Yeah I'm picky about the assemble due it is new anyway light bearing oil is recommended and a splash of 10 w is all I have so an trace of it will followup just for ha ha's in the crankcase but only after I get at the piston AND connecting rod and wrist pin with a dremel for a minuet or two..NO WAY !
Last edited:
Granted, all issues related to my preferences are my own, just taking a quick look at the manufacture of the connecting rod without much else tells me it appears to insist upon a closed cup needle bearing with that alone enough said. I'm the least likely the last one to point out there's too much tolerance for adding a thousandths or two or eight. Anyway my observation is more likely accurate less likely arguable without continuing into how much weight I can grind off OR ADD here or there anyway forget I'd suggest light machine oil by a ounce or so and a J 68 OK ? Matter of FACT forget I can read and write as well . Don't won't to be known as a troublemaker.Fuel, compression, spark at the right time, air, correct timing and it will run.
Make sure you're getting fuel to carb, make sure you have spark, make sure intake gasket and head gasket are tightened corectly and sealed off.
plenty of info on here to be found using search feature on how to test for all these things.
bes5 wishes and hope you get it going.
PS: forget about mods to anything and concentrate on just getting an engine running and tuned properly, otherwise you'll likely just be working against yourself since you don't have the basics down yet.
Best wishes with your engine.Granted, all issues related to my preferences are my own, just taking a quick look at the manufacture of the connecting rod without much else tells me it appears to insist upon a closed cup needle bearing with that alone enough said. I'm the least likely the last one to point out there's too much tolerance for adding a thousandths or two or eight. Anyway my observation is more likely accurate less likely arguable without continuing into how much weight I can grind off OR ADD here or there anyway forget I'd suggest light machine oil by a ounce or so and a J 68 OK ? Matter of FACT forget I can read and write as well . Don't won't to be known as a troublemaker.
Yeah, Zero play in the crank bearing, especially after only 20 miles.
I still think your posts read like a Chinese instruction manual, But I must be getting used to it because I can understand most of what you're trying to say.
And you have to post pictures, I don't think you've ever built a bike in your life, BUT I do hope you prove me wrong. WITH PICS. I just hope you don't have to build a camera first.LOL
fatdaddy.
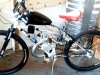
OK,here's at least one picture of a 66 cc 1930's Wards Cadet, it's the original series not a copy from the early 1940's so I'm to understand of it with stamping on the frame. 50 mm bottom bracket with conversion kit. So no problem the engine I've installed demanded close inspection and for one the piston installed in it will not fuel the secondary. OK, still runs no less now find needs to install a J 68 closed cup needle bearing found a bushing when I disassembled it do you lose one ? The connecting rod do the excessive amount of play in the assembly so far as my preferences but likely it meets the standards. All said and done can run a single ring a cut the top of the piston with a file to fuel the secondary or install the GT-5 piston with the 2.5 mm higher wrist pin center. Taking a second or so beyond that to grind off a 1/2 oz off the connecting rod with a high speed grinder while it's awaiting reassembly could become part of the reassembly process and now it that it, no need two find out how much machine oil I should keep in the bottom of the crankcase to keep the closed cup lubricated.Excluding any needs to find a wrist pin or cut one of my titanium drill bit to make one that I can't purchase that's about it.Sure excluding replacing bent spokes re positioning the fasteners on a 44 t steel sprocket and getting an~1/4'' x 2'' x 3'' rear engine mount welded little China Girl don't get hurt trying to bang herself off the frame held down by those cheap aluminum handcuffs they provide it the kits yeah sure what's your question ?
Attachments
-
 112.3 KB Views: 123
Last edited:
My god that is just too mind numbing to try to read.bla de bla bla bla...
Matter of FACT forget I can read and write as well . Don't won't to be known as a troublemaker.
So you didn't just spin the head...
And you still haven't built anything that runs...
Have fun doing things 'better', if nothing else it's entertaining when readable and too late for not being know as a trouble maker, way to late ;-}
He is THE GUY, I KNOW IT. He's the guy that writes ALL the Chinese instruction manuals. So what is he saying? That this is NOT his bike. Just a pic of some other guy's bike. GOOD GOD MAN, STOP and build a bike. I've never asked this question in my life, cause I don't care, BUT, Are you Chinese? You perhaps should get some help with your writing skills.But hey, I'm still here and still trying.My god that is just too mind numbing to try to read.
So you didn't just spin the head...
And you still haven't built anything that runs...
Have fun doing things 'better', if nothing else it's entertaining when readable and too late for not being know as a trouble maker, way to late ;-}
fatdaddy.
PS. And he still never answered why he would use the name of a known vender as his own.
IS THAT YOU RICK?
Last edited:
"He is THE GUY, I KNOW IT. He's the guy that writes ALL the Chinese instruction manuals." --fatdaddy
I think you're on to something there.
BOYGOFAST: Best wishes. But, man oh man, your posts are just too wild and weird for anyone to make any sense out of. If you want to make any progress, then you've just got to tone it down and stay more on-topic.
I think you're on to something there.
BOYGOFAST: Best wishes. But, man oh man, your posts are just too wild and weird for anyone to make any sense out of. If you want to make any progress, then you've just got to tone it down and stay more on-topic.
AND, FINISH building at least ONE bike before giving any more advice."He is THE GUY, I KNOW IT. He's the guy that writes ALL the Chinese instruction manuals." --fatdaddy
I think you're on to something there.
BOYGOFAST: Best wishes. But, man oh man, your posts are just too wild and weird for anyone to make any sense out of. If you want to make any progress, then you've just got to tone it down and stay more on-topic.
fatdaddy.